Disclaimer: The
information provided should never replace common sense or the
recommendations of the OEM. I do not assume responsibility
for
the use or misuse of this information. The information provided
is based on my experience working as a full time mechanic, on hundreds
of motors over time, reading a lot of manuals, education, and
consulting other experienced mechanics along with a number of retired
service reps I am friends with.
If
I can offer
any advice from
experience, it would be NOT to try and fix your own motor if you don't
have a good understanding of what you're doing. You need to have
the right special tools, reference materials, and most importantly,
UNDERSTANDING of what is wrong and how to properly fix this
issue. Most people do more harm then good if just messing
around blindly. The reason why I can do these repairs is I've
put in thousands of hours reading, fixing, and practicing. I
learn
something new everyday. I have also gone out and acquired the
necessary, CORRECT tools and reference manuals to work on the
motors. These are very
important to promote correct operation of the motor. The idea is
to
have a reliable motor, not just one that 'kinda runs.'
The carburetor is responsible for metering the amount of fuel delivered
to the motor. When you pull the motor over or hit the starter
button, the crank shaft spins (you see the flywheel rotate, which is
attached to the crank), this causes the pistons to 'punch' back and
forth, and the result is induction, compression, and internal pressure
changes, hence the 'internal combustion' engine. The induction,
or suction, of the pistons moving away from the crank causes a vacuum
which pulls fuel in through the front of the engine, or the 'barrel' of
the carburetor throat.
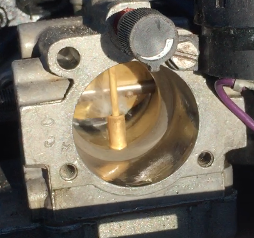
Here's a video of a 30hp Johnson, late 80's model carburetor on my test
boat. You can see the rear flap rotate up as I advance the
throttle, and see the fuel getting sucked up through the high-speed
main jet (brass 'pole' in the middle). Note that I did not go to
full throttle, only abou 3/4, because holding the camera in one hand,
steering the boat with the tiller in the other, and than keeping my
view forward along with trying to keep the sunlight (sunset) lined up
so that the camera didn't cast a shadow to ruin the video shot was
challenging.
When you pull the choke knob, you see a brass flap close, this is the
barrel or throat of the carb. Most motors post 1985 use a basic
fuel priming system rather than a choke, which squirts fuel into the
manifold and cylinders. This accomplishes the same thing as a
choke but more efficiently; it richens up the air-fuel mixture to get
the motor to fire off. If you don't see a choke knob (or flap
when the hood/coweling is off) and see a plunger type knob, then it's a
good bet you have a manual fuel injection type system.
The barrel of the carburetor is also where the venturi is, or
basically where it goes from a large hole down to a smaller one, which
helps create an increase in air velocity and a 'suction' through a
mainjet (usually seen as a vertical brass cylinder in the carb
throat). This is true regardless of if you have a choke or manual
injection system. As you advance the throttle, it rotates a
second flap
near the back of the carb which meters the fuel based on the timing of
the ignition system (magneto, or newer motors, capacitor discharge
ignition [CDI], on today's motors, it can be direct/electronic fuel
injection [D/EFI]).
On a side note, this second flap ***MUST***
be timed properly with your ignition system or your motor WILL NOT run
right, or possibly not start at all. There is an entire process
for setting this up, and some nuances to getting it right on that only
a mechanic will understand. The video shows a carburetor working
in action, and the pic below is a still frame of the carb advanced
about 3/4 throttle (notice the brass flap isn't completely horizontal),
and you can see the fuel spraying through the main jet, being sucked
into the manifold, and then down to the cylinders for internal
combustion. I find this cool.
What a choke does by principle is richen up the fuel vapor for getting
the
motor started by starving the oxygen, and allowing more fuel to be
induced into a cold, or dry motor. Once the motor fires off, this
entire process reciprocates and continues on it's own until you either
starve the motor of air, or ground out the ignition system using a kill
switch. This is the reason why you sometimes have to leave a
choke closed fully or even partially while a motor is cold, to give it
more fuel until warm so it doesn't stall out. Generally you
shouldn't have to leave the choke closed completely to keep the motor
running if both the ignition and fuel systems are right. There
are always exceptions though.
If you listen to a car that won't start, a person lays on the starter
for a long time (which is bad, by the way, easy to burn out a starter
or solenoid...if you've ever had a starter solenoid die on an old
vehicle all you hear is a 'click' or no click at all, which means the
solenoid failed and burned out and needs replacement...a solenoid
simply takes high voltage and uses a plunger type system to send high
voltage where it needs to without uses that high draw on the same
circuit. It promotes the
prevention of burnout with smaller electronics i.e. low voltage
switches & wires...production cost reduction.
Calibrating the carb for single barrel motors isn't very
complicated. What I find is that most people have no clue where
to begin with this process, yet it's one of the most important skills
to have a basic understanding off. So make sure you read this a
couple of times because it will really keep the cursing to a minimum.
If
you've bought a motor from me I've already calibrated the carb the
best I can using a test tank, test props, and in most cases, on an
actual test boat. What I do is get them pretty close,
sometimes right on, sometimes needing to be dialed in a little
more. Remember your settings may change slightly throughout the
year, based on temperature. A cold environment will generally
lend itself to needing more fuel, and less fuel economy too.
First, you need to do this under load, in forward gear, with the motor
warm. Either find a big lake with nobody around, or get a spotter
in the bow of your boat during this process. You shouldn't need
to do too much adjusting after you buy a motor from me, but if you
think it's necessary, you can start the process from default settings
recommended by manufacturers.
I'll explain this as if we're doing it from scratch, with no settings
made yet. Depending on the motor you may have 1 or 2 adjustment
needles, one for high speed, one for low speed. The key here is
that the high speed jet controls the lionshare of fuel flow. The
low speed needle is really just for idling and very low speed.
Make sure you understand how the needles work in the first place.
Imagine you have a round hole "O", and you are placing a finely
machined BRASS needle into it. By screwing/unscrewing the this
needle,
you are controlling how much fuel/air can pass through it. This
is a sensitive adjustment.
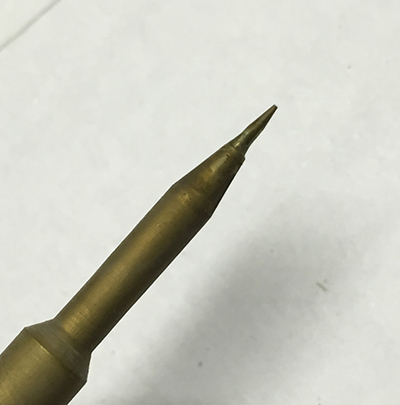
So when we start off, you screw the needle all the way in to shut off
the fuel completely. You want to be careful here, though.
Screw it in until it gently seats, don't try to screw it down hard
because these brass needles are damaged VERY easily. As in, a
16th of a turn too far and you just ruined it. Or let's say you
drop it on the ground. It hits the floor and is instantly
ruined. This isn't something you're going to be able to throw on
a grinding wheel or bend straight with needle-nose pliers. It is
no good once damaged.
In the picture below notice the taper on the needle is worn, and the
tip is in fact bent. This is due to careless operator
habits. There was probably something wrong with the carb but the
person kept messing with the low-speed needle, rather than
fixing the carb (and real problem) to make things right. This
needle is no good.
Back
the high speed needle out, generally 1/2 to 1 full turn. Unless
you own a service manual and have the exact settings, you are flying
blind. You'll need to go out and get a manual for your specific
motor to know what the start settings are. Keep in mind these are
general rules of
thumb for your motor HP, experience tells me they are ball park but the
'right' final setting could be very different, particularly if you have
a worn needle or carb orifice. That's where
experience comes into play which is what you're paying me for.
Get the motor running. Back your low speed needle out 1 full turn
but leave it alone for
now. Let the motor run for a couple of minutes to bring the
temperature up. And one thing to consider - don't try doing this
in cold water or on a cold day. The setting won't be correct and
the motor will run differently on a warm day.
Once warm, screw the high speed adjustment in slowly, say 1/8th a turn,
wait 15 seconds, repeat. You should observe the motor start to
rev up, eventually until it stalls, which means it's
running lean. On the low speed needle, if you hear the motor
cough/sneeze, back the needle out slightly until it revs back
up. Keep backing out until you hear it slow down, start to
blubber, or even die off. Find the 1/2 way point between these
two extremes. Now throttle up and see how it responds, even all
the way up if you have a spotter. You should see the motor
accellerate. If it doesn't, back the needle out to give it more
fuel. You'll find the 'right spot' by fiddling with it at near
full speed and than again at low idle.
Keep
in mind that after the high speed is set, repeat the same process with
the slow speed
needle. If you have a motor with a low speed idle adjustment (in
other words, something that sets the stop on the tiller so you don't
stall the motor out), you may need to either lower or increase the idle
stop as you get the low-speed needle set. Newer motors have a
fixed high speed jet so all you have to do is get the motor running and
deal with the low speed needle.
You should notice the motor doesn't smoke as much once you have both
needles set. Also, you should be able to throttle up quickly
without the motor bogging down or lagging, and throttle back fast
without it stalling. If you have either of these problems your
fuel system isn't calibrated or has a problem. Keep in mind a
cold motor runs quite a bit different then a warm motor. A lot of
this has to do with the fuel 'loading up' in the cylinders and
crankcase, and you may need to 'clear it out' every so often by running
at high throttle in gear. Don't ever do this in neutral, it's a
great way to ruin the motor. Many motors have a limiter for the
throttle in neutral anyways to prevent this.
The nice thing about older motors is you have the ability to control
the fuel mixture always with the rich/lean knobs. When the motor
is cold, you'll have to richen it up. When warm, lean it
out. If it's misfiring, it's a fuel issue based on motor
temperature most of the time. It is possible the ignition system
may need something too.
Here is a video showing what happens
when you adjust the carburetor
(low speed) either too lean or too rich. The motor
is a 15hp OMC, 1984 M.Y. with a fixed high speed jet (no adjustment for
high speed).
The first 10 seconds the motor is set properly. I lean it out
(clockwise) and you'll hear the idle drop to the point where the motor
is ready to die. I catch it in time and bring the adjustment back
to approx. the 6 O'clock position and you hear the idle come back
up. Next I richen the mixture by turning it to approx. the 12'
o'clock position. Listen/watch closely as you'll hear the motor
'chugging/bucking/blubbering' and you can see it shaking quite a bit
due to a rich running condition. If you watch the video a few
times with your computer volume up, you can hear the marked difference
in idle quality by making these adjustments.
I lean it back out and the idle smooths back out. Shows how a 1/4
turn in either direction can make a big difference. Note that the
motor was warmed up in forward gear using a test propeller (OEM) in a
300 gallon test tank (minimum recommended tank size) of proper OEM
recommendations. The throttle was not touched at any point during
this video; my left hand was holding the iphone, my right hand made the
rich/lean knob adjustments.
Keep in mind this motor has been fully tuned up with a strong ignition
system, new fuel system components, decarbed powerhead and exhaust
system, and is set up properly for correct calibration. If your
motor isn't running adjusting the carb may make no difference if there
are other underlying problems.
Flooding The Motor
With Fuel While Starting
What we have here, is a situation where the motor has received way too
much fuel. This happens for various reasons; the float or gaskets
within the carburetor could be faulty and allowing you to prime the
motor with more fuel than it's supposed to get; you may have the low or
high or both speed adjustment needles set too rich; the ignition system
might have failed or is too weak, leading to lots of fuel but no
ignition source; you might have left the choke closed too long when
trying to start the motor; or a common one I do - forget to put the
plug leads back on the spark plugs because you pulled them off for
servicework, then forget to put them back on when you went to evaluate
the corrective action you just made; the list goes on and on...
Whatever the issue, you're probably going to see a bunch of fuel
leaking from the motor, generally the 'throat' of the carburetor, but
you could even see it seaping out of your fuel lines due to pressure
with the primer bulb. If you were particularly persistent, you
probably even fowled your spark plugs too.
To fix this issue, first you need to figure out why you have the
problem in the first place. If the motor was running recently,
and you know the rich/lean settings are dead on, or at least pretty
close, then make sure you have spark and ignition. Once this is
confirmed, make sure you didn't starve the motor of air. Keep the
choke OPEN, pull it over a few times, and see if you can get a
pop. If it runs momentarily then dies, now put the choke CLOSED,
and try your normal starting procedures. It should start
up.
The common sense thing to do is if you see fuel leaking out of the carb
(or if the motor cowel/hood is on, out of the bottom of the motor),
then you need to let the motor breath by opening up the choke and
pulling it over to clear things out. Pull the plugs, blow them
clean and use a rag to wipe any oil/gas/carbonation. What's even
better is spraying a little carb cleaner, using a wire brush, clean
with compressed air, then regap and reinstall. Once everyting is
'back to normal,' try to start it up. It'll probably pop off
within a pull or two.
Should I Use
Fuel Additives?
My personal preference - NO. I do use "SeaFoam" or OMC Engine
Tuner on occasion, but mostly just to help keep the combustion chamber
and exhaust housing cleaner.
Most people look to use an additive with expectations that it will
stabilize their fuel from going bad. Well what happens to your
motor when you run bad fuel through it or let the fuel sit in the
lines, pump, and carb? You get 'gunk' that stops the motor dead
in it's tracks in as little as 1 day.
Don't believe me? Then take an old glass jar with metal cap, fill
it with gas, and let it sit undisturbed for a few days. Even
better, expose it to sunlight (loosen the lid so expanding gas can
escape so you don't have any hazards - and make sure their is airflow
where ever it's sitting). Watch what happens to the fuel and how
long it takes (sometimes just 1 day).
Fuel goes sour like milk. As I say over and over, I can't tell you if
fuel stabilizing will work or not, but I can tell you what works 100%
of the time - RUN YOUR MOTOR OUT OF GAS after each use. All you
have to do is pull the fuel line while it's still running and leave it
in neutral at low or slightly above idle. If there's no fuel
left, then you don't have to worry about the ethanol from doing it's
harm.
I suppose if you have deep pockets, you can buy 'marine' fuel, but I
don't know why just running the motor out of gas should be such a big
deal.
Why You Should Run
Your Motor Out of Gas
Below
are some pictures of things I commonly see on motors that have been
left sitting, and whoever used it last, didn't bother to use up all the
fuel. The reality is that gas, even 'stabilized' gas, is bad to
be left sitting in a carburetor. If you ever want to see just
what happens (and how quickly), take an old pickel jar or glass jar
from something in your kitchen and pour some gas in there. Let it
sit somewhere safe and watch what happens.
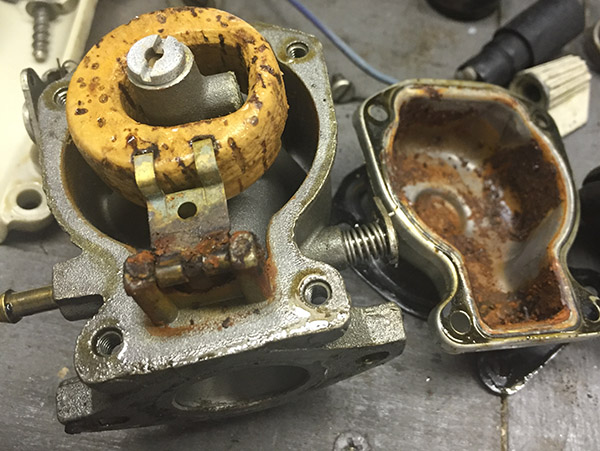
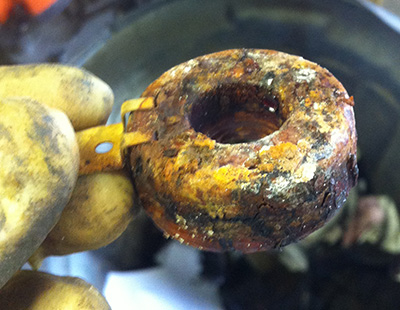
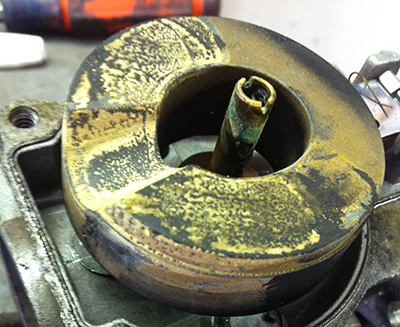
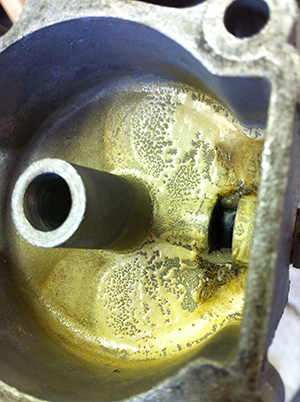
Depending on
where a motor is left to sit, worst things can happen too. The
first picture shows an older style cork float, which originally had a
coating to allow it to float and not absorb fuel. Over time they
fail, but when left sitting in today's fuels, they become caked up, and
look like this. The 2nd picture shows a newer style foam
float. These are quite a bit better than the original ones, and
in many cases can be the only part of an abused carburetor that
survive. With a cleaning, they can be reused in almost all
cases.
The picture to the far right is a 9.5hp
carburetor that was so full of build up of old fuel and crystals from
moisture and condensation, that it took several days of soaking and an
hour of hand cleaning. Leaving a motor in an unfinished basement,
barn, or out in the elements leaves it exposed to moisture
cycles. This results in white build up similiar to efflorescence
you see in your basement walls.
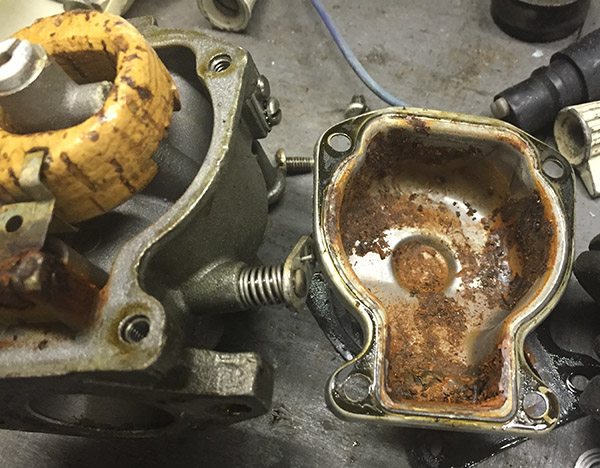
The bottom two pictures
are what old fuel turns into when left to sit in the carburetor
bowl. Either it turns to a gooey sludge, a brown mush, or
sometimes a white frosting. All can be a pain in the butt to
remove, and every aspect of the carb needs to be cleaned, in particular
the tiny passages and fuel orifices which if clogged will basically
prevent the motor from running correctly. This isn't something
where you're just spraying some solvent into the carb and away you
go. This is a full teardown situation and you really need to
understand exactly how the carb works to fix it correctly and
recalibrate as needed.
Here
is what
happens to fuel when it sits in your fuel lines for a longer period of
time. In this instance, the same white powder/gunk has formed
inside the lines. So while your carburetor may still be clean,
fuel remants can be flushed downstream and clog up the works. Run
your motor out of fuel and drain the lines if possible to avoid a lot
of headaches. If your fuel lines are getting vulcanized/hardened,
replace them right away too. Externally they may look OK, but
internally they very well may be breaking down and sending bits and
pieces throughout the carburetor and motor. The newer fuel lines
have a liner that can and will separate away from the exterior
rubber. This causes all sorts of issues!
How The Fuel
Manifold Works
When
the motor turns over the pistons move back and forth. As the
pistons move away from the cylinder head, it creates a suction through
the manifold. The manifold in most small OMC motors has 'leaf'
valves. They are called this because, well, they look like
leaves. These valves have been used for several decades and help
to further meter the amount of fuel the motor receives. In many
cases, the difference in horse power has to do with how much fuel a
motor is receiving; giving it more fuel and air gives it more power
output.
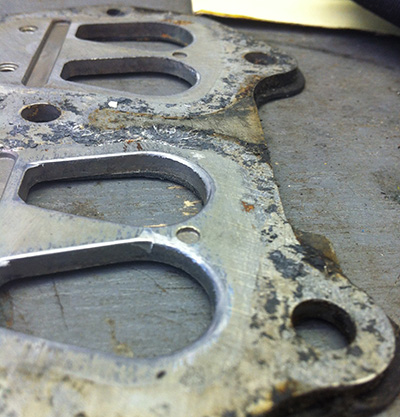
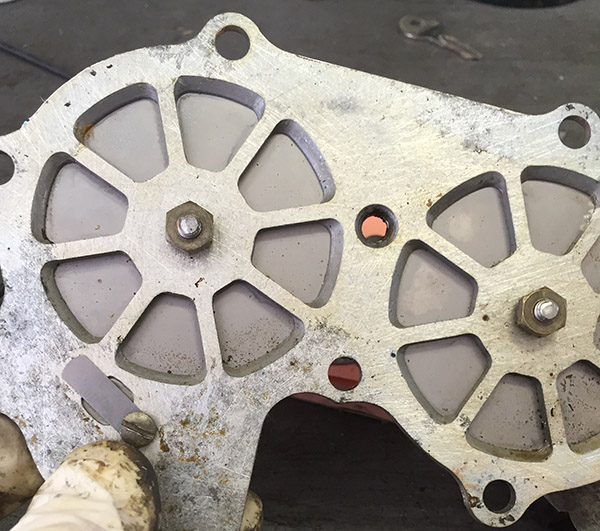
Here are two manifolds for a 15hp motor. The one on the left is
worn, notice the rounded off edges to the orifices. This is a
rare situation, but can happen after a motor has been used for a long
time and the leaf plates just slowly wear away the manifold. This
particular motor would not run right, and after evaluating the ignition
system, carburetor, and fuel pump, I suspected the only thing of
explanation was a worn manifold. Sure enough, after a full
teardown, this is what I found.
The manifold pictured on the right was a replacement and you can see it
is in good condition with 90° edges, which allowed the leaf plates to
properly seat and meter fuel intake. The motor ran fine after
this replacement service what carried out. When you try to start
a motor that is not fuel injected (this started
being introduced in the 80's), it can take 3-5 pulls of the manual
starter to charge the cylinders with enough fuel mixture before it will
start up. This is completely normal in a dry motor. You
have to pull
fuel into the motor first.
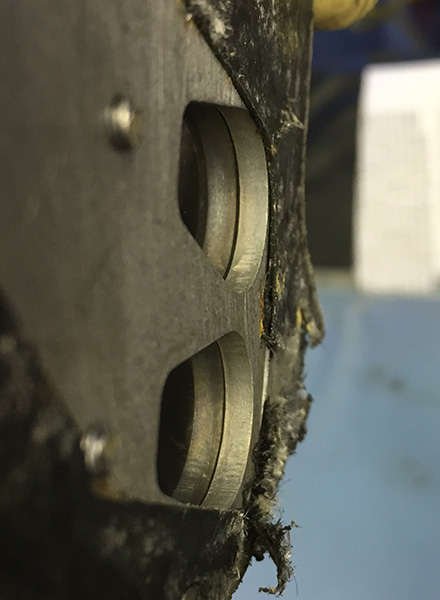
Below are pictures of a good manifold but the leaf plates are worn and
not seating properly. On the left is the worn leaf plate, with a
small gap between the manifold and leaf plate (about 1 mm). This
may seem insignificant, and yes, the motor will run, but it won't run
right, and it also ran all over the place (bad power curve). The
reason being is the fuel mixture was inconsistent at all RPMs, so
nothing you do with the carb settings, timing, or anywhere else is
going to correct this. The right picture is good leaf plates
which sat properly on the manifold. Once these are worn you
replace them. They are not something you try to repair.
Here is a video of a 9.5hp motor I took with the intake functioning as
it would when the motor is running (it's not easy holding a drill gun,
steadying a motor, and filming and getting light into the
manifold...sorry for the camera wobble). Notice the 'owl whooo'
you hear when I turn it over a little more slowly with the drill
gun. This is the suction occuring and is normal. You can
see the leaf valves fluttering as suction and pressure changes occur in
the cylinders/crankcase. If there was a carburetor installed, it
would pull fuel from the carb and send it into the combustion
chamber. This is also why there are warnings usually on the
airbox of the motor saying "keep
clothing, hair, and garments away",
because they can easily be sucked in. If the motor is running and
you get caught with the flywheel, well, "sianara" as they say.
Introduce some spark (i.e. ignition/spark plugs) and you have yourself
an internal combustion motor.
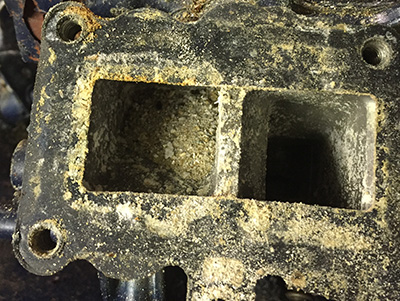
Here is another 9.5 motor that had been sitting in a basement for many
years. Notice the intake manifold is full of what appears to be
sand. This is that same build up of efflorescence-like
material. This motor is sitting in the big lake in the sky now.
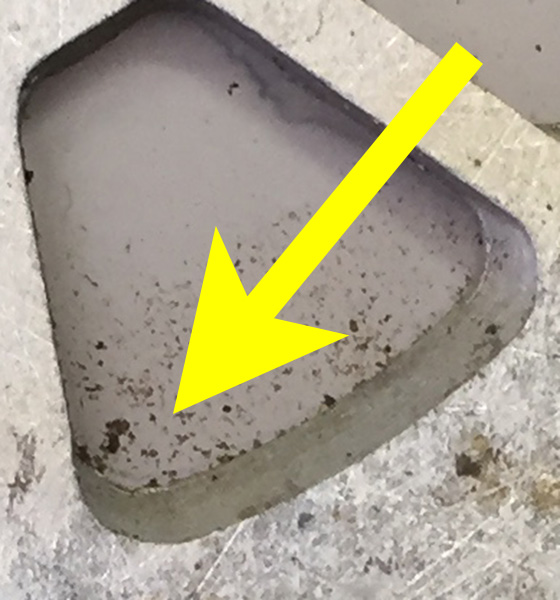
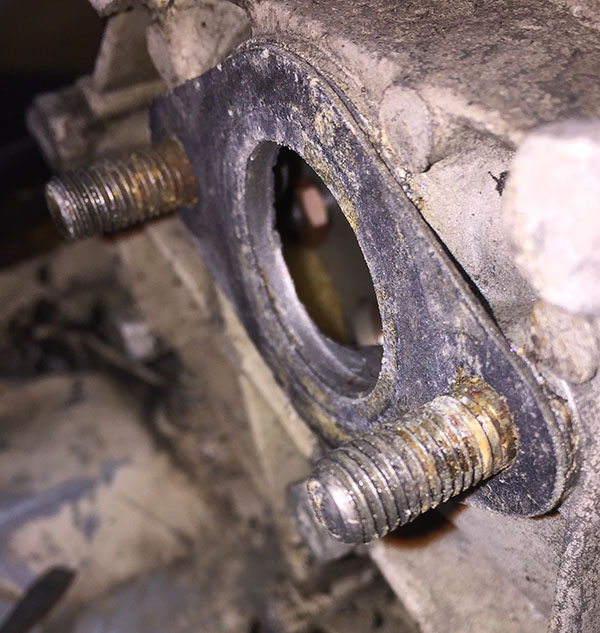
Chipped Manifold
Recall in the prior section we talked about how important an
undisturbed manifold and good fitness leaf plates and lead stops
are. Oddly enough, it is possible for the actual manifold plate
to not only get worn, but to become chipped. This may have been a
casting imperfection that found it's way past quality control, or a
small chip that broke away sometime during the earlier days of the
motor. The picture on the far right is with the leaf plates
removed, and I placed an orange slip of paper behind it to make the
chip more visible to the camera.
Whatever the reason for this problem, this tiny chip was allowing the
motor to pull more air into it than it shoud, and caused the motor to
run erratically at all ranges. If there is anything I've learned
over the years, is that if you have gone through and eliminated all the
possible sources of a problem where you've looked, than the logical
remaining possibility should provide an explanation. The trick is
understanding that there are a lot of different things that can cause a
problem, and it can be particularly frustrating when there are MULTIPLE
things going on at once!
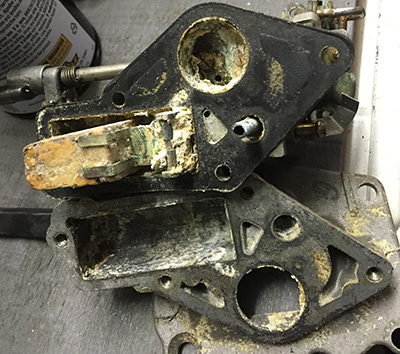
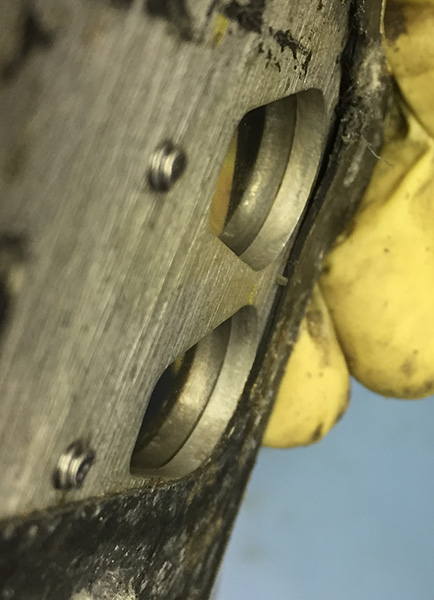
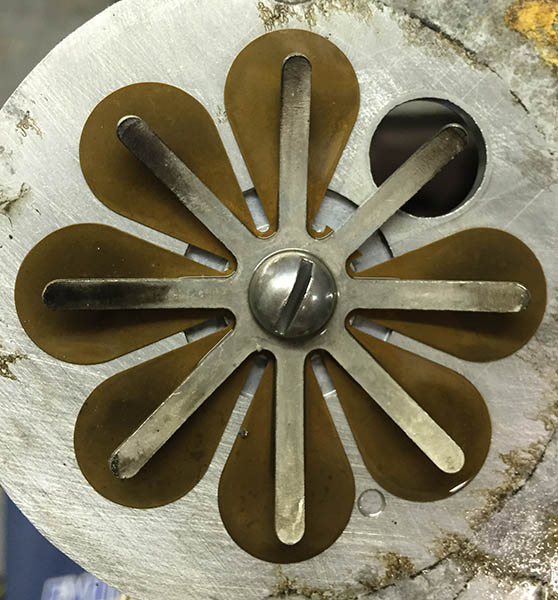
Broken Leaf Plate
Here we have a situation where one of the actual leaves from the plate
snapped off. Now, this is not an obvious problem because even
with the carburetor removed, you may or may not necessarily be able to
see this problem. After refurbishing a motor, I was able to get
it to start but it was very obvious that something was wrong. The
motor would not run without the choke closed, and was a hard
start. The motor would not idle down and was not able to get to
full throttle RPMs.
I pulled the plugs to see the cylinders were soaking wet, so the next
step was to pull the powerhead and inspect the water jacket, looking
for leaks into the cylinders. Not being able to find evidence of
where the water was getting in, I was left scratching my head.
Another thought was perhaps the fuel pump was leaking fuel through the
diaphragm, but even with switching that out, no improvement was
noticed. After 10 hours of pulling things apart and putting them
back together, and having to replace all the gaskets that were
destroyed along the process, I put the motor away for a good night of
sleep and a warm dinner.
Than, AH-HA! Could it be the manifold? Pulling the carb and
carefully shining a flashlight into the manifold revealed my smoking
gun. One of the leaf plates was completely gone! I have
seen instances where the center screw had loosened up and fallen off,
generally resulting in odd running characteristics (this allows more
fuel/air mixture), but this truly was an oddball situation. After
replacing the leaf plate, the motor ran completely normal.
Foam in Manifold
In the last section I showed you pictures of a manifold with 1 leaf
plate missing. Well on another motor, I was able to get it
started but it was running lousy. See prior to me running motors
for the 1st time I have already gone through the entire motor, so if
they don't run right the first time is usually means there is some sort
of oddball situation. In this case, part of the insulation foam
that is glued to the inside of the cowel had been sucked into the motor
by the prior owner, and unbeknowst to me, was lodged into the
manifold. Amazingly, the motor would still run, even up to near
wide throttle, but it was running erratically.
Once I pulled the carb to inspect closer, I could see the yellow foam
mashed down in the manifold. I carefully pulled it out to find
out this little foam was more like a 2 x 2" block of foam! The
motor ran totally fine once removed.
Common Carb Issues
Carburetors,
at least OMC ones, aren't terribly complicated, but do
need to be set exactly right to work correctly. Recall that
they are responsible for metering the fuel flow to the motor, while
also being syncronized with the ignition system. Many DIYers
think that 'the motor will run if the carb gets cleaned.'
That is almost never the case. There are many, many different
things that have to be correct for a motor to run right. Don't
forget there probably is more than 1 thing wrong in many instances, not
just the fuel system, but other areas of the motor too.
Here
is a float needle that has become worn out. The point should be a
straight point, not have those divots (which is where the needle seats
on a brass orifice which also needs replacement at this point).
What this does is turns fuel on and off inside the carburetor based on
how much is being consumed.
When you prime your motor with the hand fuel bulb, you are filling the
carb bowl with fuel. The float is connected to this needle.
When the bowl fills, the float rises, and when filled up this needle
shuts off fuel so you don't flood the carb. This is why all the
operator's instructions say 'pump bulb until it feels hard.' If
you continue to force fuel into the motor, you can damage the needle
and fload the carburetor. In this instance, you'll need to read
the section about a flooded motor I wrote.
If you see fuel pouring out of the mouth of the carb it's because
either the needle has worn out and isn't sealing correctly, the float
is no good, or there could very well be several other issues leading to
this.
Now you may still get the motor running, but it probably won't run
right because fuel can enter in an unregulated manner.
Another common issue is a worn ignition cam follower. As you
accelerate a motor and give it more fuel, you have to increase the
timing of the spark to account for this. DFI (direct fuel
injection) motors are computerized with sensors and handle this
electronically. Carbureted motors use a cam that opens the
carburetor flap based on the timing of the ignition (either your
tiller, or remote throttle). When these wear out, it changes the
timing of the motor and it will not run correct. People often
'cob job' this fix which is a mistake, a band-aid at best.
Debris in your carb
will make the motor run erratically. All it takes is a small
piece of lint or hose material to dramatically change the way the motor
performs. It's important you always take a look inside your fuel
tank and where possible, pull the intake filter of the gas tank and
your fuel pump and check for clogs or just accumulations of
materials. What can happen if you don't do this, is eventually
the 'junk' will get past the fuel filter screen(s), and make their way
into the carburetor. For fuel injected motors, this can
clog up injectors which will turn into a very costly service procedure,
to the tune of $200-400 on a good day. At the very least you'll
see a fuel restriction which will either make the motor stall, have a
difficult start, or just not have a lot of power when running at higher
RPMs due to the restriction.
Here is a picture of just how little it takes to make a motor not run
right. Some small pieces of bugs and fuel line had clogged up the
high-speed jet of the carburetor (seen as the black stuff in the middle
of the carb). These can also get caught in the float needle and
seat. So the motor will start and run, sometimes a little longer
to get it to kick over, but is only getting a trickle of fuel. Anything
much idle will have you itching your head and possibly fiddling with
the rich/lean settings. Frankly nothing you do with the rich/lean
adjustment is going to fix this without disassembly of the carb and
inspection.
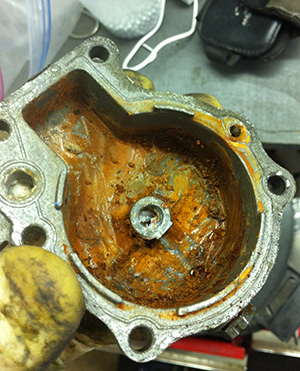
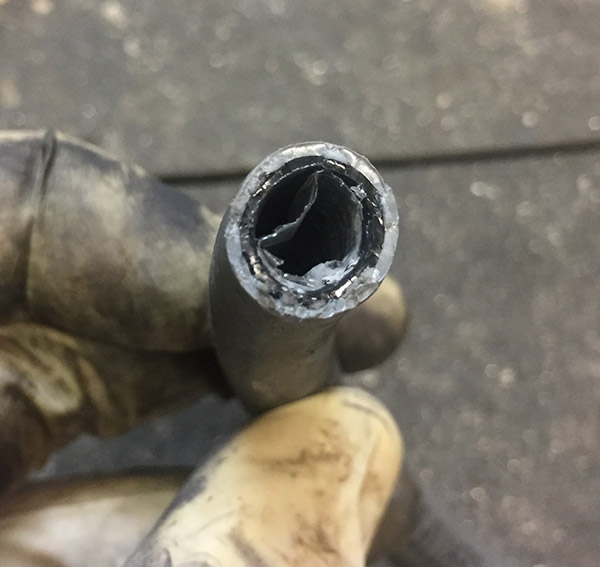
Leaving fuel in the
motor for an extended period also accelerates deterioration of the carb
bowl. Here are pictures of what happens when you leave fuel in
the carb for a long time. You can see the float bosses are badly
corroded, and the float bowl itself destroyed. This carb had to
be thrown out.
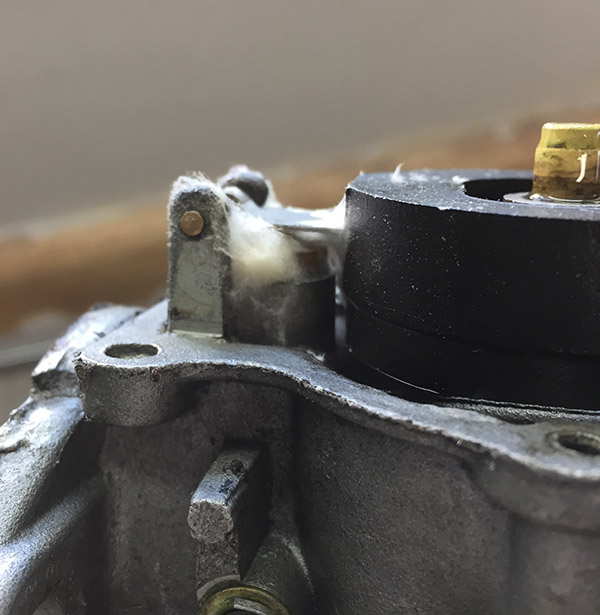
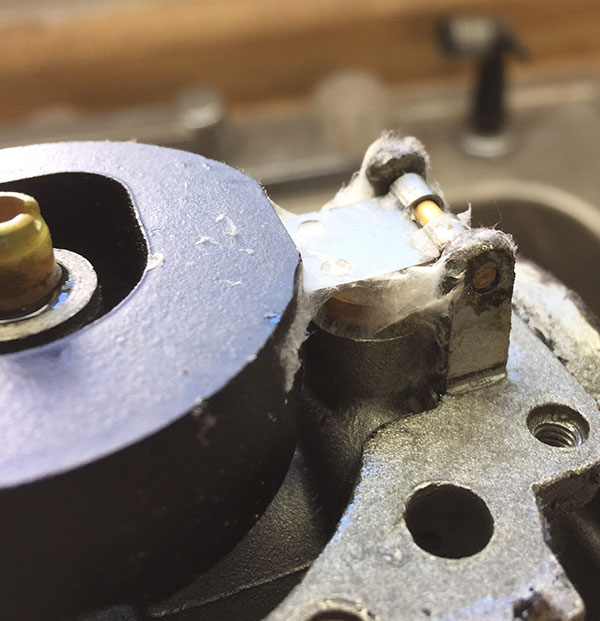
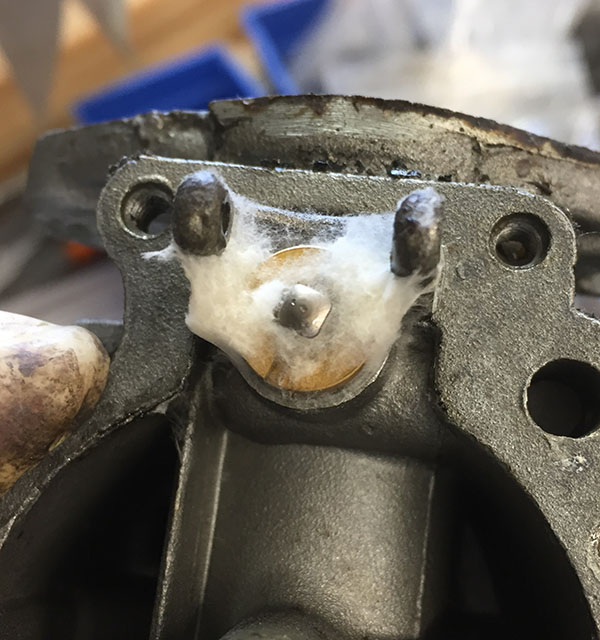
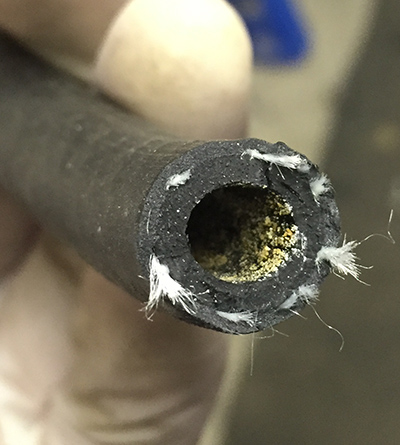
It's also possible
that a bug may have climbed into your carburetor over night and built a
nest. Here is a picture of a carb I pulled and was inspecting as
part of my normal routing, prior to putting gas to the motor to try and
start for initial calibrations. A common mistake people do is put
fuel to their motor and try to start it after it's been sitting for
some time, hoping they will get lucky and it will just work fine.
In many cases, this actually cause more damage by sucking debris into
the manifold and possibly damaging the cylinders.
Float Height
Importance
Many times when I talk to DIY-ers, or other modern day mechanics about
carburetors, I have to bite my lip when the conversation turns to the
topic of float height. The reason for this is two things; not causing
political waves, and most importantly because I know they flat out
don't know what they're talking about.
The issue is that these folks don't seem to realize that they aren't
dealing with a EFI (Electronic Fuel Injected) motor where the computer
and related sensors monitor fuel input into the engine with precision,
and that the carburetor is the older technology responsible for this
important aspect of the combustion cycle in a pre-2007 OMC motor. As
mentioned in earlier parts of this section, the carburetor meters the
amount of fuel sent to the crankcase and eventually the combustion
chamber (cylinders) with a level of accuracy and if this is disturbed,
the engine won't run right.
Well, one of the most simple and important aspects of the carburetor is
the height the float sits off of the needle and seat (where the fuel
first enters into the carb). Part of getting this set up is using a
little metal clip that attaches the float to the needle. In this
particular instance, the customer brought their motor in because it was
running erratically, yet they had already replaced the ignition sytem
with new components (pricey), and rebuilt the fuel system with new
lines and fresh carb kit installations. After initial evaluation, I
ruled out an ignition or compression issue being the root of the
problem. So off comes the carburetors, and low and behold, the smoking
gun presented itself. The picture below shows how the customer didn't
understand how to install the retaining clips, and improvised using
some thin wire to hold the clips to the floats.
The effort was good, but the application wrong. The float MUST sit at a
precise height from the float bowl to meter the amount of fuel the
engine receives at any given throttle range. There is a special float
gauge that sets this height and is essential in initially setting OMC
carburetors up, and if this is wrong, the motors will run with no rhyme
or reason at different throttle ranges and will leave you throwing your
arms into the air giving up on the situation due to frustration.
Many folks will say, "MEH, just make them level with the float bowl."
Well, I'll tell you that is a quick indicator to me that the person
doesn't know their head from their 'you know what.' Working on
thousands of motors tells and reading the manufacturer's directions had
educated me otherwise.
Oddball
Manufacturing Situations
If there is
anything I've learned over the years, is that what the books say, what
the parts diagrams illustrate, and what is actually true aren't always
correct. You see, when a motor is made, it has gone through many steps
to get to the point where you are holding it in your hands and
operating it. Engineers design it on paper, it goes through countless
evaluations by the bean counters, the mechanics sit in board room and
give feedback (which falls on deaf ears), it goes into production, then
us poor saps "the consumers" use the motor and the dealers are caught
in between trying to fix all the kinks the engineers missed due to NOT
listening to the instructors/line engineers.
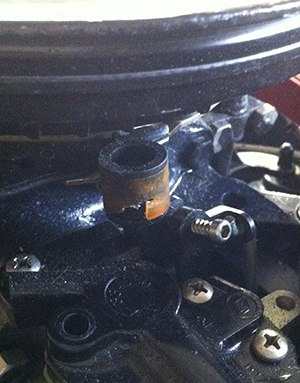
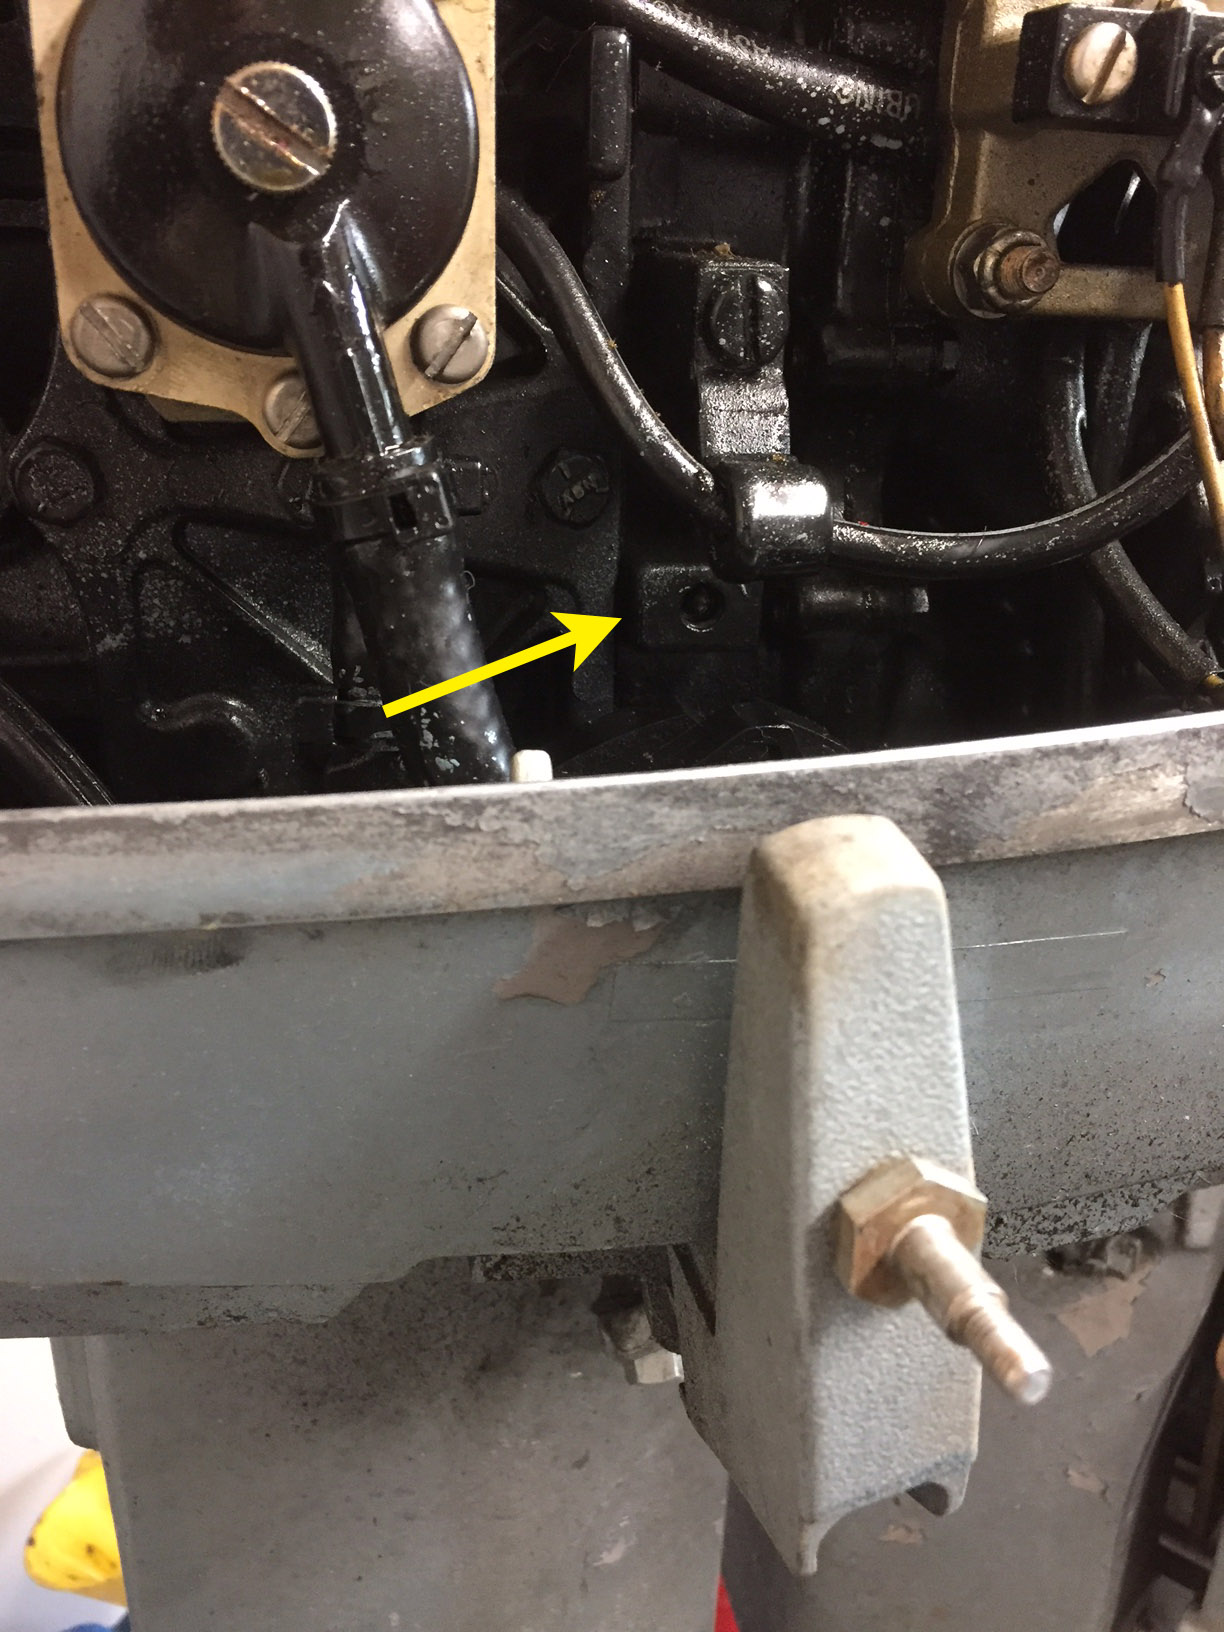
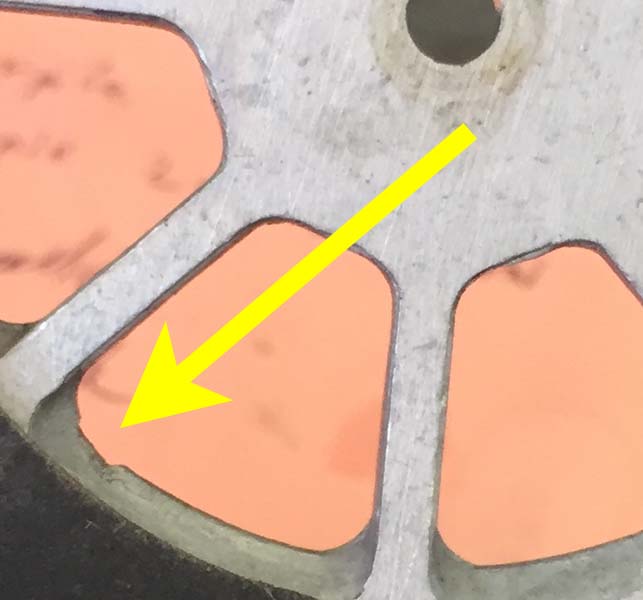
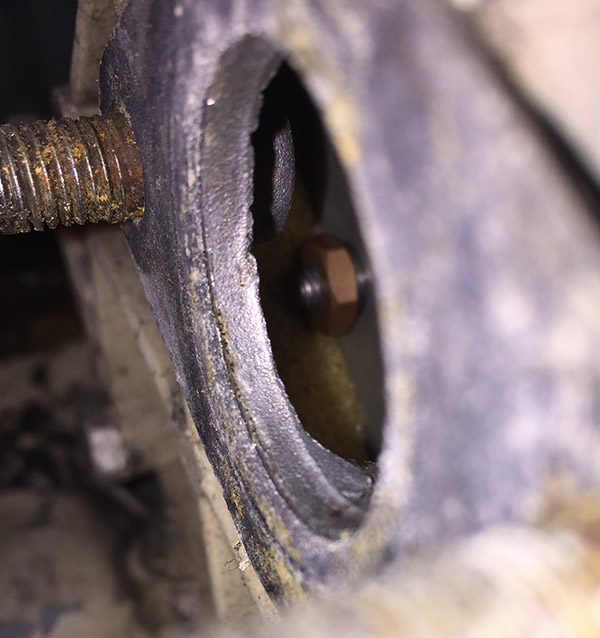
That said, here is a simple example. The picture below has an arrow
showing a threaded hole. This hole on most models was used to secure a
shift retainer, to help hold the gearcase in gear, and also prevent you
from trying to start the motor while it was in gear and/or at higher
than idle throttle.
The thing with this is that it can be removed easily and the motor can
still be used, or if you convert a tiller motor to a remote motor many
times this feature is not re-installed.
The thing folks don't know unless you turn wrenches all day, every day,
for several years, is sometimes when the factory drilled and threaded
this hole, they did so to the point that it penetrates into the intake
side of the crankcase. So if you try to run the motor without a screw
in this orifice, it is sucking air and running lean. It will barely
stay running without constantly repriming/choking. I simple 1/4-20
screw will fix all your issues. YEP, that's all it takes due to a
manufacturing flaw that can potentially affect about 2 million motors
per year over the course of, in my personal estimate, about 15 years
(or 30 million motors).

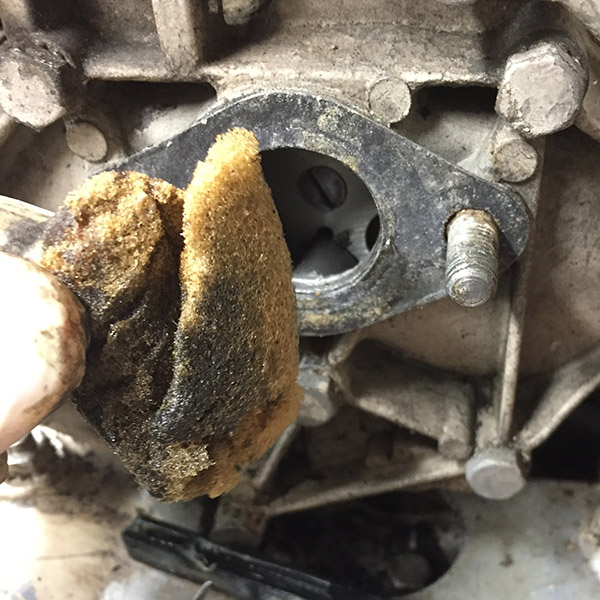
 Here
is a float needle that has become worn out. The point should be a
straight point, not have those divots (which is where the needle seats
on a brass orifice which also needs replacement at this point).
What this does is turns fuel on and off inside the carburetor based on
how much is being consumed.
Here
is a float needle that has become worn out. The point should be a
straight point, not have those divots (which is where the needle seats
on a brass orifice which also needs replacement at this point).
What this does is turns fuel on and off inside the carburetor based on
how much is being consumed.