Split Stabilizers
Flywheel Issues
Failed Driveshaft
Corroded Exhaust Housing
Motor
Mounts - Not to be Neglected! 12/20/18
Split Stabilizers
Most smaller OMC motors utilize a system of 6-7 stabilizers to attach
the powerhead and exhaust housing the transom bracket/clamps.
There are 3 just underneath the motor pan (lower cowel); one aft, one
starboard, one port. At the bottom of the exhaust housing/leg,
there are usually two screws that run laterally and two screws running
bow to stern on the lower bracket which hold 3-4 other rubber
mounts. These lower screws are usually the ones that become stuck
because they are always submerged in water, particularly in salt
applications. There are usually 4 more rubber mounts below the
lower cowel/motor pan to further reduce vibrations. The fail over
time as well. Basically anything that is rubber, will fail over
time. Not much you can do about this.
Now when these things fail it leads to safety issues as remember that
these points are what keep the motor attached to your transom! I
see folks running motors all the time with broken motor mounts, and
usually they are the same people who are being a little too cheap in
terms of maintenence. This is absolutely one area that you DO NOT
want to be pushing your luck on. Granted, the chances of the
motor breaking loose are low (unless in various obvious, serious
situations), but why chance the safety of you or your passengers over a
few bucks?
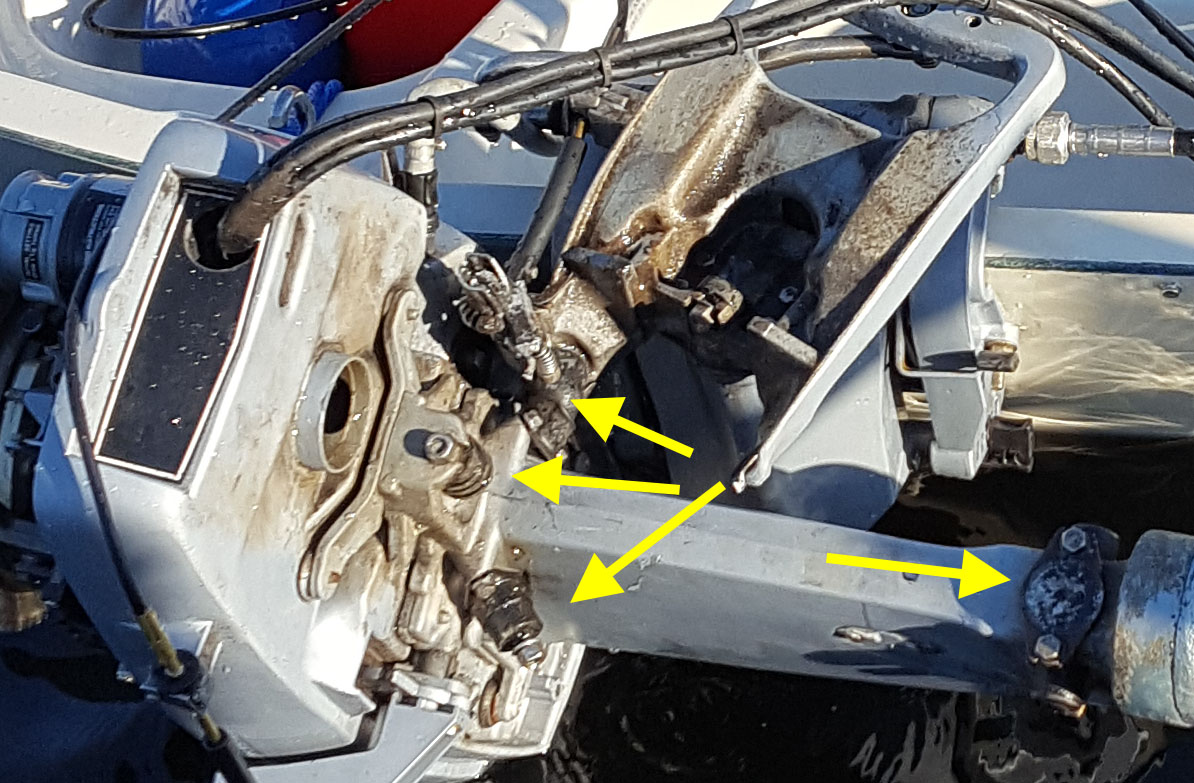
Here are some pics of broken motor mounts. You may not be able to
see them, but if you have the motor mounted and can physically move the
powerhead/upper pan forward or backward more than a 1/2 inch, and
possibly see/feel a 'thud' each time, well, you likely have some broken
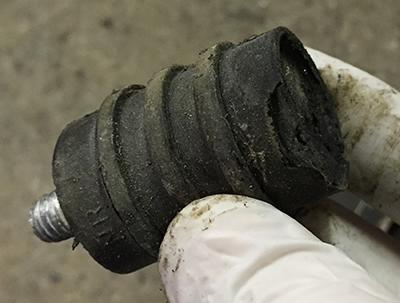
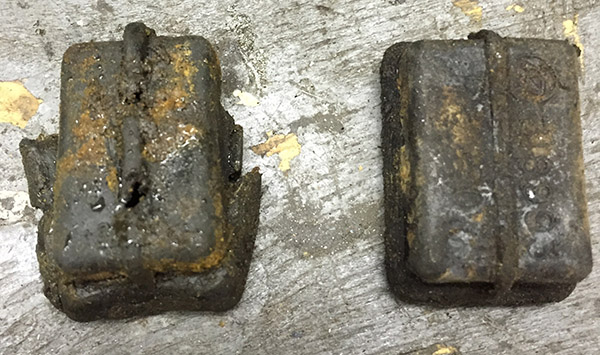
motor mounts. Picture #1 shows an aft stabilizer that has broken;
there should be a screw stud on both ends of it. This is what
keeps the top of the motor from shaking forward and backward. If
you drop a motor on the skeg, these often split in half. So say
you accidentally put too much weight in the back of your boat and you
go to unhook the trailer from your vehicle, and the tongue swings up in
the air. What hits the ground first? The skeg of the motor,
as the whole system pivots on the trailer wheels like a teeter-totter
(1st class lever). Now you have to replace this motor mount (yes,
I have accidentally done this before...easy to do with an aluminum
boat).
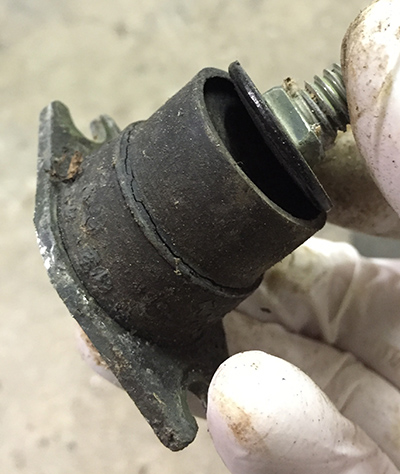
Picture #2 shows a lateral mount that has split. You can see the
rubber has vulcanized and has cracks, but where the transom bracket
attaches via the stud, the rubber has separated from the mount and no
longer offers a solid connection. These are common
situations. The powerhead/lower cowel should have some play
involved to help damper normal vibrations of the motor under normal
circumstances.
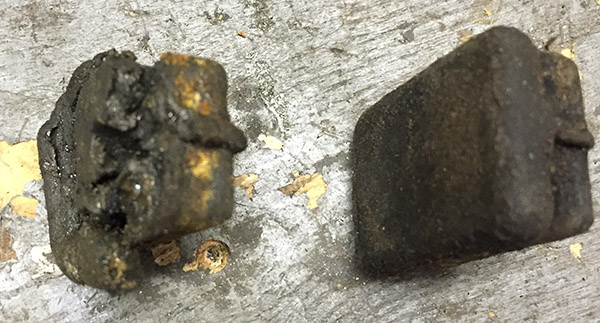
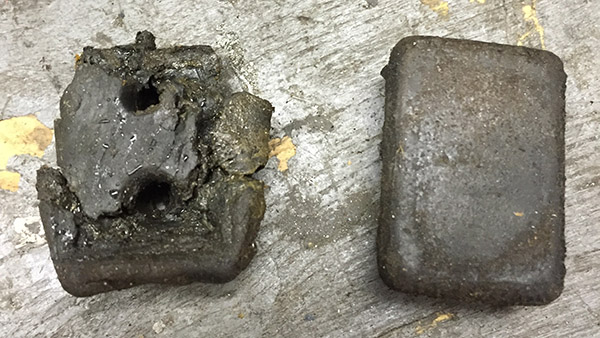
The three horizontal pics are a front, rear, and side picture of a
lower motor mount on a 9.9/15hp motor. It was totally
shredded. The one on the left is the deteriorated one, on the
right is a normal one. The last photo is a forward lower mount
that has separated from the lower unit/exhaust housing on a 30hp
motor. Commonly, this happens when trailered improperly.
Flywheel Issues
The flywheel serves a few very important functions. First, it
usually has a magnet installed in it which is used as part of the
ignition system to generate spark and combustion. Second, it
helps balance the forces produced by the powerhead and prevent
premature gearcase wear. Even more importantly, flywheels help
maintain the inertia created by the spinning crank for overall engine
economy. So when you are a high throttle/RPMs, when you throttle
back, if you did not have a flywheel spinning with inertia, the motor
would slow down rapidly.
This means that everytime you needed to accelerate or decelerate, the
motor would have to work that much more rather than using the inertia
of the flywheel to gradually slow down/speed up. This could
possibly lead to faster mechanical failure of the internal components
of the motor as well.
Flywheels sit on top of the crankshaft and utilize a taper to hold it
in place. They need to be installed with specific torque values
so they can function as intended. DIYers generally don't know
what these are, or simply do not have the tools to remove/install
correctly. Again - don't get into something that is over your
head. There really isn't a margin of error here, it has to be
correct 100% of the time. A flywheel (woodruff) key is installed
in the crank taper to insure the flywheel sits in the correct location
so that the timing of the ignition system is right.
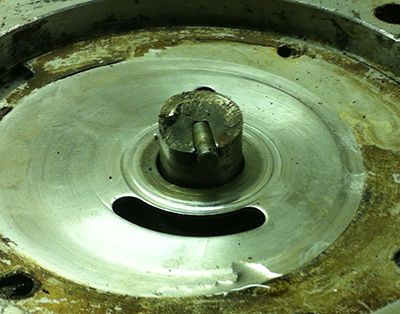
Here is a picture of the keyway of a flywheel that has been wallowed
out. This should be perfectly square under normal
circumstances. A number of things can cause this, but generally
this type of wear is due to sudden shockwaves being transmitted
throughout the motor which can stem from any number of sources.
If a flywheel is torqued down the wrong amount, this could possibly
lead to a worn flywheel. This cannot be used any longer as if the
flywheel changes it's position even by a 1/2 mm, then the timing of the
motor will be severely affected, which only applifies the whole issue
in very short order. To the scrap yard this went!
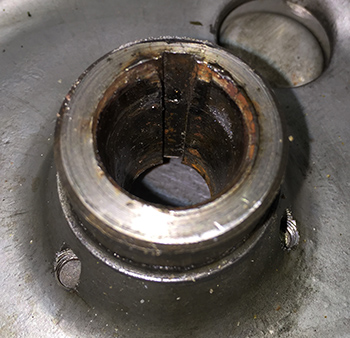
Below are two pictures of a flywheel where the woodruff key has sheared
off and melted into the flywheel keyway. Again, incorrect
torquing or an imbalanced motor can lead to this. The taper on
the crank and flywheel orifice should be perfectly clean as well.
Often times DIYers will put grease or pentrating oil on the tapers
thinking this will make it easier to remove/install the flywheel at
future junctures. This is totally wrong.
The flywheel is supposed to stick to the taper, and usually comes off
with a loud 'pop.' I've removed flywheels before that were so
loose you could almost remove them by hand (which is absolutely
wrong). In these two cases, if the broken key can be
chipped out without damaging the keyway, the flywheel could be used
again. Removing the broken pieces from the crank orifice is a
different situation.
A
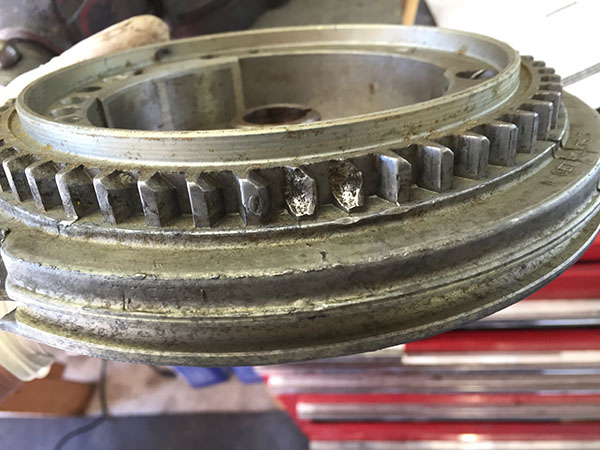
more obvious issue is if the flywheel is damaged. Below is a
flywheel with a few teeth missing. Depending on the motor type
you have, this may not mean anything if the manual starter is employed
and utilizes bosses on top of the flywheel, independant of these
teeth. But if you have an automotive type manual starter with a
pinion gear, or an electric start model, now you have a problem, as the
missing teeth will not allow either to work properly.
Failed Driveshafts
This is a rare situation, in fact so rare, that some other long-time
(in many cases, retired) mechanics have conferred that you might only
see this once or twice in a lifetime under normal circumstances.
Driveshafts are made of stainless steel. So literally the metal
has failed, but that is extremely uncommon. Driveshafts can and
do break when the motor encounters a collision, and this is something I
have seen many times. There is usually evidence in other parts of
the motor of damage as well such as the gearcase or exhaust housing, or
the mounting hardware. But to have a driveshaft fail on it's own
under normal usage is generally going to be a manufacturing
defect.
Generally with a collision the driveshaft will simply snap in
half. Remember the rotary forces created by the crankshaft are
being transmitted down the driveshaft (so you are applying a twisting
force), into a pinion gear, and then to the prop shaft and various
gearcase components. When the prop is suddenly stopped, the
prop will spin in the prop hub and/or break the shear pin. These
two provisions generally prevent damage to the motor, but not
necessarily give it 100% protection; it's the best you can do. If
the collisions is of great enough magnitude the driveshaft is going to
take on this sudden stop. There are a lot of forces being
generated here!
Here is a picture of a driveshaft that broke under normal usage (no
collision) at the impeller key. The customer was boating along
when suddenly he lost all power and the motor started winding out at
high RPM. Well the reason for the high RPM is because the
powerhead had nothing to work against with the broken driveshaft.
Upon receipt, I would shift the motor and here the gearcase click into
gear, yet I could turn the flywheel without seeing the prop turn in any
direction. Further diagnosis became suspect when I removed the
gearcase off the motor to see the driveshaft still mounted in it's
proper position. Off came the impeller housing and the problem
was very obvious. Of all the places a driveshaft could fail, I
suppose this would be the best spot due to the smaller amount of
materal left to absorb the rotary forces, due to the impeller key
orifice (the little metal peg, which holds the impeller/water pump in
place).
Corroded Exhaust
Housing
The exhaust housing is often referred to as the lower 'leg' of the
motor. In fact what it is responsible for is protecting the driveshaft
in an enclosure, the shift shaft, the water tube which delivers cooling
water up to the powerhead, and finally directly exhaust down from the
powerhead to an under water orifice. Perhaps the most obvious
function is noise suppression and keeping exhaust emissions away from
an operator. If you've ever owned an outboard where the shift
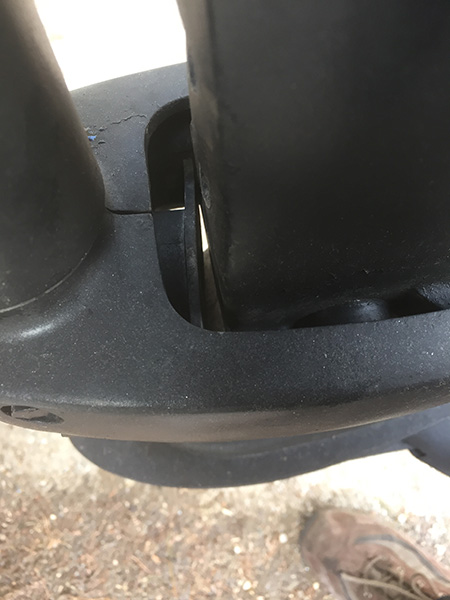
shaft linkage is accessed via a little 'door' on the exhaust housing,
and this cover has been lost or removed while the motor is running,
then you quickly learn just how important the housing is.
Without a properly enclosed housing, every internal combustion
explosion sends out a deafining pop. It literally sounds like an
automatic shotgun going off and is an absolutely miserable thing to be
around. If you aren't underway, you quickly find yourself
inhaling exhaust fumes too. Even modern day motors with next to
no emmisions still give off an odor, and your clothing and hair will
get saturated with it.
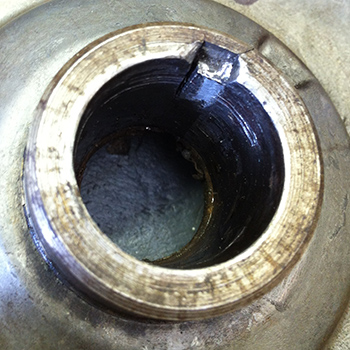
Here is an upper exhaust housing for a 15hp motor that has two holes in
it. After carrying out all the repairs necessary I was running
the motor on it's initial test trial. It was vary obvious there
was something wrong, as exhaust fumes started going everywhere in a
very unusual way. After some investigation it was clear what the
source of the problem was. Well this also meant I had to do a
full disassembly of the motor to replace the exhaust housing. Who
knows how these holes got here. And how did the previous operator
keep using the motor thinking this was normal?
You can see the upper driveshaft after I had removed the powerhead, the
gearcase was still mounted on the exhaust housing. It ended up
being removed and having the entire exhaust housing assembly replaced.
Motor Mounts - Not
to be Neglected!
Here is a situation I see quite a bit in my shop when I work on motors
- motor mounts that are broken or marginally holding together. The
motor mounts are rubber grommets attached to metal wafers which absorb
the normal harmonics/vibrations of the motor as it runs, impacts, and
typical stress put on the engine. Well, rubber dries out, and people
run motors hard, so these eventually need to be replaced. They are
basically shock absorbers for the engine.
Many
times, customers bring motors in for service where I identify this
problem and explain what can happen (motor breaking away from the
boat). Most of the time, customers think I'm pulling their leg, but I
also explain when I sell a motor that proper tranportation of the motor
should be in a tilted position making use of a transom saver (look at
the trailer section for more info on this). It helps take the stress
off the motor when you go over bumps in the road.
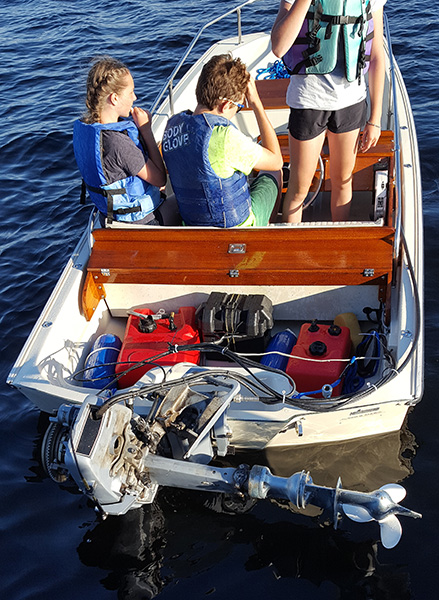
Here we see a motor that has broken away from the stern brack
because the motor mounts all failed. The customer brought the motor to
me as his 3 children, all under the age of 12, were driving their 13'
Boston Whaler across Lake Winnipesaukee (largest lake in NH) following
him in his larger bow rider pleasure boat. I was able to repair the
motor for him, but things could have ended up much worst!