Disclaimer: The
information provided should never replace common sense or the
recommendations of the OEM. I do not assume responsibility
for
the use or misuse of this information. The information provided
is
based on my experience working as a full time mechanic, on hundreds of
motors over time, reading a lot of manuals, education, and consulting
other experienced mechanics along with a number of retired service reps
I am friends with.
If
I can offer
any advice from
experience, it would be NOT to try and fix your own motor if you don't
have a good understanding of what you're doing. You need to have
the right special tools, reference materials, and most importantly,
UNDERSTANDING of what is wrong and how to properly fix this
issue. Most people do more harm then good if just messing
around blindly. The reason why I can do these repairs is I've
put in thousands of hours reading, fixing, and practicing. I
learn
something new everyday. I have also gone out and acquired the
necessary, CORRECT tools and reference manuals to work on the
motors. These are very
important to promote correct operation of the motor. The idea is
to
have a reliable motor, not just one that 'kinda runs.'
Motors need 3 things to run (not necessarily run right). Spark,
compression, and fuel/air. When you look at a used motor you want
to check for compression with a compression guage. Each
horsepower and model type of motor has different compression
numbers. Generally, the higher, the better, but just because
compression has dropped doesn't necessarily mean it's a bad
motor.
There are a lot of things which affect compression; cylinder moisture,
temperature, the guage, carb throat opening, speed of cranking, plus
more. The general idea is to know acceptable compression numbers
for the motor to run. If it has 'low' compression, that may be an
indicator that something is wrong, but it could also be a false
positive. Generally, motors 9hp and below will have a peak value
around 85PSI, but that isn't always true. The size of the
cylinder, style of cylinder head, intake and exhaust ports, pistons,
and connecting rods all affect compression.
People get hung up on compression all the time. If the motor
starts up within 1-3 pulls and runs, then that's what you really want
to see. If it has 'low' compression (generally anything south of
65PSI, repeatedly, is probably in need of service), it will just fade
out and die off at a low RPM. You might see less power at the top
RPM range too. Or it may just plain not run at all.
I can say that low numbers, or uneven numbers between cylinders doesn't
necessarily mean a mechanical problem. I have seen many motors
that once run, the PSI goes up, sometimes as much as 20-30PSI.
This was probably because of carbon build up in the rings, stuck rings
that freed up, or with a dry cylinder, the oil helped reseal the gap
between the cylinder and piston walls. When metal warms up, or
anything for that matter, it expands and softens. This could have
loosened up hard carbon build up in the rings or walls and swept them
away, allowing for better sealing/compression.
Get the motor running and calibrated before writing it off.
That's the moral of the story. Remember a 10hp motor for OMC
compared to the same one for Mercury won't show the same numbers.
They are two entirely different motors.
When You Don't Fog/Longterm Storage Prepare Your Motor Customers give me motors all the time that are
for parts. Either they are beat to hell, stuck, or just plain
taking up space. Often times folks want to get some form of trade
in value if they're buying a replacement, and are often shocked at what
I offer. The motor below from the outside looked cosmetically
very good. However, it was stuck.
Now a
seized motor can sometimes be saved, but it's really just a roll of the
dice whether that motor will ever see regular service again. And
no, it's not just a matter of throwing some 'Mystery Oil' into the
cylinders for a couple of days and magically everything is OK
again. That is just plain foolish when I hear people say
that. A seized motor can happen relatively quick too, depending
on where the motor has been sitting.
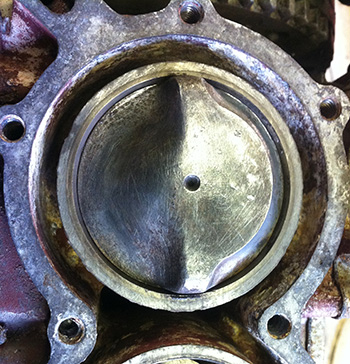
So to start, we remove the cylinder head to see down the cylinders and
what condition they're in. This one actually appeared pretty much
OK, no scoring on the cylinder walls, and no corrosion build up.
The motor had been lift sitting with the bottom intake/exhaust ports
uncovered, which means air can pass through the motor at least on the
bottom half of the powerhead. Both up through the exhaust, or
down through the intake manifold. This is bad. Sometimes a
motor can dry seize, and in this case, filling it full of oil and then
giving the pistons some jarring strikes can free it up. This is a
best-case scenario situation though. Sometimes you can just use a
long lever on the flywheel nut and this will free the pistons/crank
up. Wasn't the case with this one.
After giving it my best, it was time to do a full teardown. You
have to disconnect everything (ignition, fuel), pull the powerhead,
than split the crankcase. And guess what I find? It's full
of corrosion throughout.
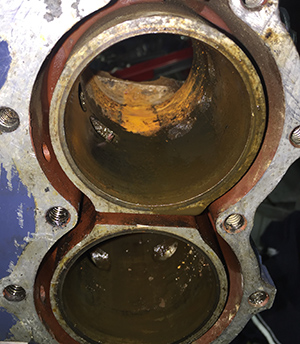
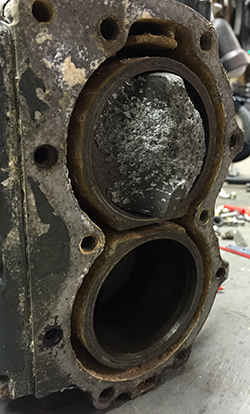
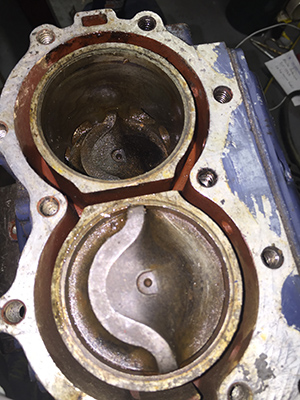
After removing the crank, you can see the cylinders are badly rusted
from the crank side of the motor. The needle bearings were pitted
and ruined.
After fully removing the
pistons, it reveals further damage on both cylinders. This motor
is obviously toast and not worth repairing. The pistons actually
came out pretty easily after a few driving blows; the combustion
chamber side was still in reasonable shape. But since it had been
stored away in a basement for years, never fogged (oiled), and worst
yet, left with the intake/exhaust ports open, this allowed air/moisture
to pass through the motor.
The condensation cycle that happens in this case can start rust in as
little as just 24 hours (leave an iron wrench outside overnight and
watch all the rust that appears overnight). Keep in mind these
motors are aluminum housings with iron cylinders. Multiply this
by a few months, or even years, and the motor is totally ruined.
The crankcase and cylinders are the most important part of the motor,
which is why you do a compression test on motors before buying to make
sure the internals are OK. Even brand new motors this holds true;
over time compression will drop due to normal wear and tear, but if
something has lasted 40 years and is OK, then chances are you're going
to be OK moving forward.
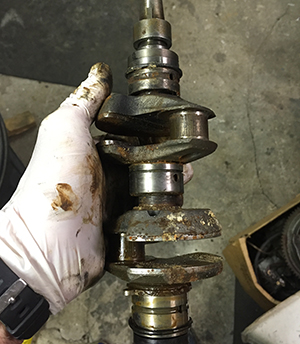
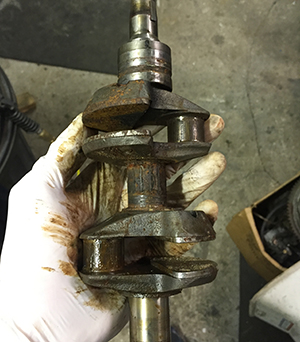
Pulling the crank and looking at it showed the same abuse. The
journals (the smooth parts that the rods are connected to, must be
perfect with no pitting) were ruined. After removing the needle
bearings, it revealed the crank was not salvageable. The cranks
are stainless steel, but that can only tolerate moisture up to a point.
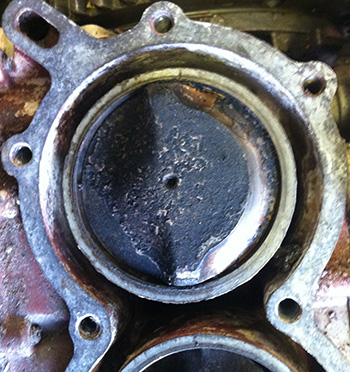
The last picture shows the cylinders from the combustion chamber end
again, pistons removed. Again, the initial inspection of the
motor in it's entirety, not just the powerhead, did not reveal any of
these significant issues. So the customer who I accepted this
from knows there is a legitimate approach to the offer I made
him. It was priced as a parts motor, and was in fact just that.
Why Yearly Tune
Ups Are Important
Regardless of if you have a 2-stroke or 4-stroke motor, carbon build up
inevitably happens. The power from your motor has to do with the
spark strength, fuel delivery and throughput, and compression.
You have control over all 3 factors. Fuel delivery is pretty
simple (clean carb and a good fuel pump). Compression has to do
with overall maintenence of the mechanical components (mostly just
enought cooling components i.e. oil and water pump/thermostat).
Spark strength is ignition system maintenence, which is generally
clockwork too.
Now the "X" factor is carbon build up, which spans all of these 3
factors, and just builds up in general. Yes, using 'sea foam' or
other fuel additives certainly holds these things as bay, but a yearly
tune up insures that you reset your motor, specifically the combustion
chamber, pistons, rings, and exhaust side of the motor. But a
de-carb clears all of those components out.
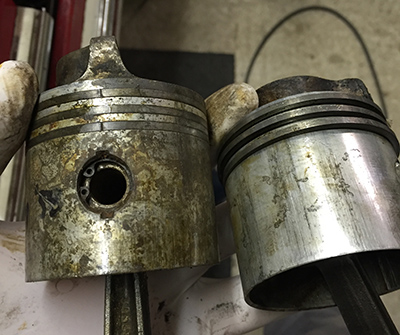
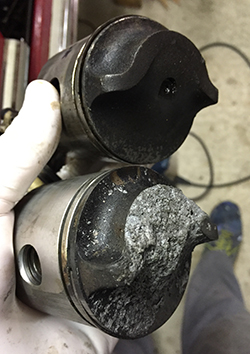
You can physically clean off the top of the piston by pulling the
cylinder head, but that doesn't mean you've freed up stuck rings.
This is an older 18hp motor that was running fine, but had separate
issues that required a tear down. I pulled the pistons and
between the top and bottom, there wasn't a huge PSI difference, but
when you hold them in your hands, it's pretty obvious where the problem
is stemming from.
Both pistons had minor scoring (but still acceptable compression
numbers), but the piston on the left had stuck rings due to carbon
build up. When rings stick, they reduce compression because they
don't 'grab' the cylinder walls as well, allowing what is called 'blow
by', or simply air/fuel mix to escape during the compression cycle back
into the compression chamber.
This is what makes your motor run OK, but have less top end.
Guess what? Every internal combustion engine you own behaves this
way. At least electric motors work consistently, and then just
stop (i.e. a starter motor, drill gun, or even your blender).
The Simplicity of
Compression
Not a long entry, but interesting none the less. We've talked
about the basic principles of motors (whether that be an outboard, weed
wacker, chainsaw, lawnmower, or snowblower), but these pics show how
the major companies keep production costs lower but yet expan their
product line. The idea is to produce the same block, then modify
it to create more product lines. The reality is that spending
money from a business standpoint on R&D, even today with computers
and such, cost some seroius denaros.
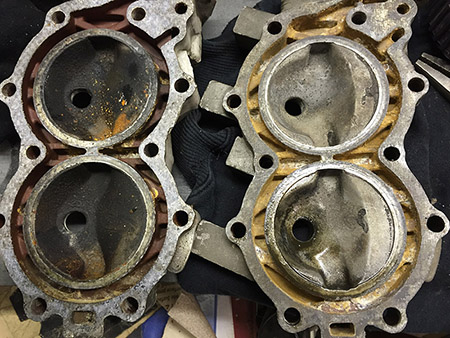
The older 18-20-25hp motors are all the same (there are internal mods)
but the most obvious change is the cylinder head. By cupping the
compression the pistons create more PSI's and gives more power.
For what it's worth, putting a 25hp cylinder head on a 18hp motor
creates PSI numbers that would quickly blow up a powerhead, so don't
even attempt to do this. It might be a fun spectical but a
complete waste of an otherwise good motor.
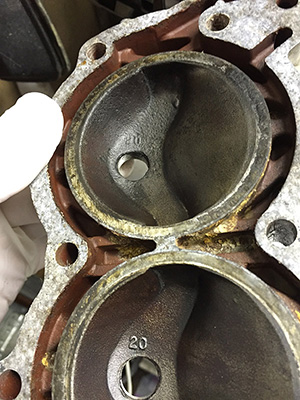
Looking at these pictures, you can see the obvious physical differences
in picture 1. Picture 2 shows how newer models had the number
'20' stamped inside the cylinder head to help folks differentiate
things if they didn't understand the obvious physical
differences. The secret that most people don't know is the only
2hp increase between an 18 and 20hp OMC motor is the leaf valves.
Yep...it all comes down to fuel supply. This might be the
simplest HP conversion of all motors...ever. But finding those
leaf plates is uncommon, unless you want to pay for P&L with
someone who knows what they're doing these days, which would exceed the
conversion cost on paper.
Blown Head Gasket
The
head gasket serves the very important function of maintaining a seal
between cylinders, confining the compression-detonation cycle between
cylinders. I have had situations where I've gone to bench test a
motor only to find it was starting hard, or stalling out at anything
much above idle. After evaluation the ignition and fuel systems
to no avail, I check compression to find that seems to be OK, and than
finally deciding to pull the cylinder head to make sure there are no
internal issues only to find that the last person who laid hands on the
motor had forgotten to torque the cylinder head bolts down to the
specified ft-lbs. Well what this does is lets the compression
escape out of the cyilnders to adjacent cylinders, or even out of the
motor. A loose spark plug can also do this too. Remember,
it takes compression, spark, air, and fuel to make a motor run.
Any 1 of these 4 components being off, and you're going to have a
problem.
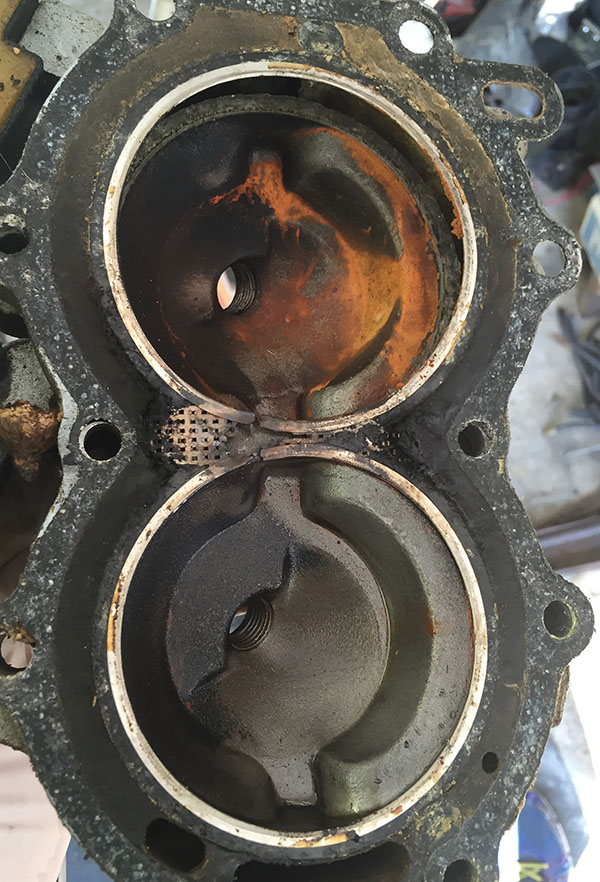
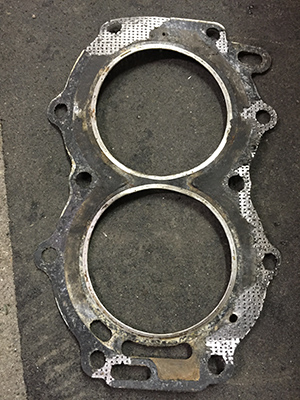
Below is a head gasket that was partially blown. The 2nd picture
is another head gasket that separated upon removal of the cylinder
head, and it was obviously in need of renewal. On the first
picture, you can see the
break in the metal rings between the top and bottom cyilnder, and the
wire mesh showing through where the fiber gasket material had broken
down and been swept away into the cooling system. The motor was
showing compression numbers below 30 on both cylinders. I could
turn the flywheel by hand with both plugs in with little to no
resistance.
Closer investigation of pulling the head revealed that the cylinders
looked good, but the gasket had failed. Replace the gasket and
the numbers were restored to 130PSI+, very good numbers for a cold
bench test.
I've seen situations where a cylinder head was in fact warped
(concave). So as the motor warmed up, the head would expand and
create a very small gap between cylinders, causing loss of power.
It's possible that the motor had gone through a minor overheat at some
time prior, as after replacing the cylinder head and gasket the
compression numbers evened out and no further problems were observed.
A cylinder head does not need to show any evidence of having been
overheated and you can still see low compression numbers. So when
you apply extra heat to aluminum there really is not rhyme or reason to
what may or may not happen. It's best just to avoid that from
happening in the first place by keeping up with proper maintenence of
your cooling system!
When to Use
Helicoils
Helicoils make sense for a practical application in terms of
functionality. However, applying them to a stripped plug hole
could possibly cause issues (unless you're underpropped for a vessle,
which would cause excessive RPM's and mechanical failure).
Predetonation is a situation where the combustion chamber is too hot
too early, causing fire when it shouldn't be, and almost instantly
causing the pistons to get so hot that they melt.
Let's say part of the helicoil breaks off, or say a 'save-a-thread'
boot is installed, but the person who does it doesn't bother to pull
the head, and some metal fleck sticks to the head of the piston and
randomly engrain's itself in some carbon build-up. Well, that
could possible light up like a x-mas tree in about 2 seconds, causing
predetonation. This is an instant catostrophic failure, and the
motor will be toast. One of my first motors did this, and it
actually started right back up (after 3 consecutive seizes from
overheat...cooling system was fine BTW) and ran fine up to the mid
range, then would go into an instant overheat.
What Happens When
You Don't Use Oil in Your Gas
The #1 & #2 ways of killing a 2-stroke motor are running straight
gas with no oil, and running it with a malfunctioning cooling
system. The oil you put into the fuel serves as lubrication and a
method to reduce friction of moving internal parts, while tolerating
the extreme heat produced by an internal combustion engine. Some
of the oil is burned off during this process too, which is why you see
smoke along with the fumes produced by combustion of gasoline (which of
course causes and explosion and drives the pistons away from the
cylinder head). A faulty cooling system is another story to be
reviewed in the cooling system section.
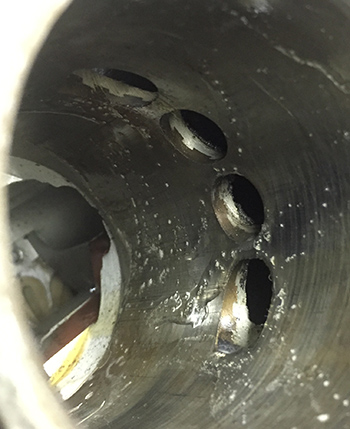
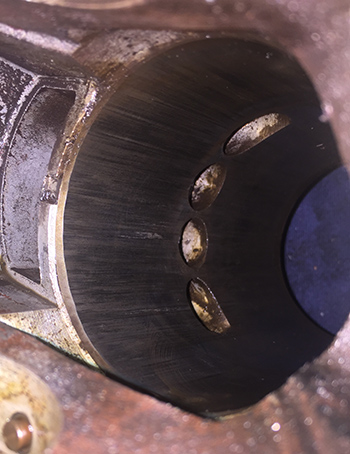
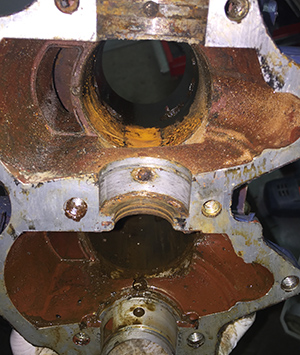
Most outboards are made with cylinders that have iron sleeves (or
another strong, heavy metal) which are fitted to an alumimum motor
block. Here is a picture of an older 25hp block with pistons
removed, and you can see the 'teeth' of the iron cylinder sleeves
fitted into the aluminum black via the intake ports. I had just
fogged this block, which is why you see oil slung all over the
cylinders. This particular motor had a bad crank and required
replacement, along with inspection of the pistons and replacement of
both rods (why I removed the pistons). After rebuild, the
motor still had very good compression and ran perfectly.
When a motor is run without oil mixed into the fuel, bad things happen
in short order. The pictures below are of a motor (25hp) that had
been run without oil. Keep in mind at low, low idle, most motors
are turning 600 RPM, or 10 RPM per second. That's fast! The
block itself is aluminum and, much like your laptop, cell phone, and
desktop computer, aluminum does a pretty good job of dissipating
heat. By the time the block is showing signs of an
overheat, you can bet the internals have heated up far more than what
you see/hear/smell on the block.
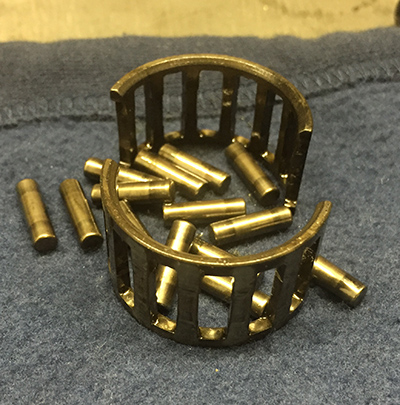
The first picture is of the needle bearings and retainer cage used to
reduce friction at the connecting rod end of crank (good
condition). This same configuration is used at the piston end as
well. When no oil is supplied, these tiny metal needle bearings
heat up very quickly, because it is metal rolling on metal.
Imagine rubbing your fingers on a piece of fabric non-stop. You
burn your fingers in a matter of a few seconds doing this due to the
heat created by the friction.
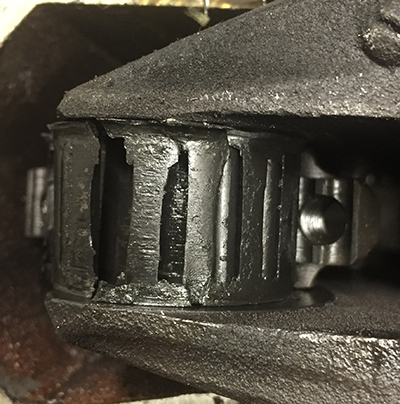
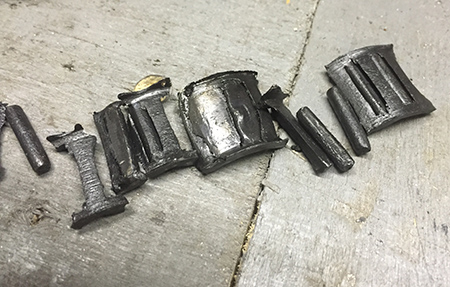
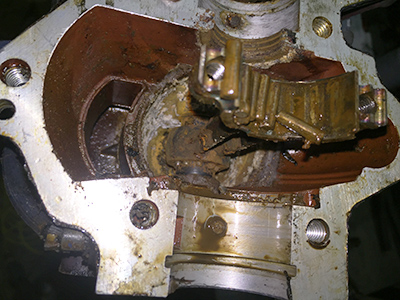
Here are pictures
of the same cage that has been burnt out in a motor where no oil was
used. First picture is the cage still installed with the connecting rod
cap removed. You can see the cage actually melted, and the needle
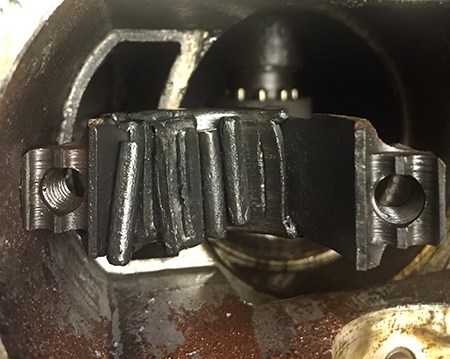
bearings melted too, into the cage, and onto the rod. Picture #2
shows this also once the crank was removed (which fortunately,
survived the overheat without significant damage). Picture #3 is
what's left of the cage and needle bearings laid out for display.
I had to use a small punch to remove these pieces from the rod, which
was no longer usable due to scoring, melting, and distortion sustained
on the overheat.
Upon removal of the top piston, it was clear that this powerhead
suffered catastrophic damage with the scoring of the cyilnders,
pistons, rings, and just general distortion throughout. Again,
somehow the crank survived this mess and crank bearings were OK too on
all 5 journal surfaces, surprisingly. The scoring was so bad in
the cylinders I could catch my fingernail on the grooves that were
carved in due to grinding metal. It should be noted that initial
testing of the motor revealed 70 & 120 PSI on the top/bottom
cylinders respectively. 120 is still OK for this motor, but 70
was clearly indicating a problem. There was also a 'catch' in the
normal turnover of the crank, indicating something mechanically was
wrong. I'm impressed the motor turned over at all, given the top
needle bearings on the connecting rod were essentially melted down to
nothing.
Pulling a
Flywheel...The Wrong Way
If you have to service your older style ignition, you have to pull the
flywheel. This is a relatively easy process, and you can use a
steering wheel puller from your local automotive store to accomplish
this. Newer motors (say, post 1976) require a beefier version
specifically made for outboards. You might be able to get the job
done with a harmonic balancer (garden variety automotive store puller),
but that is a gamble at best.
Now, knuckleheads don't use pullers. Correct pullers apply a
relatively universal application of physics to a vertical pulling force
to the flywheel by inserting 3 screws into pre-drilled flywheel holes,
then hitting the flywheel with blunt force suddenly. The shock
wave jars the flywheel loose off the crank taper. Most people
don't realize the woodruff (flywheel) key is NOT what keeps the
flyhwheel on the crank...it's the taper of the flywheel and crank.
What knuckleheads do is use pry bars or mallets to try and remove
flywheels, rather than correct physics. Don't get me started on
Youtube...there is so much mis-information on there, it is about as
gossipee as a politial presidential election, which as of this post
(1/16), is a pretty common climate. What using these WRONG
methods does is distort the mechanical components of the powerhead, and
basically ruin everything. See what a large portion of the
R&D department of these companies do is research the mechanical
physics of a sustainable, reliable motor. I know this because I
have 2 degrees in biomechanics (which is the human application of
physics). If you're off by a few foot pounds in engineering, you
have a short term ticking timebomb.
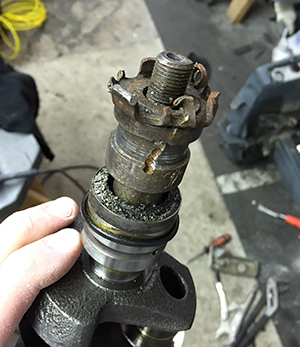
That is the difference between big companies and posers. Here is
a crank I yanked from a good motor that was destroyed by a DIY'er
& his neighbor who tried to perform a repair that was beyond their
knowledge base. Fortunately, I saved this good motor by swapping
cranks and putting the motor back together the way it is supposed
to. It's still out there putting smiles on it's owners face
today. I saved this motor from being scrapped despite one
person's ego quest.
They actually managed to yank the entire flywheel off with exception of
the taper. It is actually more physically difficult to do this,
than to pull the flywheel off itself. They literally ripped metal
in half. When I pulled the crank it was actually in mint
condition, but getting this 'knub' off separately would have been
nearly impossible and impractical to try and do in terms of labor
hours. I had a spare crank to use instead.
Worn Connecting
Rod Bearings
Here
we have a situation where over time, or perhaps due to a lean mixture
(too little oil) situation, the bearings on the connecting rods (which
connect the pistons to the crankshaft) have wallowed out and have some
play. If you watch the video I shot, you'll notice a pop/click
noise when the pistons are at top dead center and bottom dead center
respectively, but no noise when they are mid powerstroke.
This is because while they are mid-stroke, the 'slack' between the
journals on the wrist pins (at the piston) and connecting rod are taken
out. HOWEVER, when at TDC and BDC, this excessive play/spacing
creates a clunk, which is brought out by the minor compression you can
create even when just manaully spinning over the crank by hand at a
crawl-along speed.
This motor ran fine, but was loud as hell at anything much below mid
throttle. The reason is that at 4000 RPM, you could hear the
clang/bang of the rods whacking against the wrist pins and crank
journals. If not for switching out the rods, this motor could
have very well have blown up internally and been destroyed in the near
future.
Broken Crank Shafts
This can happen for any
number of reasons, but generally it's 1 of 2 causes. Either the
motor was run without enough oil (overheated), or it was just failure
of the component itself (uncommon, nothing you can do about
this). Believe it or not, motors will still run with broken
crankshafts! They will be loud as hell and it will be very
obvious something is wrong. If you turn the flywheel over
manually it might present as a clunk or 'sticking' at the same point as
the motor turns over. If the motor is continued to run then it is
a guarantee of permenant damage. Once the cylinders are scratched
up from pieces of metal, then the powerhead probably will need total
replacement.
Exhaust Mix Build Up & Bad Performance (11/26/18) Internal
combustion engines rely heavily on their ability to 'breath.' In other
words, air/fuel mix flow through the engine, the speed, and the
quantity dictates power produced. There are of course, several other
factors and this is an over simplified concept I am presenting, but
fundamentally this is what we're going to consider for now.
Think of a motor as a donut. Fuel enters through one end, combusts,
then exits through the other end of the donut. In greater detail, the
mix enters via the fuel manifold (leaf plates), passes through the
crankcase, continues down the air intake side of the combustion
chamber, is compressed and ignited during the power cycle in the
cylinders, then the burnt exhaust mix (which still has some unburned
fuel) exits via the exhaust ports in the cylinders. It continues along
down the exhaust housing, and most modern day motors post 1968 have an
internal tube used to tune or accelerate the exhaust leaving the motor,
directing it the air flow away from the powerhead.
Remember that when air enters a chamber, and equal amount needs to exit
otherwise the chamber is pressurized. Think about blowing air into a
soda bottle; you can inflate the bottle slightly with the strenght of
your lungs but not much because the soda bottle is rigid plastic. You
can, however, inflate a rubber balloon easily but you still see
resistance.
In a motor, the throughput of the air/fuel mix makes a big difference.
If it encounters resistance this will cause a power drop in the motor
because it simply can't breath. Consider blowing air through a straw.
Not that easy, right? Well that's because the tube is very small and
the air encounters friction against the walls of the straw. Now if you
try the same thing on a garden hose, it's easy to blow air through it
because the inside diameter is larger.
In outboard motors the air/fuel mix isn't completely burned, meaning
some of it is sent out of the motor mixed with water (at least, not in
carbureted motors). Over time, and if the engine hasn't been tuned for
awhile (i.e. running cold, running rich, etc.), this fuel mix with
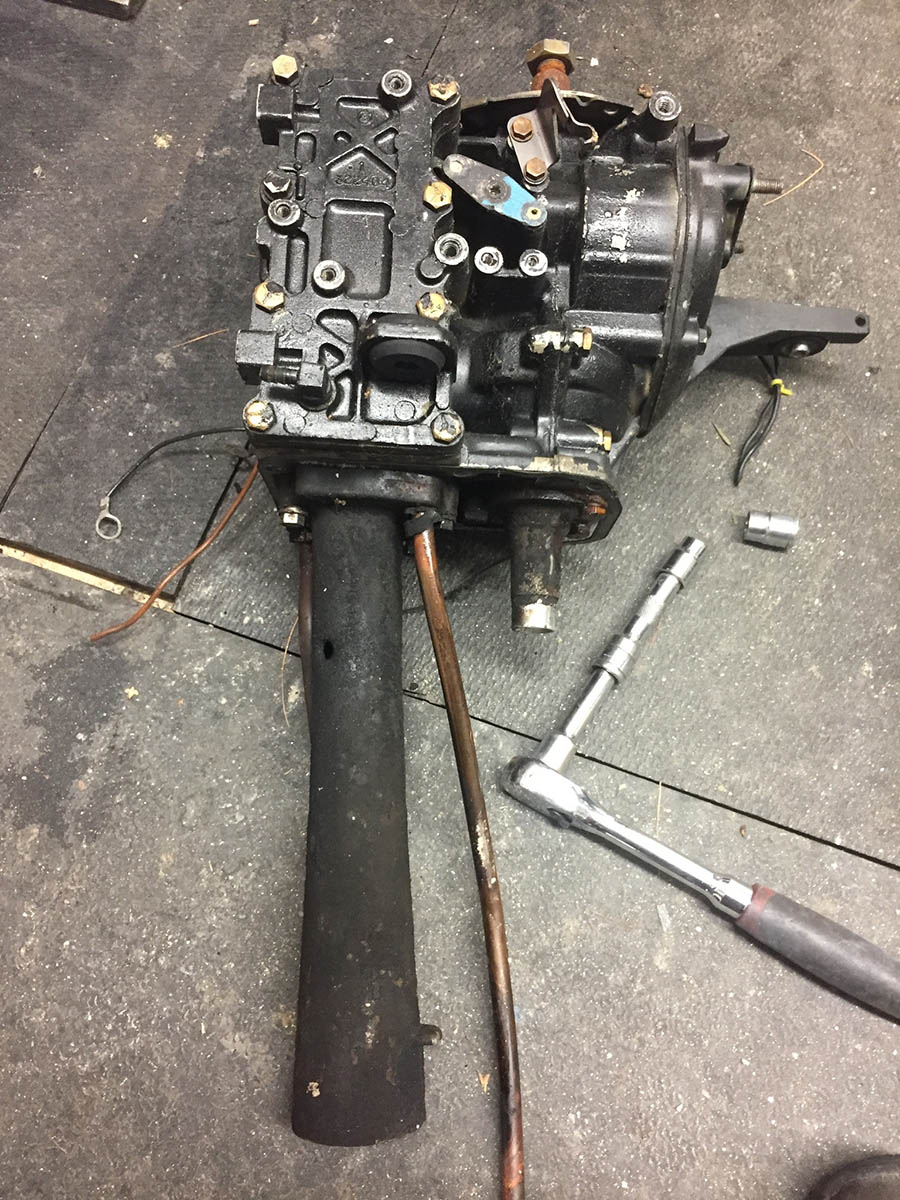
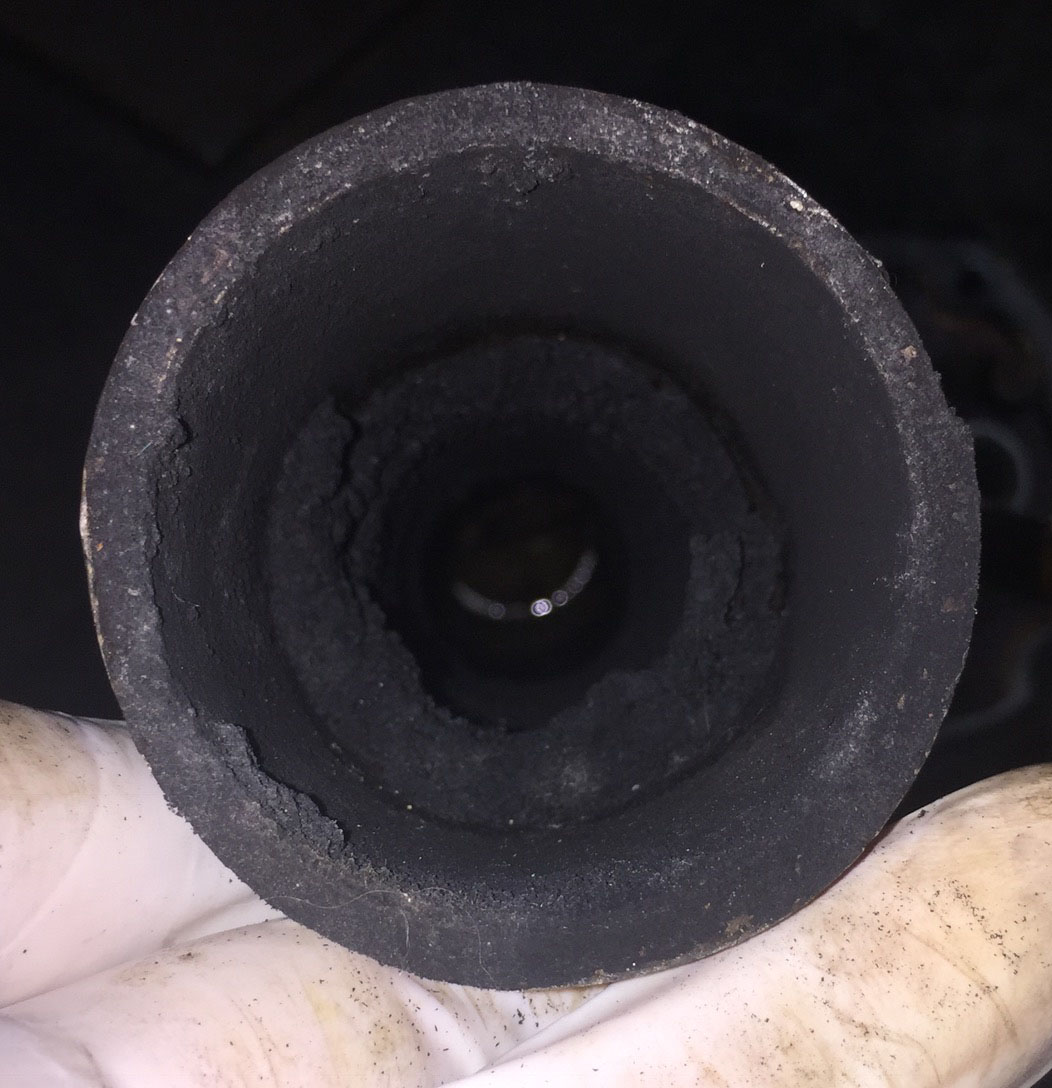
exhaust cakes up inside the engine. Below are two pictures, the first
one shows a 15hp powerhead that had been removed from the lower motor
pan and exhaust housing, you can see the long black tube attached to
the bottom of the powerhead which is used to tune the exhaust and
squeeze more power out of the engine by allowing it to breath better.
Well, this motor ran, but was a bit of a dog at the top end and
sluggish at the bottom. Closer inspection revealed about a 1/2 inch of
caked up exhaust inside the tuning tube, which meant the engine simply
could not breath the way it should and was loading up at low RPM and
starved at high RPM. A mechanical cleaning of this tube and normal
operation was restored. This was caused by not running 'engine tuner'
through the motor periodically.
Here
is a video of me running a 70hp, 3 carburetor Johnson. These
motors are sensitive to trim height because they are loop
charged. The beginning of the video shows the motor trimmed high
enough where most of the exhaust is out of the water, allowing the
motor to breath normally. The lower I trim the motor, the lower the
RPMs go, and fully trimmed down it starts smoking like a chimney and
you actually hear a couple of lean running 'sneezes.' Well, this is
because the motor can't breath because it is almost swamped, and the
oil in the carburetors are partially blocking fuel flow. When I trim
the motor back up, it starts idling faster and smoother. Pay attention
to the audio on the video clip and you can really hear the difference.
It should be noted that this sensitivity can be amplified by a cold
running motor, or one that is very high hour and getting worn out. The
motor ran fine otherwise, but would load up/stumble/choke itself out
when sitting so low on this heavy hull boston whaler from the 1960's.


 After fully removing the
pistons, it reveals further damage on both cylinders. This motor
is obviously toast and not worth repairing. The pistons actually
came out pretty easily after a few driving blows; the combustion
chamber side was still in reasonable shape. But since it had been
stored away in a basement for years, never fogged (oiled), and worst
yet, left with the intake/exhaust ports open, this allowed air/moisture
to pass through the motor.
After fully removing the
pistons, it reveals further damage on both cylinders. This motor
is obviously toast and not worth repairing. The pistons actually
came out pretty easily after a few driving blows; the combustion
chamber side was still in reasonable shape. But since it had been
stored away in a basement for years, never fogged (oiled), and worst
yet, left with the intake/exhaust ports open, this allowed air/moisture
to pass through the motor.