Disclaimer: The
information provided should never replace common sense or the
recommendations of the OEM. I do not assume responsibility
for
the use or misuse of this information. The information provided
is
based on my experience working as a full time mechanic, on hundreds of
motors over time, reading a lot of manuals, education, and consulting
other experienced mechanics along with a number of retired service reps
I am friends with.
If
I can offer
any advice from
experience, it would be NOT to try and fix your own motor if you don't
have a good understanding of what you're doing. You need to have
the right special tools, reference materials, and most importantly,
UNDERSTANDING of what is wrong and how to properly fix this
issue. Most people do more harm then good if just messing
around blindly. The reason why I can do these repairs is I've
put in thousands of hours reading, fixing, and practicing. I
learn
something new everyday. I have also gone out and acquired the
necessary, CORRECT tools and reference manuals to work on the
motors. These are very
important to promote correct operation of the motor. The idea is
to
have a reliable motor, not just one that 'kinda runs.'
Some basics of a gearcase I filmed. I go through this
conversation over, and over, and over each year with customers.
What happens when
you don't maintain a gearcase
Maintenance of a gearcase isn't all that complicated. OEM
recommendations are to change your oil once a season, or every 50
hours, whatever happens first. The problem is, how do you know
how many hours you've logged? The simple way, is to buy a
tachometer/hour meter off of ebay. These serve 2 great purposes,
1) to keep a log of how many hours, and 2) to properly set up your boat
with the correct propeller (see the guide page for more info).
If you don't change your oil regularly, that's like running your car
without changing the transmission fluid. Outboard gearcases take
a lot more abuse than your automobile does (most cars go 40-50,000
miles, or roughly 4-5 years, before changes...I do it annually).
The other problem is if your gearcase has water intrusion (which there
is always a little bit, even when it's perfect), or if your seal(s)
have failed, you are on a short amount of borrowed time. This is
why you should have your motor serviced at least annually to monitor
it's health.
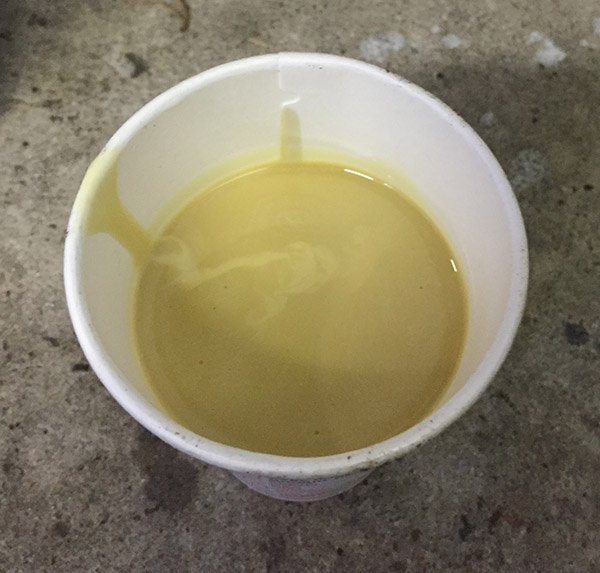
Below is a picture of gearcase oil that has been contaminated with
water. If it looks 'milky,' you have water getting in and
shouldn't run the motor again until it's been addressed. This can
happen after just 1 outing for a few minutes. All depends on how
bad the leak is. Regardless, don't use the motor until it's fixed
properly! The oil should look relatively clear, but may be
different colors depending on the brand; brown, green, blue. If
it smells like rotten eggs then the oil is very old, burned, and
expired.
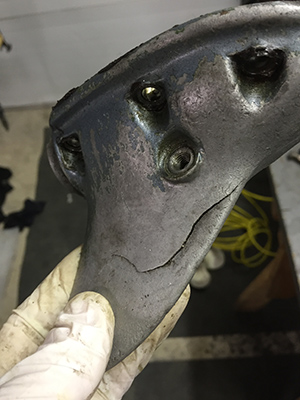
You should certainly change the oil before temperatures drop below
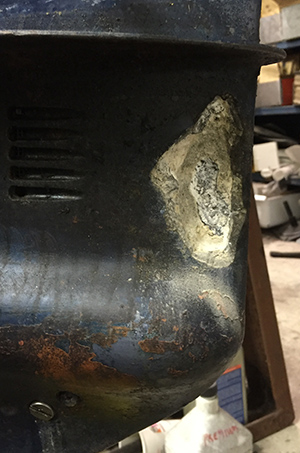
freezing. If there is water in there, the gearcase can split (see
pictures). The pics I have are of a badly split gearcase, where
someone with no clue to what they were doing decided to try and fix it
by putting a glue/epoxy on the inside. This skeg is too damaged
to salvage, and the owner decided to run the motor, and in this case,
run it filled with water, no oil, and when I acquired the motor, had to
do a complete overhaul and replace everything including the driveshaft
with exception of the upper gearcase housing.
If a gearcase is left without new oil and water sitting inside for an
extended period, the other picture is what happens to the
internals. Lots of rust, gunk, and a complete loss. In
other words - CHANGE YOUR OIL REGULARLY. If the internals aren't
corroded, then careful cleaning may be able to salvage them. But
more often than not there is pitting on the metals and it is a
completel loss.
Here
is a wallowed
out berring, which also happens when run with old or bad oil, or worst
yet, straight water due to a crack or faulty seal. The 2nd
picture shows what happens when a lot of water is left in the gearcase
during winter. The pressure of freezing water blew the prop shaft
bearing carriage right out of the back of the housing!
Maintaining Your
Propeller
The
propeller is like your tires, it's where the rubber hits the
road. Make sure the blades are all very closely curved to each
other (in other words, not out of alignment, bent). The leading
curve is the most important one, but the entire blade should be
evaluated. If you see any nicks on the blades, those should be
removed using a metal file. Shave it down to a smooth, tapered
edge. You can repaint the blade using a good automotive paint
(for durability). If you have any major chips or bends, you may
need to replace it or have a marina try to fix it. But these
days, unless you're dealing with an $800.00 propeller (say, for big
boats), it may make sense to go and buy a new one. Most props
aren't much more than $150.00. If your prop is spinning and
vibrating wrong due to bent blades, that can cause problems with your
entire motor, specifically the gearcase, driveshaft, seals, and
potentially the crankshaft and powerhead.
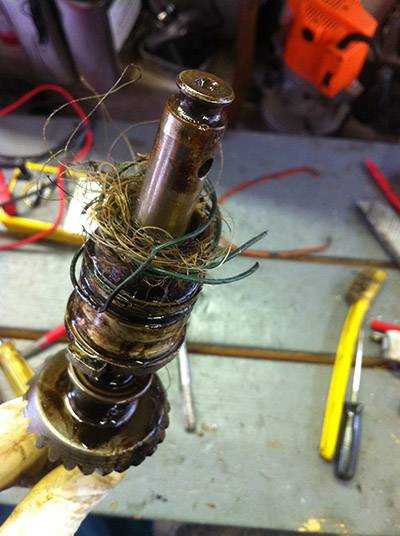
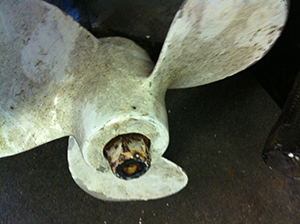
You should pull your prop every so often to make sure there isn't
fishing line wrapped around it. Even if you don't fish, check the
propshaft for line. If you don't, this stuff will wind around
behind the prop in a matter of seconds and cut into your prop shaft
seals, leading to water intrustion, and gearcase failure (quickly,
too). Put some grease on your prop shaft to make sure the prop
doesn't get seized to the propshaft, which I see happen.
The
picture I have here is what I found on a motor where the gearcase had a
bad seal. The beginning of that repair process involves pulling
the prop. This is what I found. It doesn't take long to
figure out why the gearcase had a bad seal after seeing this. There was
about 20 feet of line wrapped around this prop, and it was leader and
regular line, along with 5 hooks. Believe it or not, all of this
was hidden out of sight and could not be seen with the prop on the
gearcase. Picture #2 is what happens if this is left for awhile,
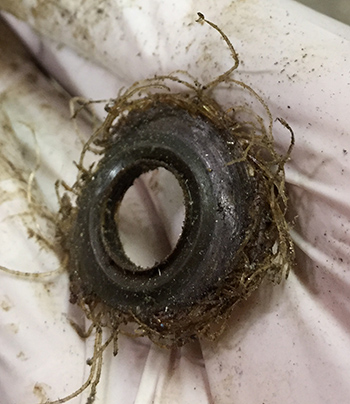
and the line heats up enough (yes, even under water) to melt.
If you allow this
to stay on your prop shaft long enough, believe it or not, rubber and
plastic can in fact cut through metal when enough physics are
applied. Here is a prop shaft that has divots on it from the seal
and fishing line applying friction long enough. The picture
doesn't do it justice; you can take your thumb nail and catch it on the
various "rings" of divots this shaft had. This happens more
frequently on driveshafts, but that is uncommon too.
Your prop nut (if equiped, newer motors have splined hubs, prop nut,
and cotter pin) should be the correct one. Often times the
'redneck fix' is to locktite a hardware store nut to the prop
shaft. WRONG. It usually takes a blow torch and a long
breaker bar to pull the nut off, and potentially drilling out the
cotter pin orifice or even replacing the prop shaft all together if
damaged. Taking shortcuts may seem sensible in the interim, but
causes bigger problems down the road and more repair bills.
(picture 2)
How to Shift
Correctly
This is a conversation I have with every operator that I sell a motor
to, or just generally deal with. The #1 reason why your gearcase
fails is incorrect shifting. If you watch the video on this page,
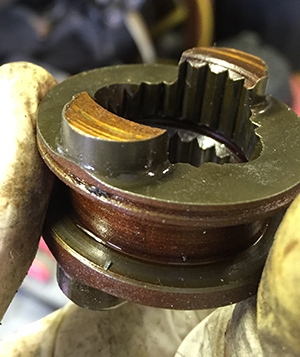
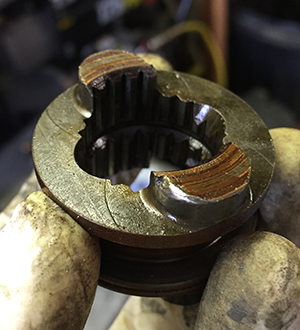
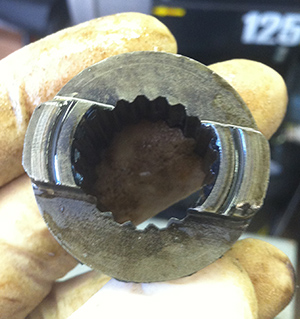
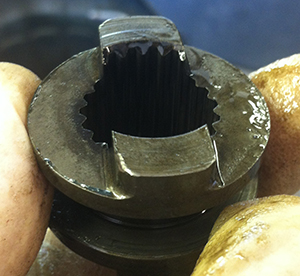
it explains the problem more. Here is a picture of a worn clutch
dog. You should here a 'clunk' when you shift, and do it as fast
as possible, with the motor at the lowest RPM you can make it go (low
idle, for instance).
When the clutch dog is worn, the motor may jump out of gear, or not
stay in gear at all. This may also happen due to a worn forward
gear, or if your shift linkages are not calibrated properly (which
happens a lot with DIY-ers who service their own impellers). The
first picture is of a good clutch dog. Pictures 2-4 are bad (3
different ones...fairly common situation I run into in repairs).
Notice the leading edge is rounded off, where a good clutch has little
to no wear on the leading edge. Some wear is normal, and there is
nothing you can do about stopping this. They all go bad
eventually and this is normal replacement item over time.
Remember many of these things last decades before failure. But if
you're consistently shifting wrong, this will significantly accelerate
this issue, and if you are using a motor with remote controls where
your shift box is set up wrong, you can ruin your gearcase in a matter
of a few days or weeks. All the more reason to have things set up
by a good mechanic.
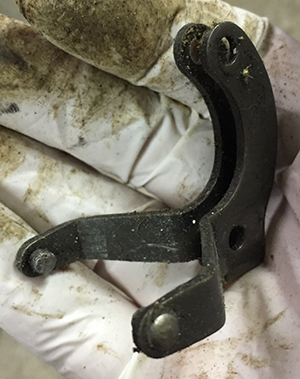
If you don't shift correctly sometimes the shift cradle or lever can
become damaged. These are the least costliest parts to
replace, but will cause the gearcase to jump out of gear at any range,
even idle. A collision with an object can cause this too.
Remember there are a lot of forces being generated by a working
motor. A sudden jolt to these parts get's transferred to
something; there's really no way to predict what can happen.
The top row shows (left to right) 1) a worn lever, 2) what it looks
like zoomed out, and 3) a pitted lever from a rotted out gearcase left
to sit with water and no oil (failed seals, water gets in from
condensation and the motor sitting for years).
The bottom row shows the cradle that is damaged (likely a collision)
and zoomed out what it looks like. In a perfect world, either of
these situations would be the source of a failed gearcase. In
reality, it's almost always the clutch dog or forward gear. The
clutch dog is between $70-200, the forward gear generally is
$500.00+. Not because it costs more to make, but because it is a
common wear item that manufacturers can kill us all on.
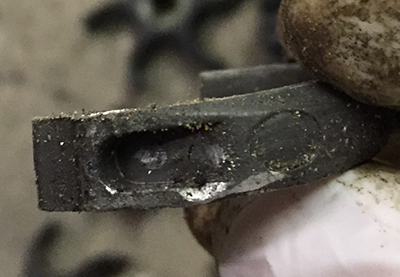
Here
is another pic of a more modern shifter yoke where the hook that grabs
the cradle which actuate a clutch dog has broken off. The motor
was stuck in forward gear; pulling the gearcase apart revealed a simple
problem. Replace this part and voila, the gearcase is restored to
proper working order.
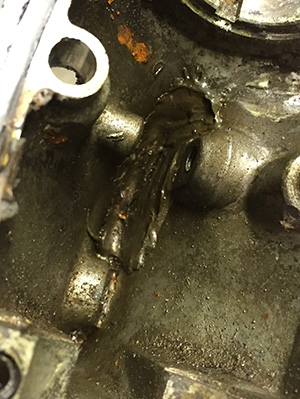
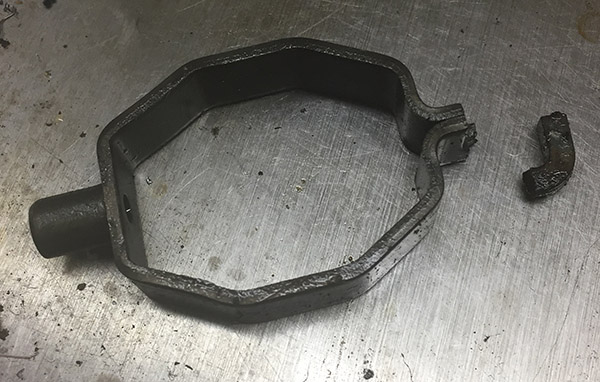
Stuck Driveshafts
Here
we have a situation where you go to remove the gearcase for water pump
service, only to find the gearcase won't come out of the motor after
having taken all the gearcase fasteners out, and disconnecting the
appropriate shift linkages. This generally happens because the
last person who did this forgot to put grease on the driveshaft splines
and/or put an O-ring at the top of the driveshaft if the motor calls
for it (some don't). Again - this is amateur hour at it's finest.
Now your driveshaft has seized up into the crankshaft of the
motor. The next option is to force the gearcase off, causing the
driveshaft to pull up through the impeller housing and breaking a small
portion of the impeller housing due to the impeller key forcing it's
way up through the impeller housing. On newer motors where the
housing has a water seal, this will require a full replacement of the
imeller housing. But this is the least of your
problems. Now you have to figure out how to get the driveshaft
out of the crank, if even possible. I have had about a 50%
success rate at doing this. If you can't get the driveshaft out,
whatever way you try, then you have to do a full teardown of the motor
and replace the crank. Lots of headaches.
For the average person, you might as well accept the fact that you will
need to buy a new motor at this point. Cranks cost a ton of
money, and there will be many, many hours of labor involved and other
parts (i.e. gasket, fastners, etc) that now need replacement. The
reason is because when you pull the motor apart completely, chances are
the gaskets that hold it together will not be reusable.
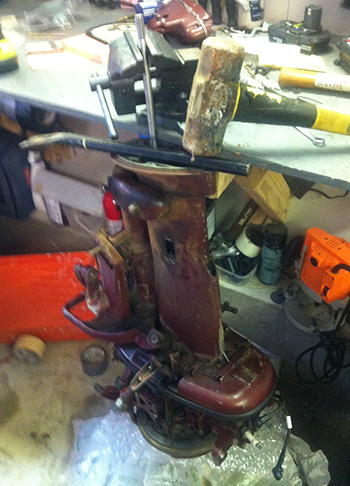
You *might* get lucky by hanging the motor upside down from a vice and
pouring a lot of penetrating oil down the driveshaft to the bottom of
the powerhead. From here you put a large piece of thick flat
stock metal across either the exhaust housing or the bottom of the
powerhead, then strike it with a 8lb sledge. This works sometimes
and when done correctly will not damage the motor (you may damage the
lower crank seal, still requiring a full teardown of the motor to
replace the seal). Depending on the motor, this may not be
possible, particularly for very small or very large motors.
Either you're going to break the exhaust housing or powerhead striking
it, or the motor is too big to hang upside-down to attempt this
process.
Just another reason to leave repairs to someone who knows what they're
doing.
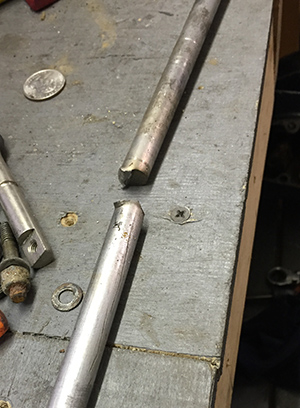
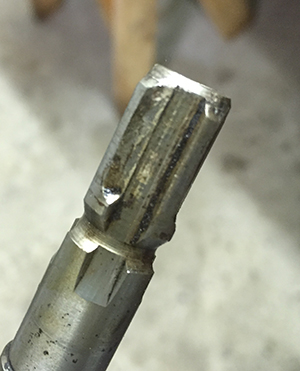
I had a customer donate a 15hp motor one time (this happens frequently
with people who decide to take on jobs well outside of their knowledge
base, usually destroying the motor, and donating it when they buy a
replacement). The motor showed up with the driveshaft cut in
half. Keep in mind this is 3/4" stainless steel rod.
(picture 1 below)
He went on to explain that the motor wouldn't shift, and when he went
to pull the gearcase off the driveshaft was stuck in the crank.
Rather than follow the procedure he should have, he made a bad problem
catastrophic by cutting the driveshaft in half. I was able to
remove the driveshaft after pulling the powerhead and using the process
I described previously.
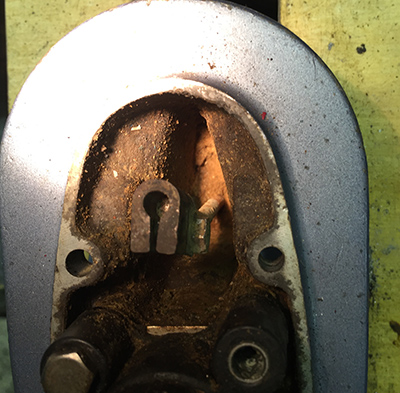
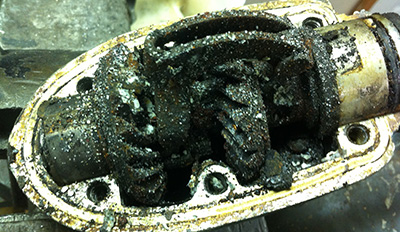
Water Relief Holes
and Why They're Important
Continuing on from the previous title (stuck driveshafts) the gearcase
was a different story. The reason why the
shifter wasn't working is because apparently he had used the motor in
shallow, sandy waters quite a bit. Most gearcases have water
relief holes to allow water to drain out of the various passages and
cupped internal sections. This helps prevent filty build up,
carbon and exhaust ooze to wash away, and otherwise discourage burst
housings due to water freezing when left out to cold climates (picture
2).
When these passages
get clogged, this allows sand and other debris to accumulate and start
to cause issues. If you are exposed to salt, this can quickly
become a problem. If you are not in salt, it will still cause
problems if neglected. This can also happen quickly too.
The shift rod was stuck because there was about 2-3" of solid packed
sand that had become so hardended that it had the consistency of
cement. After working on it for about a half hour with a pick
and, believe it or not, a wood boring drill bit, I was able to free the
shift rod up.
Getting to the water relief hole proved impossible (which is common),
so I ended up drilling another 1/4" hole above the original
configuration. Later revisions of this same motor had larger
holes drilled (about 3/16" - 1/2") to essentially eliminate this
issue. The sand was so densely packed that the chances of any
significant water getting into there and causing issues seemed very
unlikely. The pictures below show the internal gearcase before
and after I cleared it out. I was able to restore this gearcase
to proper working condition.
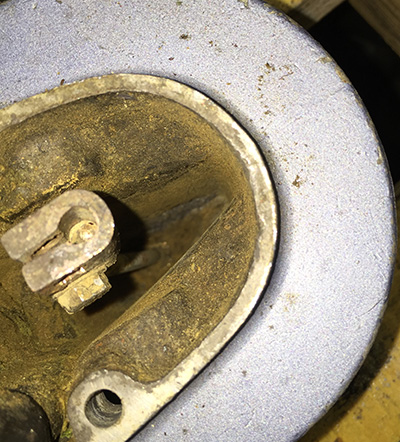
When I pulled the 'nub' of the driveshaft from the crank, it revealed
that the crank orifice was also full of hard packed sand, with no
evidence of having grease. This is why the driveshaft was
stuck. I also had to use a pick, compressed air, and repeatedly
driving the driveshaft 'nub' into the splines of the crank orifice to
essentially purge all contaminants until it could be installed and
removed normally. I actually would up using the removal trick 8
times in a row, each time getting easier and easier, until eventually
the driveshaft could be removed with just the force of my arm pulling
on it (normal). Adding plenty of grease and making sure both the
female and male end splines where clean brought things back to normal.
Once again, poor servicework by either a low-skilled mechanic or
unknowing operator lead to needless headaches and problems for this
motor. Fortunately, I was able to restore it to proper working
condition and it lives on to put smiles on it's new owners face.
This is a happy ending, but for everytime this has worked, I can think
of at least the same number if not more times where I have to replace
the crank and driveshaft completely to restore the motor, or just send
it to the scrap yard. All due to laziness/incompetency in
carrying out a repair properly.
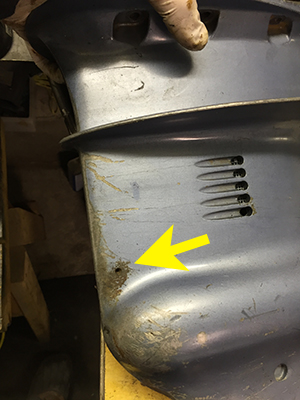
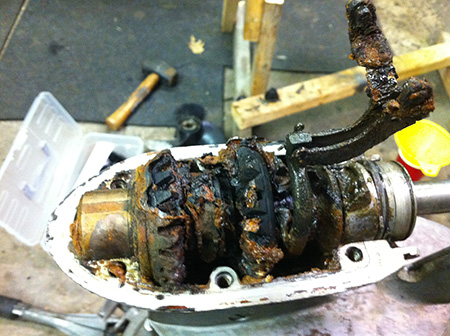
Here is a picture of what happens when you let this stuff build up with
salt and sand, then let it freeze. This is from another 15hp
gearcase, and it actually blew out completely. Let's just say the
first words out of my mouth when I saw this weren't exactly "I have to
take a picture of this one." You can fill in the blank.
Stuck/Frozen
Shifters
If you have ever
tried to shift a motor while it wasn't running, you may have noticed
that it won't shift. This is normal for a motor that is
off. What is happening is the clutch dog lugs are lined up with
the lugs on the forward or reverse gear, and when you pull/push the
shift lever to slide the clutch dog along the prop shaft, it can't
interlock with the respective gear because of being out of
alignment.
This is why you shouldn't try to force shift your motor when it isn't
running; you can in fact break things fairly quickly if you are really
persistent. If you MUST shift your motor into gear while it isn't
running, you should turn the flywheel clockwise (to avoid potential
water pump damage) OR you should turn your propeller either direction
to change the orientation of the clutch dog and avoid the lock
up.
Before doing any of this,
remove the plug leads off your motor, or better yet, remove the spark
plugs completely. There is such a
thing called 'runaway motor
phenomenon.'
It is rare, but your motor can in fact run without the plug leads
attached to the spark plug wires if enough carbon/fuel build up is
gunked up in the combustion chamber, and static electricity/charge
decides to detonate that gunk. This can and will happen with no
warning, rhyme, or reason. And most people like their
fingers/hands just right where they are.
Now if you are doing either of these things (turn the flywheel or the
propeller) and you still can't shift, then you may have a real
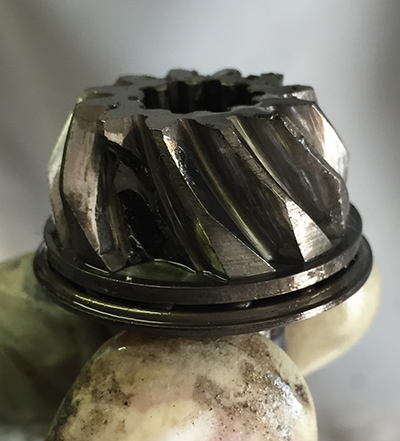
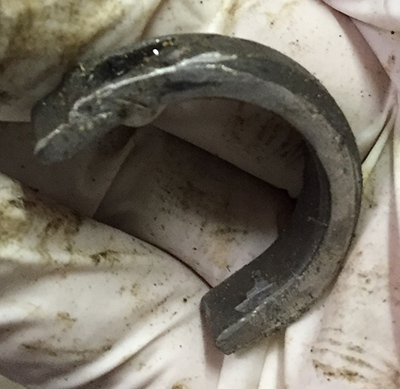
problem. I have run into a few situations where the pinion gear,
which sits at the bottom of the driveshaft and articulates with both
the forward and reverse gears constantly, has broken a tooth (or
two). This could happen for any number of reasons, but if it does
and that tooth happens to find it's way between other gear teeth, then
your gearcase can quickly become blown up internally. If somehow
you luck out and it finds it's way to the bottom of the gearcase where
the magnetic pickup is (most gearcases have a magnet which picks up any
metal shavings that inevitably accumulate from gear wear), you may
not notice any problems, but you will eventually at some point.
The other scenario is that tooth could become lodged in such a way that
it prevents the shift cradle from actuating properly, and stop you from
being able to shift forward, or reverse, or at all. Here is a
picture of a pinion gear with a broken tooth. The gearcase would
not shift into forward, and after opening it up and replacing the
pinion gear, it worked properly.
Before you get worked up, make sure you don't have your throttle all
the way up to the point where the low idle lockout isn't
engaged. Many motors post 1960 have a cam/mechanism which
prevents a manual starter from working when you are throttled up
high. The reason for this is if you accidentally turn off the
motor and are in forward gear, then try to start the engine up, you
could easily fall out of the boat (or a passenger), then the motor
makes a hard port side turn, circles around, and you get run over by
the propeller and die. This happens every year in every state due
to broken remote steering cables (make sure you check them
regularly).
These basic safety features also prevent you from shifting out of
forward gear into neutral or reverse when at wide open throttle.
What happens when you slam your brakes on in your car without wearing a
safety belt? You go out the windshield. Well in a boat, you
fly out of the boat (or a passenger), then get run over by your own
boat, and die. Again, boating isn't for everyone. You have
to have at least >some< brain activity to be a good skipper.
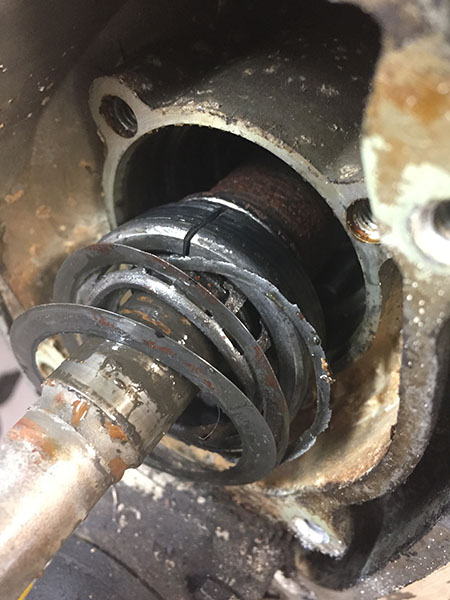
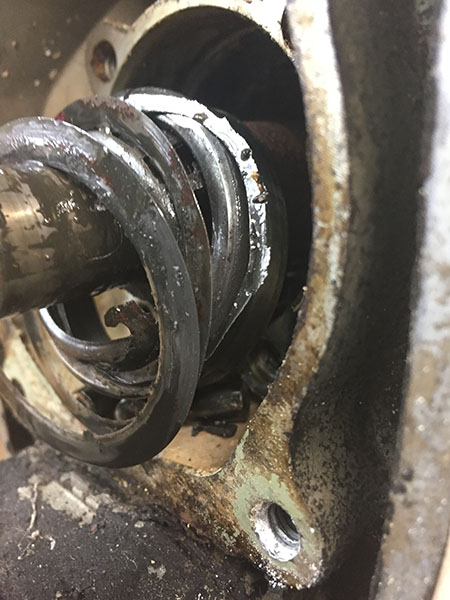
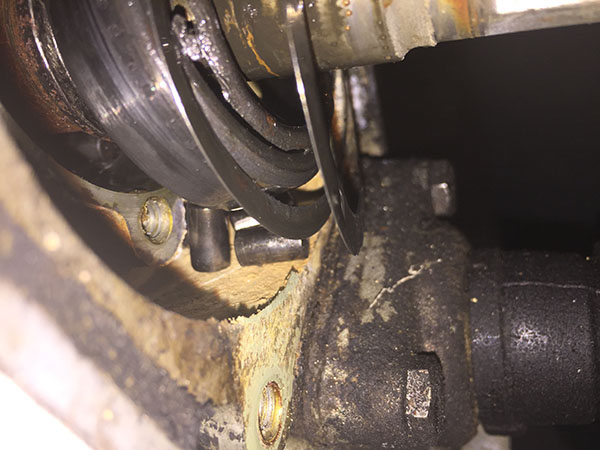
Why O-Rings Are
Important
Another customer
brought in a motor (which he subsequently left behind)
where he stated he had put the motor away and fogged it, but after
letting it sit for a few months, had become stuck. I was able to
move the flywheel with great effort and a long socket wrench (no
cheater bar). The cylinders appeared OK with visual inspection,
but I suspected he had somehow overheated it and caused a bearing to
get stuck or fail, or perhaps the gearcase had not been changed out and
water infiltration had somehow made the driveshaft and internals get
stuck. The other possibility is that the impeller was very stuck
or broken down, and jamming up the internals of the impeller housing.
On trying to remove the gearcase to eliminate that as a source, the
driveshaft had become seized up in the crank (or at least we both
though at the time). To carry out more repairs would have cost
more than what the motor was worth, so I reluctantly accepted it as a
parts donor. This motor had been used over in Kittery, ME, with
frequency, and this particular customer had stated he could not get it
to run consistently well and had fooled with the oil mixture.
That obviously was a very large red flag for me, and indicated that he
plain had no idea what he was doing, because the oil mixture (or
potential lack thereof) would not be a source for a motor running
poorly, unless he was putting way too much oil into the fuel.
So off came the powerhead. 5 broken gearcase screws, 1 broken
powerhead mounting screw, 2 broken inner exhaust tube screws
snapped. Last was the lower powerhead/upper driveshaft water seal
bearing. Surprisingly, all 3 screws came out easily, and so did
the driveshaft...still seized up in this bearing housing! Voila,
the powerhead turned over as normal, and the source of the issue was
clearly this seized housing.
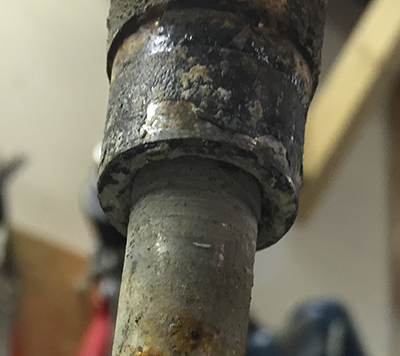
(Left to right) You
can see the upper driveshaft seal bearing seized onto the
driveshaft. The driveshaft itself came out the crank easily as
normal. The lower aspect of this bearing had become so
infiltrated with salt and standing water, that as this crystalized it
slowly squeezed down on the driveshaft when the motor was left to
sit. But this is unusual. After holding the entire bearing
and driveshaft head under a 600° flame for a minute or two, the
aluminum expanded enough where I was able to use a vice as a narrow
passage to ram the bearing off the driveshaft. This took about
50-70 hard blows, so the bearing carrier obviously needed replacing
once finally removed.
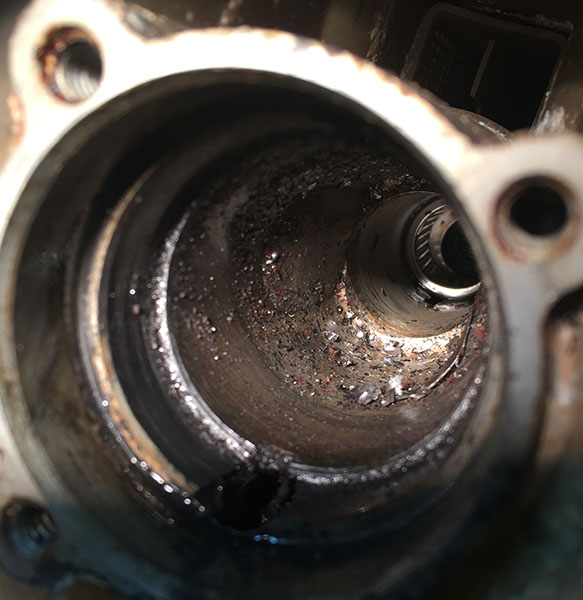
The last picture shows just how bad the salt intrusion had gotten, but
the 'smoking gun' was the complete lack of an o-ring at the neck of the
driveshaft. This is the source of the problem; either the
customer or a lazy marine tech had serviced the impeller and forgotten
to replace the driveshaft o-ring and/or grease the splines. The
o-ring is responsible for preventing water from working it's way up to
the splines and making everything get stuck, the grease further
discourages this. It is also an indication that the customer
probably didn't carry out normal service maintenence. Again -
another reason to make sure these jobs are done by a good
mechanic.
I ended up scraping out the exhaust housing in lieu of a replacement
(too many salt issues), but the powerhead itself was turned over
correctly and showed excellent compresion, along with several other
components. So this motor ended up being a transplant to a happy
ending to this particular story, and is still trolling the waterways
today with a new operator.
Odd Driveshaft
Situations
Driveshafts are
responsible for transmitting the forces created in the
powerhead to the gearcase, creating propulsion. Logic would point
to reason that they are one of the more susceptible areas of the motor
to high applications of torque (or rotary forces, twisting
motions). Here is a driveshaft from a gearcase that had been in a
collision. The gearcase itself had a partially broken ventilation
plate, and required full inspection (consequently, it could not be
returned to service).
You can see in the picture that the splines are actually twisted; the
pinion gear (which goes on the bottom of the driveshaft and engages
your forward and reverse gears) was actually still OK. This
driveshaft could no longer be used because clearly the metal had
actually twisted. You can see where the splines of the pinion
gear actually 'chewed' up the splines on the lower driveshaft during
the jolt of force. It's sort of like bending a piece of wire; if
you keep bending it back and forth, eventually it will break. You
don't want a weak driveshaft.
Basically the motor was in forward gear winding out, and then the prop
suddenly stopped due to the collision. Then started spinning
again. Now props are designed to slip around their hubs in these
situations, but remember your boat is flying forward. All that
force has to go somewhere! In this example, a good portion of
that force went into the driveshaft splines. There's no way to
predict what is going to happen, it just does.
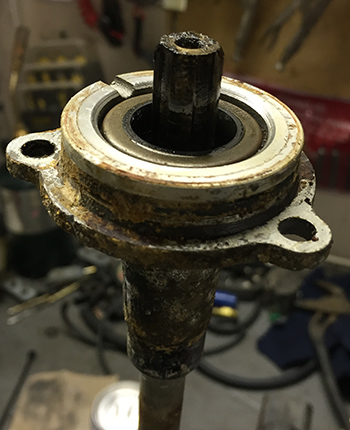
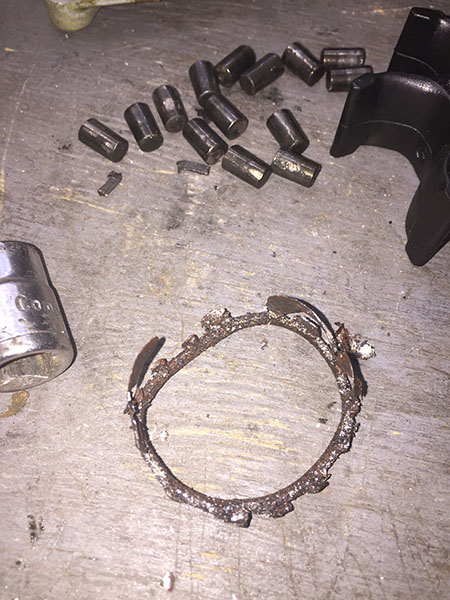
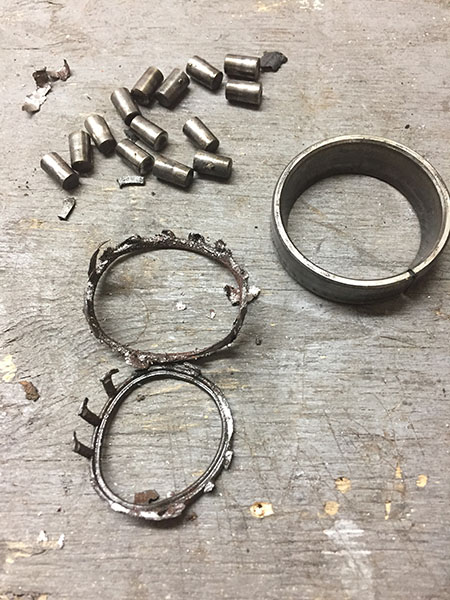
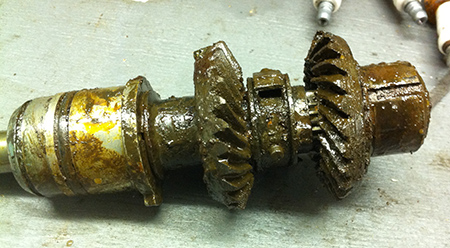
Driveshaft Bearing
Failure
Larger gearcases need beefier components to handle the torque and
stress placed on their components. One way to handle the extra HP
put out by the powerhead is the implementation of bearings at the
driveshaft. Just below the impeller (water pump) housing is a SS
plate, and below that plate is a bearing housing. In most motors,
tiny shims are used to line up the pinion gear with the forward and
reverse gears in a very precise manner. The roller bearing, which
is pretty much the same type of thing you find in your trailer tire
hubs, helps stabilize the driveshaft and along with the bearing housing
and seals, gives the driveshaft some extra support (say, about 1/3rd
the length up from the lower splines of the shaft).
I had a customer bring in a 40hp motor where he said the motor would
not stay running once he shifted it into gear. He had owned the
motor for a long period of time, and been doing a fair job of keeping
up with normal maintenence. Out using it one day, it started to
make a whining noise, lost power, and stalled. He was able to
restart the motor, but it would stall as soon as it went into
gear. So running fine in neutral, but quitting in gear? It
is easy to surmise that neutral = NO LOAD. In gear = LOAD, so
evidence points in the direction of a gearcase issue.
Pulling the gearcase down off the motor, the next step was to pull the
gearbox apart and see if it was a matter of stripped out gears, a
failed pinion, who knows what? After 'gutting' the gearcase, I
found the gears to be in good shape, and was left saying, what is the
issue here? These larger gearcases have a pinion gear with a nut
holding it to the driveshaft, rather than splines like their smaller
counterparts. Pulling the driveshaft bearing housing, it became
very obvious what the problem was - the bearing had
disintegrated.
These bits and pieces you see in the gearcase driveshaft orifice are
metal shards, and you can see the roller bearing cage had failed, the
needle bearings came loose, and were instantaneously shredded.
Keeping in mind the forces applied in a split second; the driveshaft is
spinning at 3, 4, 5,000 RPM, and now it can start wobbling out of sync,
and the needle bearings are tumbling around. The flat discs are
the shims, which are set at a precise relationship using a special
calibration tool.
The picture you see with the sparkles are metal shards, and then you
can see what the individual pieces (or remnants) looked like when
spread onto the work bench. The bearing retaining ring was still
mostly there, albeit scored and scratched from metal shards being
abbrasive.
Anti-Ventilation
Plates, Drag, Draft, and Hydrodynamics
This is the large
flat plate located directed above the prop.
These are most important from 1/2 to full throttle range. The
main purpose is to prevent air from entering into the spinning prop,
which can cause slippage, but also ventilation. Cavitation is a
different situation, which is influenced by many different
factors. A more in depth explanation can be found all over the
internet, here is one example.
Keep in mind that correct installation of the motor plays a major role
in the effectiveness of this plate, along with the size of your vessel,
load, and prop size. Generally the plate should be the same
height as the bottom of your boat, but this doesn't guarantee
effectiveness. Talk to an experienced mechanic to make sure your
motor is set up the right way.
The video I shot below was at wide open throttle on my Boston Whaler
17' NewTauk (a custom combo boat I built). This is a 70hp motor, and
you can see the water discharge just above the ventilation plate, and
also from the exhaust relief holes near the top of the exhaust housing.
It is 'blubbering' out. Keep in mind the boat is moving about 34mph in
this video! If you use the YouTube control panel, you can slow down the
video to 1/4 speed and also increase the video quality to make it
easier to see. You can also make the video go to full screen mode for
easier viewing.
It should also be considered that this plate can also cause drag and
slow the boat if
the engine is installed at an incorrect height or trimmed improperly.
You can play with the power trim height (or manual trim on smaller
motors) to improve your boats efficiency and performance.
You can see
by watching the video that the plate is 'even' with the way the water
is flowing from underneath and behind the boat as it hydroplanes across
the surface of the water. This is very important.
For one thing, it means the boat is gliding across the surface of the
water with the least amount of drag. You may read reviews and
specifications on boats that talk about "DRAFT." What this means, is
the amount of the boat that actually sits under the surface of the
water when the vessel is on plane. This is very important. The greater
the draft/depth of the boat in the water when 'up on plane,' the more
drag the boat has in the water, or generally speaking less HYDRODYNAMIC
the boat is.
Ever hear of a sedan being more AERODYNAMIC than an SUV? Well that's
because the SUV is generally a big box, so it creates a lot of wind
resistance as it moves along, which in an automobile application means
more wind drag, or less fuel economy all things being equal.
This is also why it is important to consider these things with boats.
Guess what happens if you have a bimini top deployed/opened? Well, you
are creating more aerodynamic drag which slows down your boat. You can
also consider how gearcases have been redesigned, with the most
significant design changes being developed by OMC (Johnson/Evinrude)
back in the late 1960's. It is the same design that all manufacturers
still utilize today.


 Here
we have a situation where you go to remove the gearcase for water pump
service, only to find the gearcase won't come out of the motor after
having taken all the gearcase fasteners out, and disconnecting the
appropriate shift linkages. This generally happens because the
last person who did this forgot to put grease on the driveshaft splines
and/or put an O-ring at the top of the driveshaft if the motor calls
for it (some don't). Again - this is amateur hour at it's finest.
Here
we have a situation where you go to remove the gearcase for water pump
service, only to find the gearcase won't come out of the motor after
having taken all the gearcase fasteners out, and disconnecting the
appropriate shift linkages. This generally happens because the
last person who did this forgot to put grease on the driveshaft splines
and/or put an O-ring at the top of the driveshaft if the motor calls
for it (some don't). Again - this is amateur hour at it's finest.