Disclaimer: The
information provided should never replace common sense or the
recommendations of the OEM. I do not assume responsibility
for
the use or misuse of this information. The information provided
is based on my experience working as a full time mechanic, on hundreds
of motors over time, reading a lot of manuals, education, and
consulting other experienced mechanics along with a number of retired
service reps I am friends with.
If
I can offer
any advice from
experience, it would be NOT to try and fix your own motor if you don't
have a good understanding of what you're doing. You need to have
the right special tools, reference materials, and most importantly,
UNDERSTANDING of what is wrong and how to properly fix this
issue. Most people do more harm then good if just messing
around blindly. The reason why I can do these repairs is I've
put in thousands of hours reading, fixing, and practicing. I
learn
something new everyday. I have also gone out and acquired the
necessary, CORRECT tools and reference manuals to work on the
motors. These are very
important to promote correct operation of the motor. The idea is
to
have a reliable motor, not just one that 'kinda runs.'
During the repair process and evaluating cooling
system performance,
there is one area that most people don't check. That is - the
thermostat. Nearly every modern day motor over 5hp has one of
these installed, and it controls the amount of water flow through the
cylinders to help the motor run at the right temperature. The way
most of these works with a temperature (and pressure)
'thermo-ferm.' Commonly, around 143°, the thermostat opens, and
allows water flow.
So if your motor is cold, it stays shut, but usually allows a minimal
amount of water to flow. Once the motor warms up, it's time to
keep it from overheating so it opens and allows cool water to flow by
the hot cylinders, where there is essentially a wall of flame inside
from the ignited fuel/air mixture.
Now the issue is that these things can fail either closed or
open. If open, the motor won't fry, but it won't run right,
either. It will smoke like hell, blugger, hesitate, fowl plugs,
you get the picture. If closed, your motor is going to overheat,
potentially even at idle on a warm day.
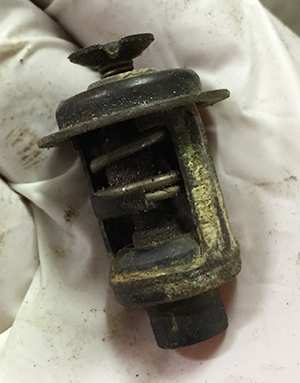
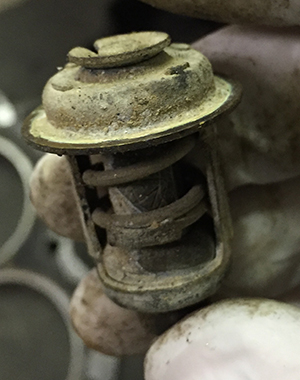
The
pictures below are of failed thermostats stuck open (last one is stuck
closed). If old
enough, these things can actually break apart, or get clogged up with
debris, salt, leaves, dirt, etc. It's a good idea to replace it
every couple of years, or at least have your motor gone through for an
overall tune up once a year. It may seem like an unnecessary
expense, but it's actually a marginal investment (worst case, about
$100 for a newer motor). There is no way to predict when this
might happen, and random bad luck could also strike you. The
reality is you can change it out every day, but that doesn't guarantee
any extra protection. They just fail.
Remember overheats are
caused by no water cooling or no oil in the fuel (2-stroke).
Clogged Thermostats
The 2nd issue you have to watch out for is debris accumulating in or
around the thermostat and clogging it. The water intake screens
prevent debris larger than a couple of millimeters from entering the
cooling system, but silt and sand, broken down leaves, weeds, fish
scales, marine plants...they can all find their way into your cooling
system, even small pieces of fishing line.
Now the thermostat is supposed to open, roughly at 143°. This
SHOULD allow a clog to be flushed out, especially if you 'gun' the
motor to increase water pressure. However, this does not always
happen. In particular, if you have a clog and shut the motor
down, the debris can dry out, harden, and then really lodge
itself. This can further complicate things because if the
thermostat is fully clogged, and you shut the motor off, the water in
your cooling system can slowly drain back out of the motor creating an
air pocket.
So next time you go to run the motor the air pocket (if the clog is
thick enough) stays around the cylinders, and you are essentially
running the motor with little to no cooling action. If you turn
the motor on and see nothing coming out of the water telltale ('pee
hole') or exhaust relief (usually at the top of the exhaust housing)
within a few seconds, then you have a real problem and should turn the
motor off right away. If you see steam coming out, that means
there is a trace of water getting through, but you should pretty much
always see a steady stream of water coming from the motor. Modern
day motors come equipped with an overheat sensor, so if this alarm goes
off there is your confirmed evidence. But that is assuming your
temperature sensor is working and/or your alarm is functioning
correctly.
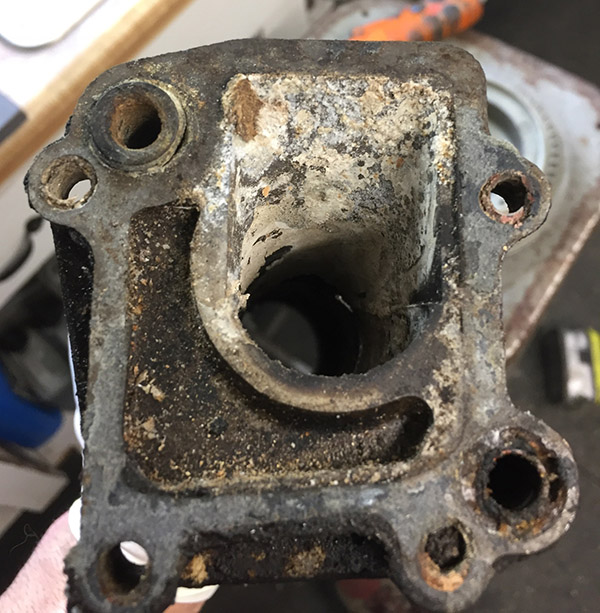
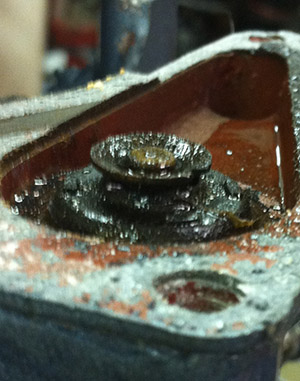
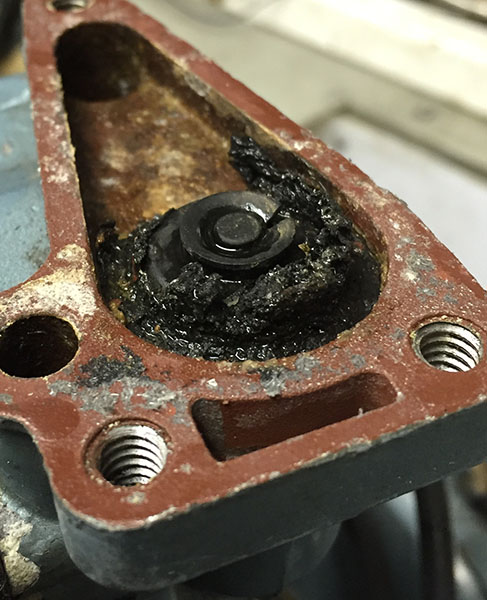
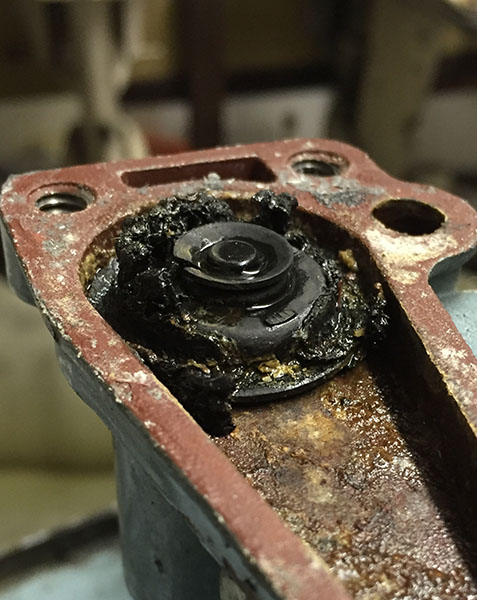
Here are a couple of pics of a clogged thermostat. The motor was
pumping water, and I knew this for sure because I had changed out the
water pump as a standard service practice I do on all my motors, but
yet no water was coming out. Pull the thermostat cover and
voila! Here is the problem. There were several dead leaves
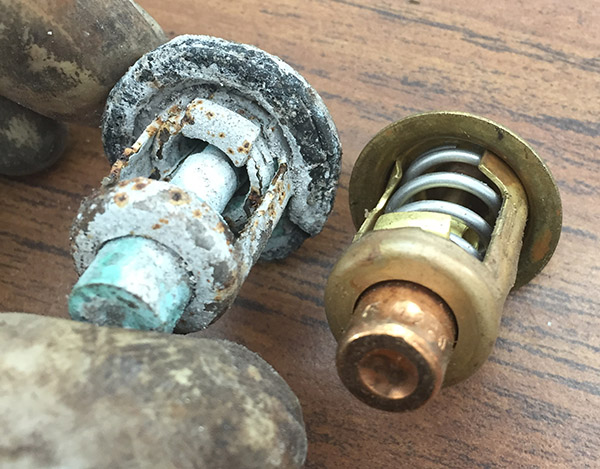
clogging the top and bottom of the thermostat. The 3rd picture is
of a motor that overheated badly, and you can SEE the thermostat was
wide open, yet it was completely clogged with debris. The picture
is next to a new thermostat.
Thermostat Function
Below is a video I shot
of a 15hp motor being run in my test tank at
approx. 4500RPM, to evaluate the cooling system prior to sale of the
motor. You can see the thermostat cycling between open and close to
regulate powerhead temperature; if you watch 7, 27, and approx 42
seconds into the video you'll see the steam and flow of water out of
the upper exhaust relief passage. The majority of the water exits
through the through-prop exhaust (a design conceived by OMC in the late
1960's and used by all manufacturers today).
Overheated
Powerheads
When
the cooling system is failing or simply not keeping up with the heat
produced by the motor damage is going to occur. It depends on how
bad the cooling system is performing, how hard the motor is being run
(idle vs WOT), and how long the motor is forced to run in a retarded
state. If you're lucky, the
pistons, cylinders, and rings don't sustain any
significant scratches or wear. At the other end of the spectrum
the motor gets seized from an overheat which usually presents itself as
a sudden stop of the motor, or you're going along and the power drops
off and the motor quits. The operator tries to restart the motor
and finds that they can't get the motor to turn over and the flywheel
is stuck. If you're lucky, after a few minutes the metal
internals cool off enough to shrink back down (remember most things
expand when heated up), and the motor starts back up. Here is a picture of a
severly overheated powerhead. The motor
had been thoroughly cooked and compression had dropped to the point
where the motor wasn't worth tryint ot rehab. Note the severe
discoloration of the cylinder head (dark brown) as compared to the
normal light metallic blue paint on top of the cylinders, and the
melted coils on the starboard side of the cylinder head. What had
me scratching my head on this one is that this motor was equipped with
an overheat alarm, so either that alarm didn't work, or the operator
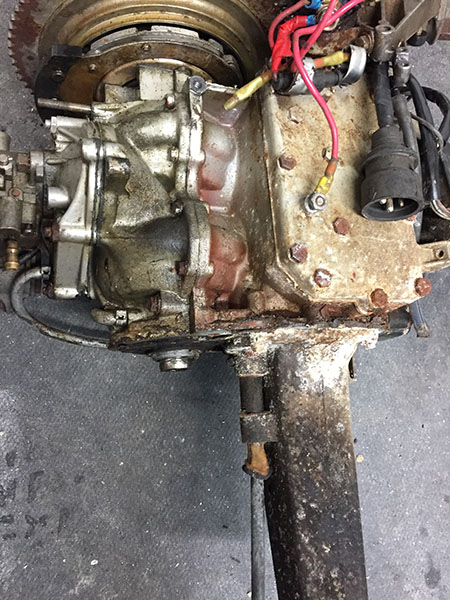
simply didn't shut the motor off when they heard it! Below we see some
pictures of another overheated motor, and some other
areas that are badly damaged. After pulling the powerhead it was
obvious that the motor would not be worth trying to rehab for a
combination of reasons. The primary one is the inner exhaust tube
(black snout off bottom of motor) had fasteners that were all badly
corroded due to lack of care, and all of the water system was badly
damaged. In the left picture you can see the water tube (small
tube next to exhaust tube) and the plastic guide that is melted.
The right picture shows the cylinder head off, and the gasket for the
water cover/thermostat cover gasket is badly burned/dried. The
coils are also melted (different than the motor above).
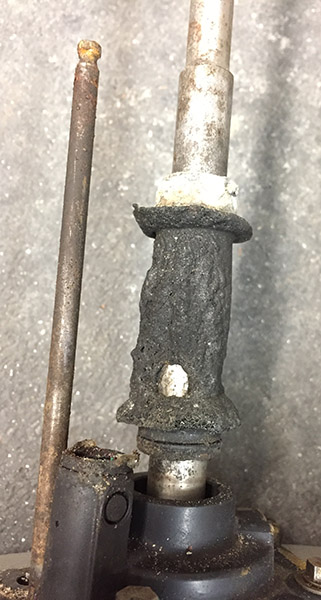
Looking closer at
the water tube guide, you can see it has been melted and destroyed by a
severe sustained overheat (left). Newer motors (circa 1970 and
newer) for OMC also utilize a protective driveshaft tube that connects
the lower exhaust housing and water pump/impeller housing (center/right
pictures). What this does, is shields the impeller from exhaust
impulses that are sent down through the exhaust housing and sends it
out the gearcase via through-hub prop exhaust, or behind the prop
exhaust. Without this, the exhaust pulses force their way into
the water pump housing and suppress water flow to the cooling system,
quickly leading to an overheat situation. The right picture shows
what it is supposed to look like next to the badly melted one off the
cooked motor.
The other thing
that happened is above the guide 'snout' (above left picture), there is
a rubber grommet used to help hold the water tube in place. This
became collapsed from heat, so even by repairing/replacing all these
damaged components, this rubber grommet if left in place would restrict
water flow by collapsing/constricting the water passage. So
switching out an impeller is not going to do much with motors that have
not been maintained properly!
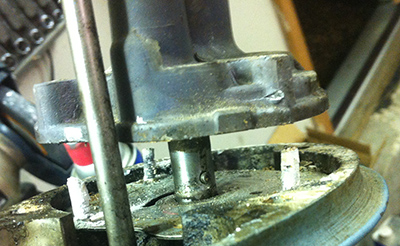
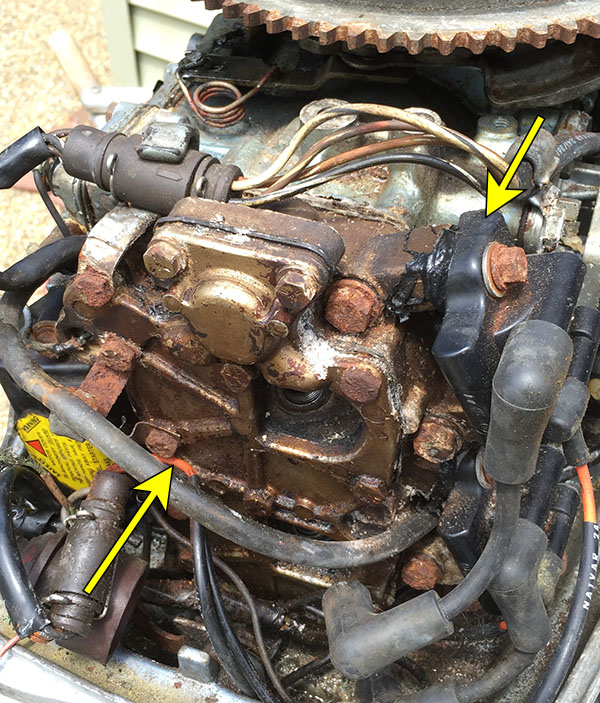
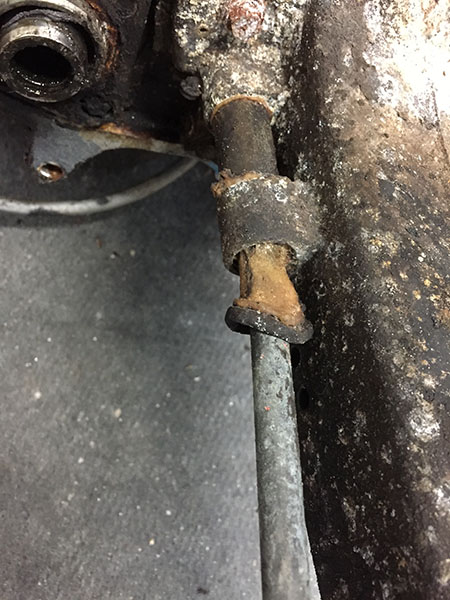
This picture shows
the inner exhaust tube (upper right), the shift lever (thin pole
hanging down), the driveshaft water tube orifice (bottom left), and the
yellow arrow is where the copper water tube usually goes into, which is
where the water pump sends water up to the powerhead through. So
there is a lot going on here to keep the motor cool and running the way
it should.
Water In Cylinders
For most OMC
motors, this is the result of one of a few sources (other
than the motor taking a swim).
#1 Your lower crank seal may have failed, allowing water up through the
crankcase through the exhaust housing, through the crankcase, and
throughout the motor. This requires a full teardown to replace
the seal (not a short job).
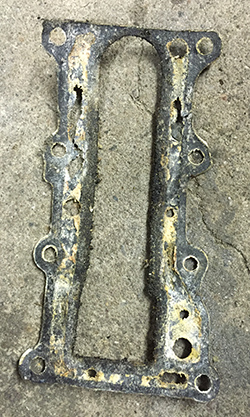
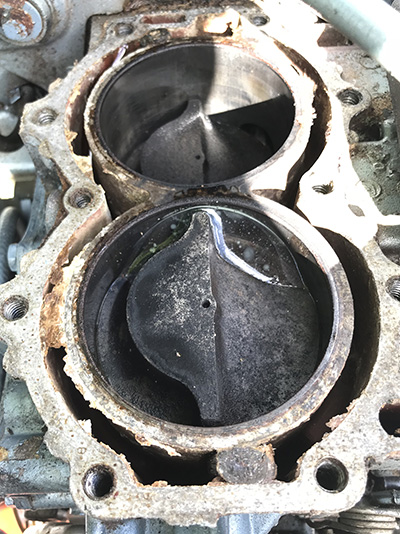
#2 You have a failed cylinder head gasket - fairly easy fix. An
example picture is below (35hp motor I worked on). The motor
would run, but erratically, then stall, then have a hard time
restarting because the cylinders needed to let the water drain
out.
#3 You have a failed exhaust bypass gasket or metal baffle (this one
requires a near full teardown, depending on the motor and if you have
access to all the bypass cover screws). This is a somewhat rare
one, but isn't all that uncommon. There is usually a stainless
steel baffle plate sandwiched between a couple of gaskets that provides
a water jacket on the exhaust side of the powerhead. Remember,
this is nearly the hottest gases in the whole powerhead, being ejected
down the exhaust, under water and away from your motor. It is
like holding a blow torch on a piece of metal non-stop and trying to
keep it from melting.
So this is usually the 1st place water is supplied to in most motors,
with the cylinders being 2nd, then the cylinder head, and then out of
the motor. When running, water passes through the motor so fast
that it is going through this whole loop (pickup, through the motor,
ejection) in 1 second. Water temperatures can rise from say, 50°
to 130° in 1 second. That's how much heat the motor generates.
A failed baffle or exhaust bypass gasket will lead to very erratic
motor running, if at all. It may start and run fine temporarily
(before water gets in the cylinders), then start dropping and picking
back up cylinders (the water is extinguishing the explosion in the
cylinders), then die, then you have to pull it over for several tries
before it fires back off, then repeat. If you start fiddling with
fuel mixtures, you get that much more stumped.
Stop fooling around - pull the plugs and check for water! If you
see water in there, you have much bigger headaches to deal with.
Just make sure you turn it over continuously if you see water in the
cylinders until you see next to nothing coming out, then IMMEDIATELY
fog the motor...basically drown it in fogging oil, or WD-40, or
anything that inhibits/discourages rust. If you let the motor sit
overnight, it may be lost for good.
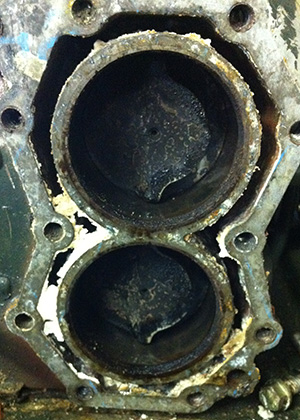
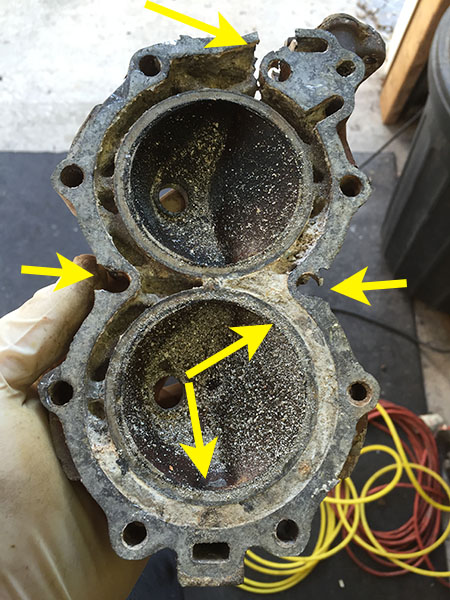
The
pictures I have here are of 1 motor with a GIANT hole in the exhaust
baffle. This motor actually ran! Not well, and erratically,
but it ran. Long-term veteran mechanics are still amazed by this
picture, none that I've spoken to have even seen a running motor with a
hole this big. Usually all you see are pin holes that eventually
rust through. This condition can easily be accelerated by taking
a motor that was run, and putting it away lying on it's side so
leftover water in the cooling system is just sitting in the powerhead,
instead of draining out like it should.
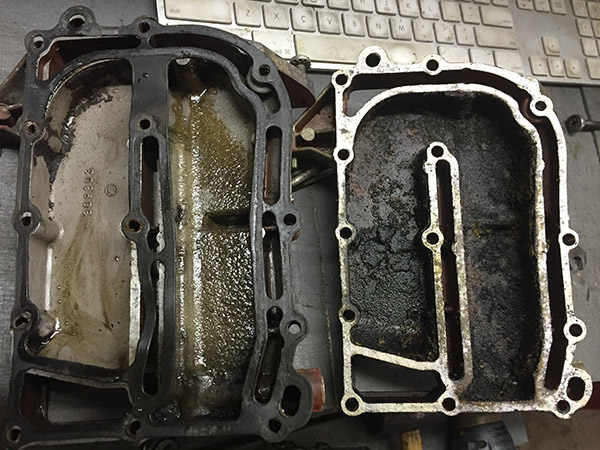
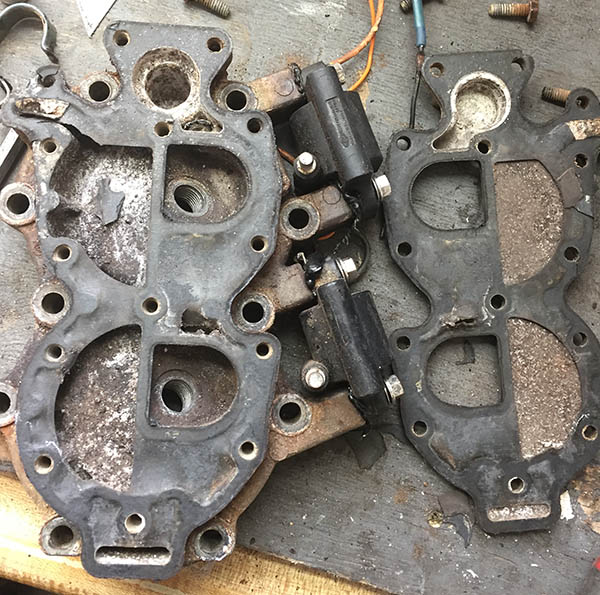
The other picture is of a failed bypass gasket, which is common.
The 3rd picture shows 2 motors (taken apart) side by side, one with a
failed gasket, the other that was still OK. Notice the one with
the failed gasket that exhaust pulses had pushed into the water jacket,
and how the water 'cleansed' the exhaust passages? Dead
giveaway. The other one shows normal accumulation of carbon,
fuel, oil, and unburned mix caking up. This is also stuff you're
supposed to clean out of the motor during a full tune up to make sure
you're getting maximum performance and power output. When the
airway is clogged up, less fuel passes through, and you get less power.
Once the baffle or gasket fail water intrudes through the exhaust holes
in the chambers and causes all sorts of problems. Once these are
replaced, both motors ran like clocks immediately.
Salt In Water
Jacket
As
most folks know, salt, other than to keep roads safe, is bad for
metal. In a marine environment it can wreak havoc on motors when
they are not cared for by operators. In particular, folks who
don't flush their motors after each exposure to salt are really just on
borrowed time.
Now just because a motor has been used in salt does not mean the motor
is going to be no good. It does, though, mean that it will
require a closer inspection and maintenence to prevent issues.
The most common issues are stuck bolts and clogged water passages (see
the gearcase section for a couple of good pics).
The pictures here are of a good working 6 & 15hp motors, but I
noticed some
'hot spots' on the cylinders. They were pumping plenty of water,
and
not overheating, but the unusual hot spots set off some red
flags. I pulled the cylinder head (6hp) and exhaust bypass (15hp)
to inspect and I found sand and
salt clogging it up. The rest of the cooling system was OK.
5 minutes with a pick, wire brush, compressed air, replacing the
gasket, and the motors
were restored to normal cooling function. Note that this type of
accumulation doesn't happen in 1 season. This happens after years
of neglect and misuse. Annual tune-ups would prevent this and are
recommended, or using common sense and flushing the motor after each
exposure to salt beach.
The third picture is from a 9.5hp motor that was running hot. The
cylinder head was plugged solid and water was barely circulating.
Trying to remove the cylinder head was impossible due to salt making
the fasteners stick. In this instance, it was easier to CUT the
cylinder head off, carefully avoiding damaging the actual cylinder
surface. Replace the cylinder head and the motor worked just fine.
Marine Growth & What it
Can Do
This may be
slightly off topic for this section but nonetheless,
involves the cooling system. I've mentioned and shown examples of
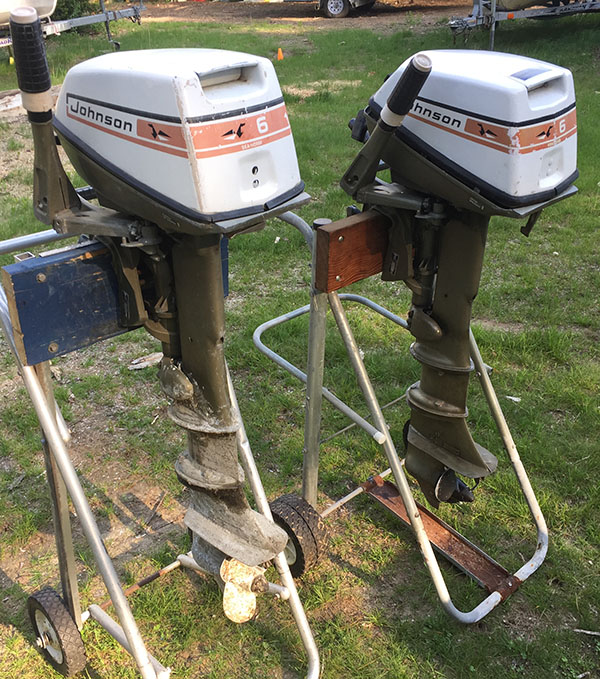
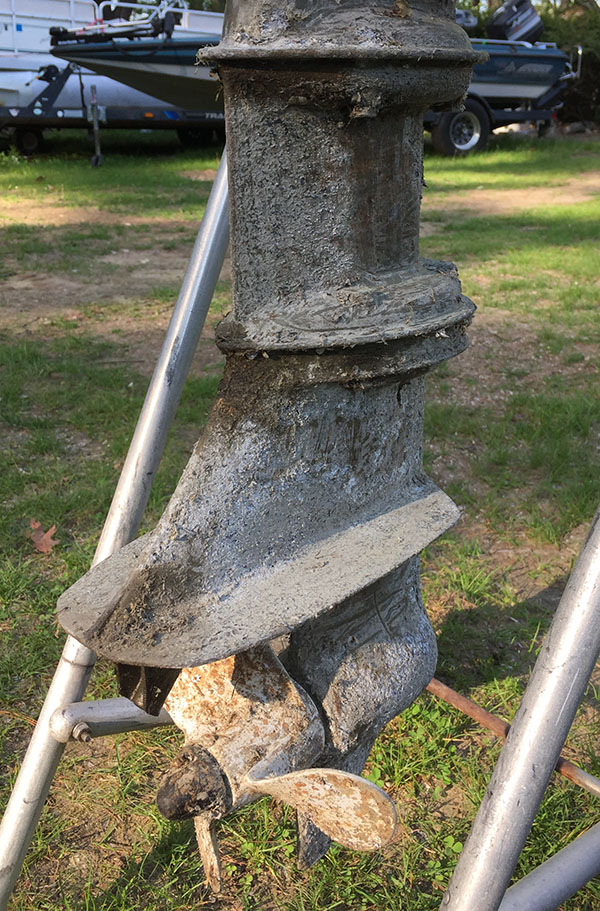
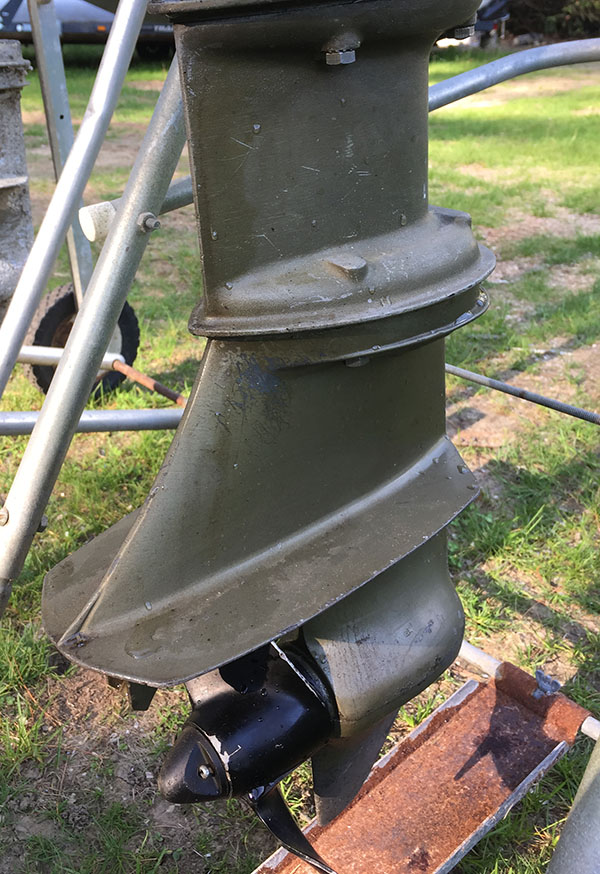
how neglect can badly effect your motor. Well, below is a before
and after of two identical 6hp engines. The first engine was
purchased by a customer who used it as sailboat motor for doing island
work on a regular basis. He didn't tip the motor up while not in
use, so it sat in the salt water for several months. The motor
next to it is the replacement motor he had to purchase after just 1
season of use because the salt had caused problems with his
motor. Needless to say, he's tipping the motor up when sitting
for extended periods now!
Using your motor in
salt isn't the kiss of death, especially if you're
only putting it in for a day or two. After each use, put the
motor in a bucket of fresh water and run it for 5 minutes to flush
it. Spray it down with the hose and give it a quick rinse
down. Using turtle wax to coat it down and spraying the whole
thing down with WD-40 both internally and externally goes a long way.
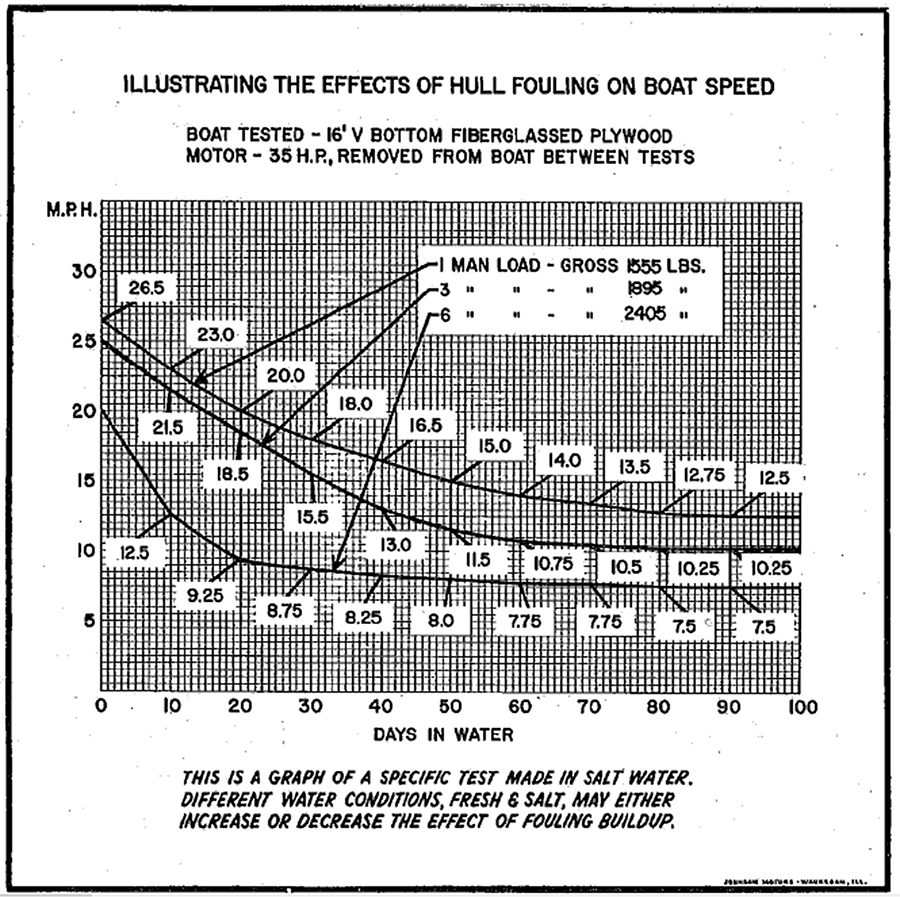
Below is an excerpt from the Johnson 10th edition service manual (circa
1962) showing the effects on hull speed due to marine growth in salt
water for an extended period. Very interesting stuff.
Brackish water and fresh water also cause loss of performance, albeit,
generally at a slower rate. But if you pull your boat from the
lake or camp half way through the season and scrub down the hull, you
should see a significant improvement in speed. If you see marine
growth, that is just adding drag to your hull.
Water Pump
Maintenence
There
are a lot of things to look for when maintaining your water pump.
You should check to see not just what the water output of the motor is,
but the the strength of that output. It makes sense to change the pump
as soon as you see water output drop off. Generally older motors
don't have overboard water indicators (pee streams). When 100%
correct, they should be pumping water like a water hose (exception
would be from 1974-1976. These were transition years). Even
when cold, they should pump a ton of water. When warm, you will
see basically a garden hose of water coming out.
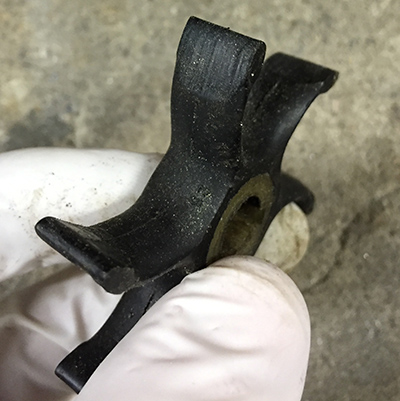
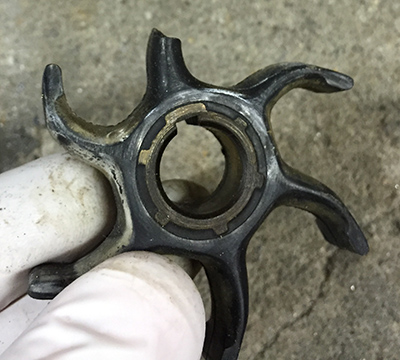
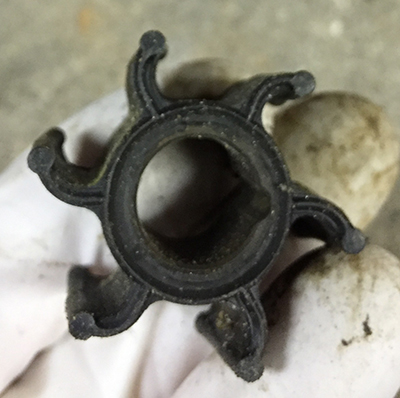
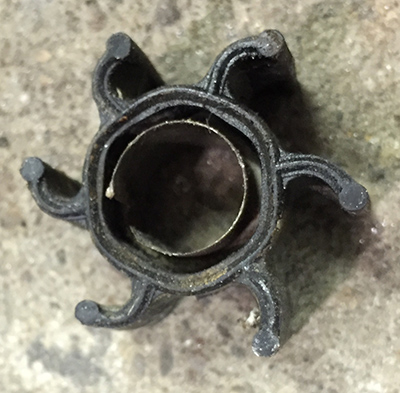
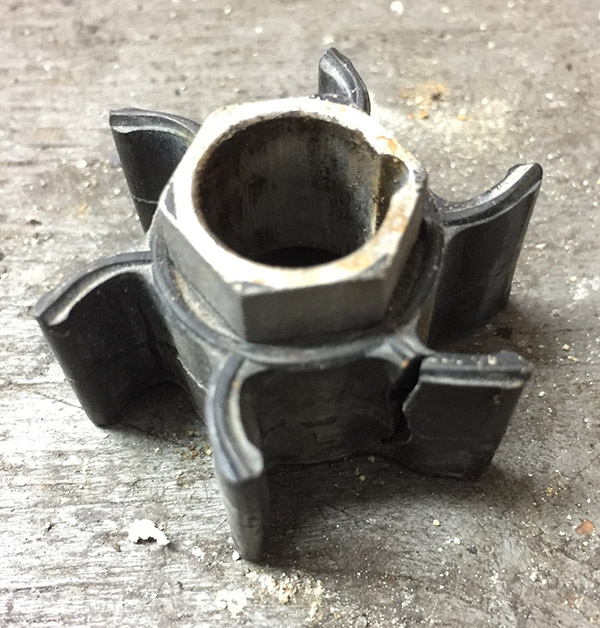
When evaluating the pump,
check to see if the blades have a melted appearance or are worn, if
it's taken a permanent form, if the rubber is hard/vulcanized, or if
the rubber has separated from the metal internal ring. Of course if you
see a blade broken switch it out.
The first row of pics (and 1st pic on the 2nd row) below show the
progression of impeller wear. These are 4 different impelelrs,
all at various stages of deterioration. They all still pump
water, but absolutely shouldn't be used any longer. From left to
right, less and less water is pumped. There are other factors
that can slow down water flow, the impeller isn't even the starting
point, even on a brand-new motor.
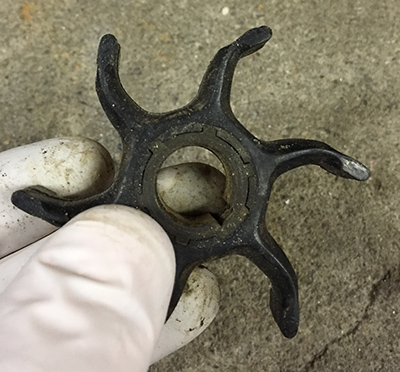
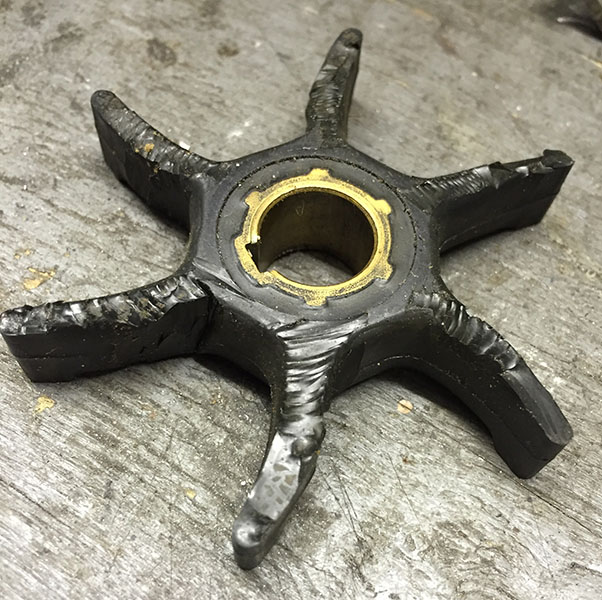
The
2nd row shows the same situation with a smaller impeller but larger
HP motor. The size of the impeller doesn't necessarily translate
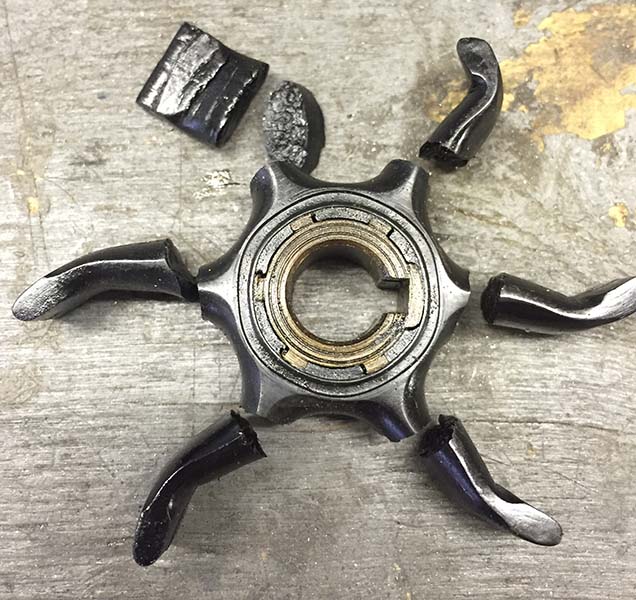
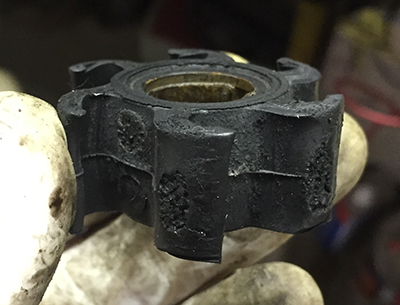
to more water pumping. The very last picture (on the right) shows
the brass ring missing; this is what ties into the driveshaft and
impeller key to rotate the pump. Either the impeller is
defective, or it is so old that it has failed. Only operators who
don't know what they're doing leave the pump around long enough to let
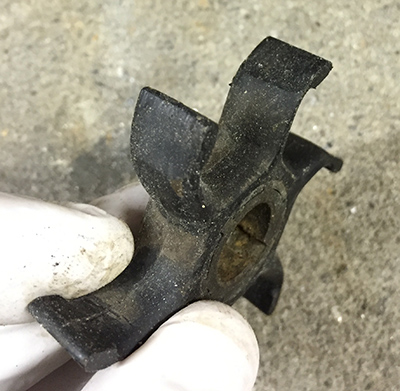
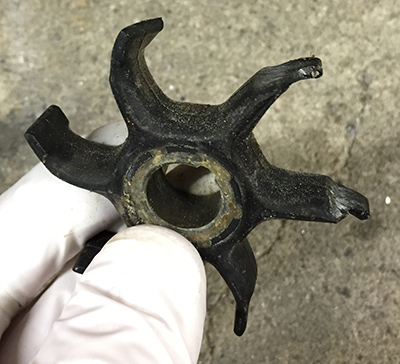
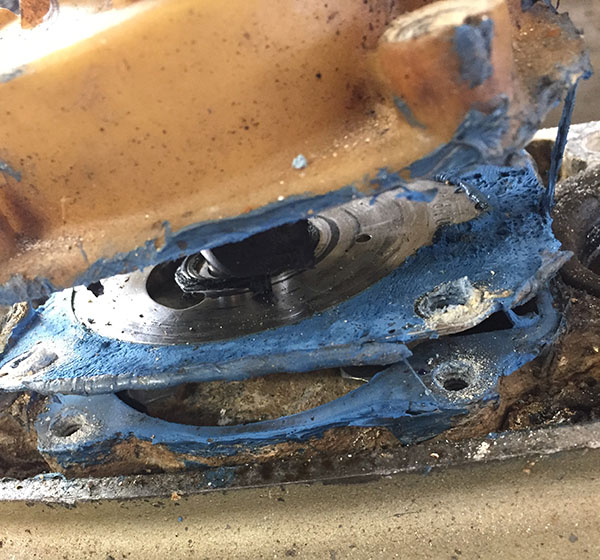
that happen. And the very last 2 pictures are
examples of when an impeller was left in so long, they explode into
pieces or the brass internal ring separates away from the rubber
fins.! Let it go this long and try to start it, and you run the
risk of the pieces getting stuck in the water jacket, and you will be
into it for a huge repair bill trying to figure out where that piece
is, and how to unclog it.
It should be noted, that
visually you may not be able to identify a failed or weak impeller.
There are situations where the impeller appears new with little or no
wear, the brass core is secure, but the rubber is so weak that it
flexes and cannot keep up pumping water when much over idle. So
looking at the water output at trolling speed keeps the motor cool and
pumping a lot of water, but when you throttle up water stops pumping
due to the fins/paddles folding over and unable to overcome exhaust
pulses.
This is further complicated because when you are going fast in your
boat, the last thing you want to do is take your eyes off of looking
straight ahead, for safety of course. So
while you may observe the water pump working at slow speeds, you have
to ask a passenger to monitor performance at wide open throttle, or
possibly look back quickly. This isn't so easy in an
aluminum boat with a tiller! When you're up on plane, turn your
head, hold the tiller, and lean one way or the other to look at the
back of your motor, that can be dangerous! And for motors with a telltale, that
doesn't necessarily mean water is circulating through the powerhead!
The #1 reason why
impeller wear out is running the motor when it isn't
submerged in water. The moisture lubricates the rubber blades,
reducing friction and heat. Without this, they are damaged as
fast as
just 5 seconds. Remember a motor at idle runs about 600RPM (or
more).
That's 60 turns in 6 seconds.
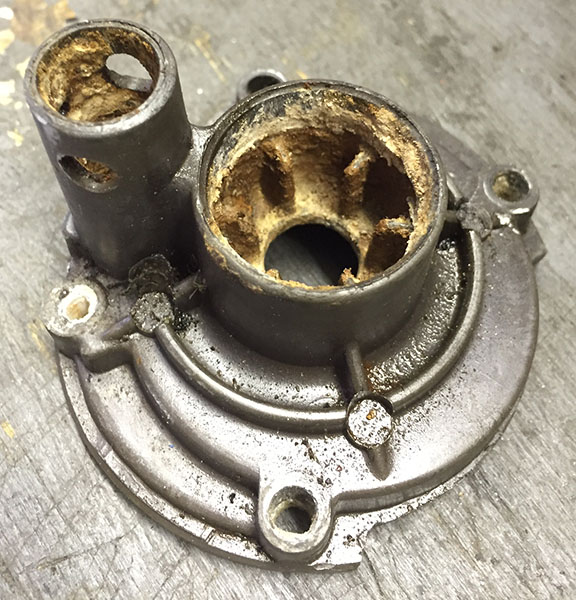
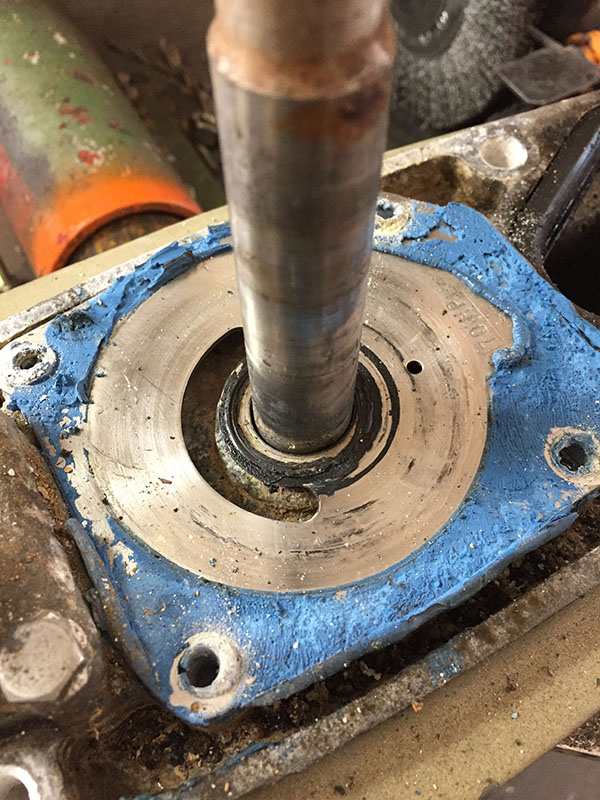
Check the impeller housing too for a lot of wear (1st picture).
This is an original housing off of a motor from the 60's. It was still
pumping water, but was clearly on it's way out. A quick
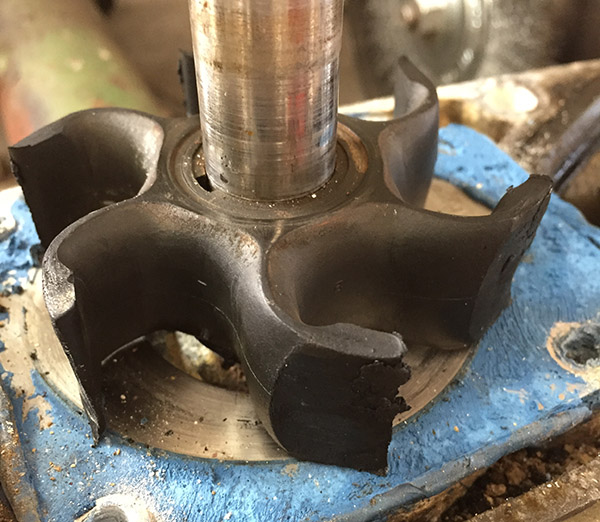
inspection showed the obvious problem. In severe situations where
a motor is being run completely dry (say, running in your driveway and
cooling system is completely dry), you can have a burned impeller
(pictured below). In these situations the rubber melts, burns,
and the globs of fried rubber gets lodged into the impeller housing and
possibly up the cooling system the next time the motor is run.
This can turn into a big problem, because now you have to pull the
whole motor apart to get the water clog out.
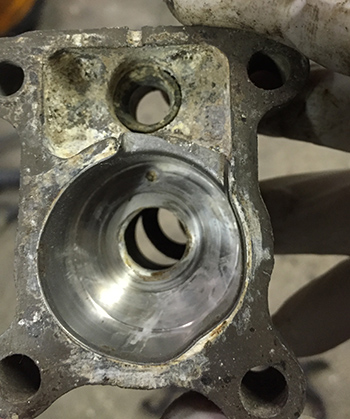
Wear isn't the only
thing to pay attention too. Newer housings
usually have a stainless steel cup on the inside to minimize housing
wear (the housing is aluminum). It's not a bad idea to remove
this cup when you change impellers to insure there is no sand or other
build up of debris. The picture below (2nd pic) shows salt build
up to the point where the internal metal
cup has crushed down on the internal orifice diameter. This happens due
to extreme neglect. This person probably shouldn't own a motor again,
frankly!
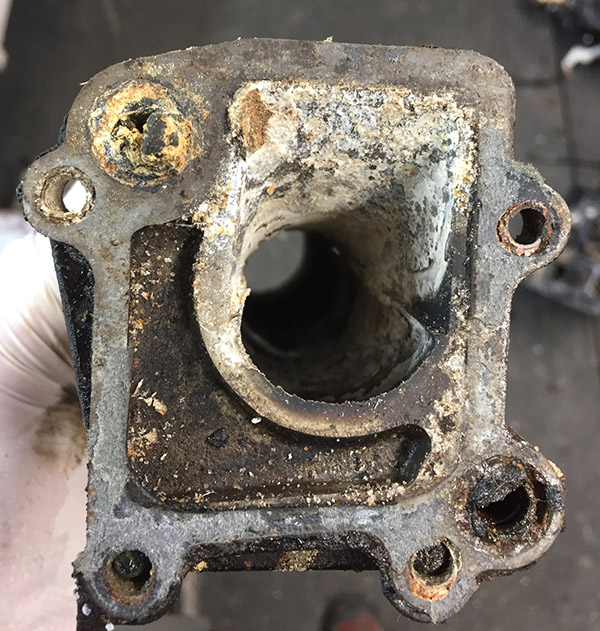
The exterior of the
impeller housing is not impervious to damage either. Here is a
picture of one with the water tube grommet removed. You can see
salt/debris build up wherever it was allowed to sit. Notice the
badly salted screw orifice as well. In these cases, the screw
head breaks off, and with luck you can pry the impeller housing off the
gearcase housing. The screw studs are usually left, or may break
off, then you have to drill out the old stud and retap the gearcase
housing, generally with 1 size screw larger.
If exposed to salt
and not maintained/flushed regularly, the screws can
get stuck, and will need to be drilled out/retapped (if possible).
These pictures are a common thing seen in poorly maintained motors
which were exposed to salt.
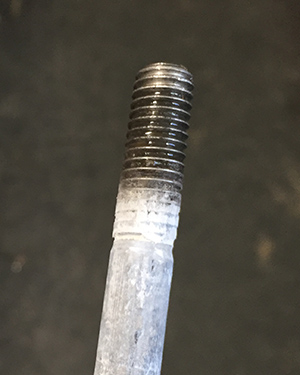
Depending on how
neglected a motor has been, you can see the various
stages of salt build up. Below is a picture of a gearcase screw
(long
one, about 4 inches) that I was just barely able to free up. The
threads are clean where screwed into the orifice, however the threads
that were NOT screwed in and resided in the hole where the screw went
into had salt filled into them. What happenes here, is that the
salt
keeps building up each time the motor is used and it dries, and
eventually packs itself into the clearance between the screw and the
hole it goes into.
If this is let go long enough it will hard pack in and cement itself,
filling the tiny clearance. Next it basically welds the stud into
the
orifice. When you go to remove this generally the screw/bolt head
breaks off, and sometimes the two pieces fastened together are welded
too. Heat helps, but after a certain point nothing works short of
boring out the orifice and screw hole and retapping. It will
literally
make a 10 second job take an hour to put back together properly.
All
due to neglect and not FLUSHING after exposure!
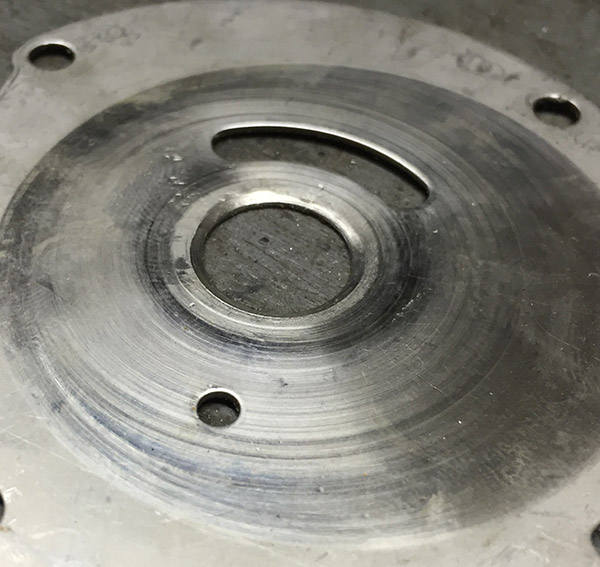
Worn Impeller Plates
Below the impeller is a SS plate that sits on top of the lower gearcase
housing. Generally this plate serves a purpose of helping mate
the impeller housing to the gearcase housing, while holding the
driveshaft seals down to a degree, providing the drivehshat another
cradle to hold it in place, direct water into the impeller housing
void, and help keep exhaust pulses out of the cooling system/pickup.
Now this plate typically gets changed out when a full water pump kit is
installed, but many times just the impeller gets changed and the
impeller housing is kept too. This is OK to a point, but when you
start seeing a lot of wear on either of these items it is worth it to
replace.
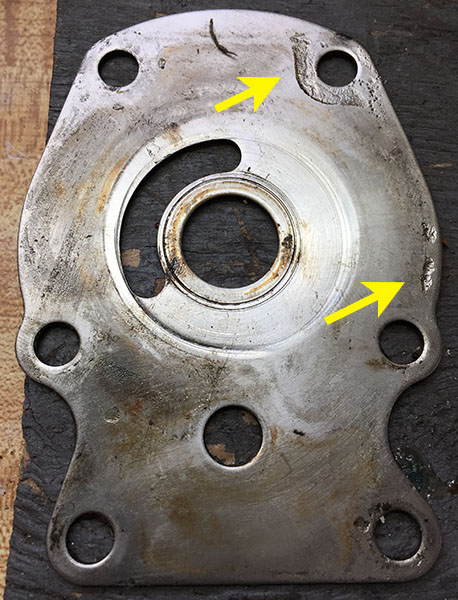
Below is a picture of a badly pitted and worn SS plate. While the
cooling system still functioned on the motor, it was struggling to keep
up. This came from a 30hp more modern OMC motor. The
overboard water indicator had intermittent stoppages, where the spray
would not be strong but be a fine mist. The water pump was brand
new, and other aspects of the cooling system had been already renewed
(i.e. thermostat, o-rings, etc). Exhaust pulses were able to find
their way into the cooling system via these pitted spots, it only takes
a 1/2 mm gap to start to suppress the cooling system's function.
At idle, the problem would show itself. Run the motor up in RPM
and it was able to pump fast enough to stay ahead of the exhaust
pressure.
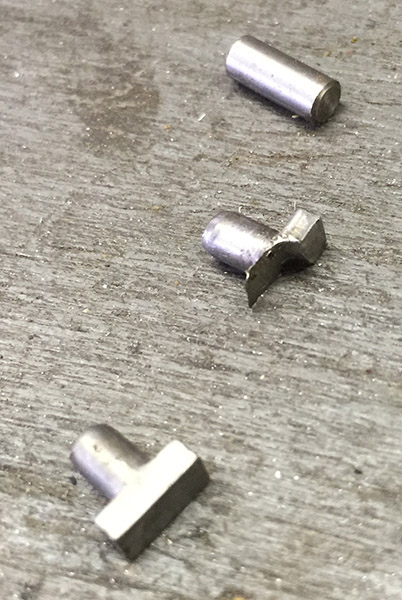
Impeller Keys
Impellers (water pumps) are secured to the driveshaft, in most cases,
by some sort of key or wedge. Older motors utilize a small
orifice hole with a SS peg. Now depending on the impeller, this
may just be a peg, or one that looks like the letter 'T.' Newer
motors utlize a plastic asymetrical wedge that forces the impeller to
be installed only in one direction.
Below is a picture of two different impeller keys. The center one
is from a motor where the last person installed the wrong key.
You can see it was worn down, and how the last person was able to get
the driveshaft to sit at the right height into the gearcase is still a
mistery. I suspect they may have forced the impeller housing down
onto the SS plate, and used the screws to tighten everything
down. Surely, trying to turn the driveshaft by hand would have
yielded a scraping noise and a lot of resistance.
The picture to the right is the impeller from the same motor.
Notice the gouges on the blades. This is very unusual and a
result of the wrong key being installed by an unknowing repair
person. This probably happened due to metal shards breaking away
from the impeller key or uneven surfaces as the impeller spun
around. It wouldn't take long for the rubber to be torn apart in
this type of situation.
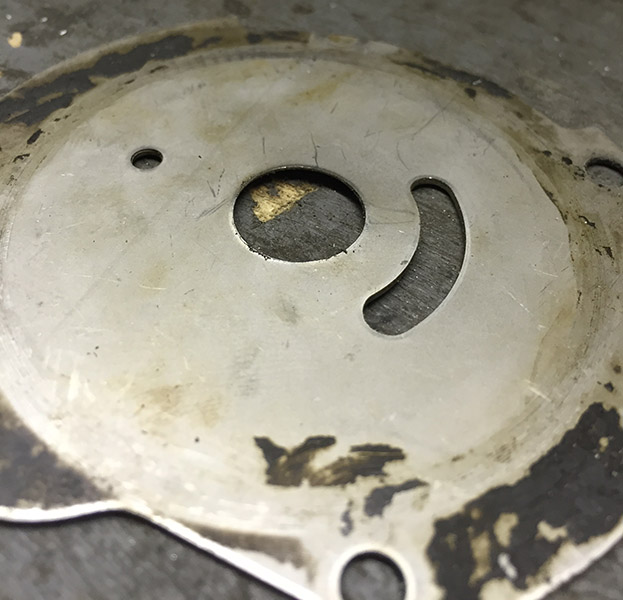
Here you see how
the T shaped key was gouging not only the impeller,
but also the impeller SS plate. There is a concave wallowing of
the hole, and the plate was convex. This is not right. It
should be perfectly flat. All of these components required
replacement to restore the water pump to working condition. It's
amazing the motor had been operated at all with this configuration -
the prior operator was on borrowed time, at best!
Running Motors Dry (Out
of The Water)
I've mentioned it in this section and others several times, how
detrimental it is to run a motor out of the water dry. Well, here
are some pictures showing just what it can do. Back in the 60's,
there was a service bulletin that Evinrude published showing the stages
of impeller wear based on time being run out of water.
Unfortunately, I'm still trying to dig it up, but will post as soon as
I relocate it. Below is a picture of a badly worn impeller from a
customer who had brought in a 70hp motor for service. He actually
was running this motor weekly, and it was keeping up (staying cool),
but clearly this entire assembly was badly damaged and needed
replacement.
Picture #1 shows a 'shadetree' job of sealing the impeller housing to
the SS plate using gasket sealant. Well, in most installations
there is either a thin rubber gasket or a fiber gasket, or both used,
not silicone used. This is a situation where the person who
changed the impeller bought just the impeller, not the actual
components needed to do the job right.
Picture #2 shows the impeller housing cup with the melted rubber from
the impeller. This is a clear indicator of the motor being run
out of the water for 10-20 seconds, possibly minutes. The rubber
impeller heated up and melted due to friction against the impeller cup
without water lubrication.
Picture #3 shows the SS impeller plate and how it's been worn down both
with melted rubber from the impeller and grooves cut in either from
sand or simply the inner metal impeller core rubbing.
Picture #4 is the most dramatic reveal, the impeller itself. You
can see it is badly melted and taken a set position.
This process starts
in as little as 5 seconds being run dry. Now,
if the impeller is lubricated with water, this slows it down quite a
bit. If you're ever in bad waves and the prop comes out the
water, it's possible to run the motor at high RPM's for 2-3 seconds
before it goes back into the water without any damage happening.
This is normal usage. It's starting a motor in the driveway
without the gearcase being submerged properly that leads to quick
damage.
Collapsed Water
Tubes
The
cooling system on most OMC motors are relatively simple. There is an
intake on the gearcase, a water pump (impeller), a copper water tube
that send the water to the powerhead, a water jacket that cools the
exhaust passages first (hottest air, basically flames), they cylinders,
then to the cylinder head cover, and finally back down the exhaust
housing and out to the lake. Now a clog can happen anywhere but the
narrowest passages generally are the copper water tube going from the
impeller to hte powerhead and the thermostat orifice. Generally with a
thermostat, if you throttle up leaves or pine needles, or garbage in
general will be ejected and cleared away. Keep in mind these pumps push
a lot of water pressure, which I would venture to guess have the same
force as your garden hose at full blast.
One
thing that can cause an overheat condition is a collapsed water tube
grommet. The copper tube that goes from the impeller housing up to the
powerhead is generally anchored to the inner exahust tube on these
motors. A grommet or two is used to help seal up this copper tube and
prevent loss of water pressure. Well, these grommets over the years
have a tendency to collapse and choke off water flow. If used in salt
water without regular flushing, they eventually pinch of the waterflow
completely due to the salt drying between the grommet, hardening, and
building up.
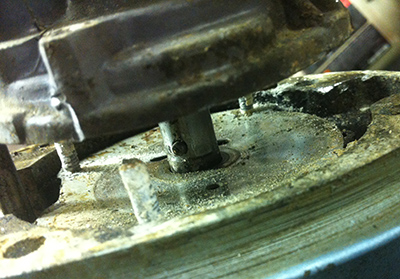
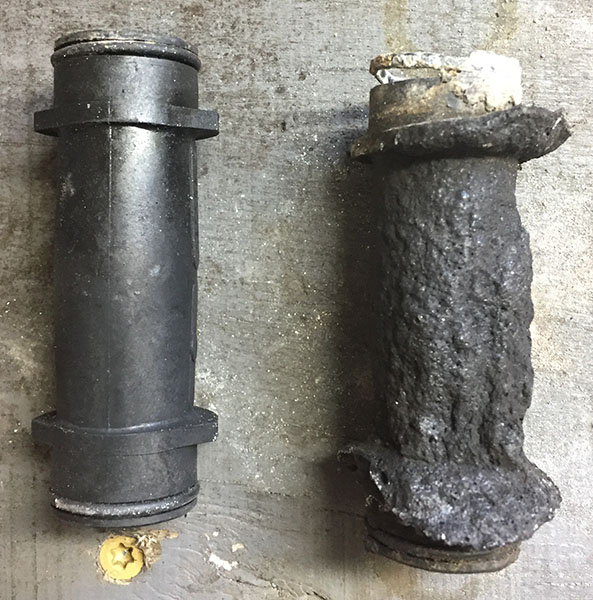
Here are pictures of an inner exhaust
housing/tube with a collapsed water tube. If you look at the upper left
hand corner, you'll see the rubber grommet collapsed down to almost
nothing. This motor was overheating, despite the water pump being new.
After I pulled the copper tube, cleaned, and replaced, you can see what
it should look like in the 2nd picture. Keep in mind that this is not
the type of job you should be doing on your own. It required a full
teardown of the motor and even if you know what you're doing as a
mechanic this is going to take several hours and require replacement of
a lot of different gaskets throughout the motor.

 The
pictures I have here are of 1 motor with a GIANT hole in the exhaust
baffle. This motor actually ran! Not well, and erratically,
but it ran. Long-term veteran mechanics are still amazed by this
picture, none that I've spoken to have even seen a running motor with a
hole this big. Usually all you see are pin holes that eventually
rust through. This condition can easily be accelerated by taking
a motor that was run, and putting it away lying on it's side so
leftover water in the cooling system is just sitting in the powerhead,
instead of draining out like it should.
The
pictures I have here are of 1 motor with a GIANT hole in the exhaust
baffle. This motor actually ran! Not well, and erratically,
but it ran. Long-term veteran mechanics are still amazed by this
picture, none that I've spoken to have even seen a running motor with a
hole this big. Usually all you see are pin holes that eventually
rust through. This condition can easily be accelerated by taking
a motor that was run, and putting it away lying on it's side so
leftover water in the cooling system is just sitting in the powerhead,
instead of draining out like it should.