CLICK
HERE TO BACK OUT OF THIS PAGE.
Ignition
Systems
| All material on this
website, and these sections, is ©Runner Outboards LLC and is
intellectual
property. You may freely distribute this information as long as
it is
NOT edited, and credit is given to the author. |
Disclaimer: The
information provided should never replace common sense or the
recommendations of the OEM. I do not assume responsibility
for
the use or misuse of this information. The information provided
is
based on my experience working as a full time mechanic, on hundreds of
motors over time, reading a lot of manuals, education, and consulting
other experienced mechanics along with a number of retired service reps
I am friends with.
If
I can offer
any advice from
experience, it would be NOT to try and fix your own motor if you don't
have a good understanding of what you're doing. You need to have
the right special tools, reference materials, and most importantly,
UNDERSTANDING of what is wrong and how to properly fix this
issue. Most people do more harm then good if just messing
around blindly. The reason why I can do these repairs is I've
put in thousands of hours reading, fixing, and practicing. I
learn
something new everyday. I have also gone out and acquired the
necessary, CORRECT tools and reference manuals to work on the
motors. These are very
important to promote correct operation of the motor. The idea is
to
have a reliable motor, not just one that 'kinda runs.'
Index - Click below to Jump to That Section
Internal
Combustion Essentials
The
Basics, What You Need To Know About Motors
Powerhead
Cooling System
Gearcase Components
Ignition System
Fuel System
Mechanical
Components
Trailer 101
When is it Time to
Change Spark Plugs?
I have to say that I hear people talk about spark plugs being the
problem or solution to a wide variety of ignition problems all the
time. I'm going to have to disagree with people on this one,
being a full time mechanic in the repair business. While it is
very important to have good working plugs, and even more importantly,
CORRECT plugs, it is rare for spark plugs to be the sole culprit, or
even the direct source of ignition problems.
Most
plugs are rated for 100's of hours
of use before they just go bad. A hundred hours on an outboard
motor takes time to accumulate. In perspective, you would need to
run your motor at least 10 hours a week for 10 weeks to do this.
Spark plug heat ranges, however, are critical (to keep the motor from
running too cold or overheating). Always verify you have the
right plugs for your motor. Most OMC's from the 60's and 70's run
with J4C's or J6C's. Newer motors generally use Champion
QL77JC4's or equivalents from other brands. NGK make effective
plugs.
Proper operation of your cooling system, correct oil:fuel mixture
(generally 2% oil), and correct syncronization between your ignition
and fuel systems all have large impacts on your plug life. You
can fry a brand new set of plugs in just 2-3 minutes if your motor is
overheating due to a faulty cooling system, or if you use the wrong
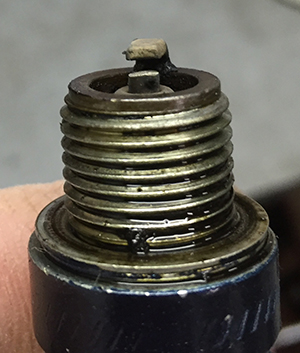
plugs in general. Here are pics of worn spark plugs. The
motor ran fine, but upon normal inspection I noticed these and it was
obvious that it was time for replacement. Worn electrodes are a
simple assessent 'red flag.' They should be squared off with the
tip (the hook shape). The spark jumps this gap and then is
grounded to the powerhead of the motor via the metal casting and
threads.
What you CAN do, is make sure your plugs are gapped correctly.
Generally, most OMC's go for 0.30 gap. Head on down to your local
automotive store and buy a plug gapping coin (usually about
$1.00). I have run into several situations where a motor is not
running right, and unless I have personally carried out repair work on
the ignition and fuel systems, the first thing I check are the
plugs. If the plugs are oily, then we know the motor is running
rich/blubbering (also easy to tell by just the way the motor is
running). If it run erratically, well then you may find water on
the plugs, meaning you have some big problems somewhere else in the
motor. If the motor is 'missing' across low-mid throttle ranges,
or even just at the top end, they may be gapped too far or improperly.
Old-time racers sometimes would gap their plugs a smaller distance if
the ignition was getting weaker. Well, this somewhat helps in a
temporary situation, but it still just a band aid. The bigger
problem isn't being truly addressed. The color of the plug tells
you a lot too. A plug that is bone dry, white, and perhaps with
specks means the motor is running too hot. This can be confirmed
by using an electric laser thermometer while running too. If the
plugs are chocked with carbon (black) and caked up fuel deposits, it is
running too cold and you're only on borrowed time before the plugs get
fouled. If a plug is totally soaked in fuel, then it may be dead
and not firing at all, or that cylinder may not be firing off due to
that side/part of the ignition sytem is dead. Further
investigation is warranted for any of these situations.
A
good running motor will show a dull grey/brown chaulky appearance on
the plugs. The worn plugs pictured above shows a normal running
motor, albeit the plugs needed replacement. I pulled these plugs
off of a 1993 6hp motor I had just run for the first time. These
were the original plugs as evidenced by the factory blue paint on them;
so for 22 year old plugs they were still working but were overdue for
renewing. The motor ran totally fine even with these, but
probably was loosing some power due to worn and overly gapped plugs,
due to the wear they had on them. It also had a newer CD style
ignition, which is superior to the older magneto style. Not to
knock magnetos, as a good magneto still can create a respectable 1/2
inch bright blue spark and thousands of volts. The electrodes
should appear square, not rounded, or worn away as you can clearly see
in these pictures.
If you are checking for spark, you need to crank the
motor over fast enough to activate the ignition system (doing this with
a long rope around the flywheel, and plugs out, usually allows for it,
but if you have a big motor (80's and newer models 20hp or higher need
a lot of cranking speed). The spark should be bright blue (do it
at night or in a dark area), and jump at minimum 1/4 inch for older
motors, but 1/2 inch or more is desireable.
You can go out and buy new plugs, but remember the plug is the last
part of the ignition system. Almost always, the problem stems
from further up your ignition system. You might luck out and for
$8, correct the issue, but don't be surprised if it's something
else. Read on below.
Weak Spark - Worn
Points (Magneto Ignition)
If you have weak spark (and the only way to know this is with an
air-gap tester, and a comprehensive knowledge of what your specific
ignition system is supposed to be outputting), a lot of different
things can contribute. Depending on the style of ignition any
number of components could be failing. I've had situations where
a pinhole in a spark plug wire caused weak ignition. Literally, a
pin hole was causing issues. But your coils could be bad
(charge or ignition coil), a weak sensor, a faulty diode in a
powerpack, dirt on the flywheel magnet or rust, bad grounds, corrosion,
leaking condensors, dirty/worn/bad points, the list goes on and
on.
Magneto systems are fairly simple and work on a similar principle to
electric motors, however they generate their own electricity, whereas
an electric motor has power introduced via an external source (i.e.
battery or wall plug). They consist of a coil, a point, and a
condenser. The coil is a metal core with many windings of copper
wire. When a magnet passes by this coiled wire it creates a
magnetic field which is converted to electricity. Points are just
that - two points that transmit the power induced by the coil.
The condenser is essentially a storage vessel. As the power is
being created by the coil it holds charge, and when the point opens the
power is released out through the coil and down to the spark plug,
igniting the air-fuel mixture and creating combustion. This all
happens thousands of times per minute as a motor runs, and this style
of ignition was used from the early 1900's and is still used even today.
When the points become dirty or worn, it interferes with the flow of
electricity to where it should go and reduces the strength of the
spark. It is a relatively easy problem to remedy, but there are a
lot of things necessary to restore the ignition system to a strong
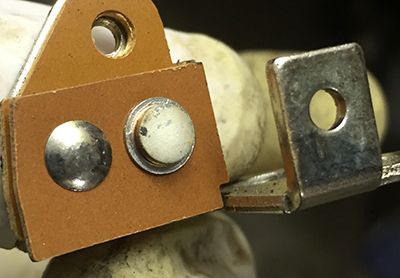
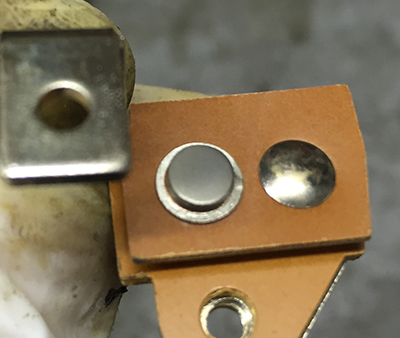
working condition. Here are some examples of points that were
frosted (white color), dirty (black) and broken in/somewhat worn
(observe the pitting). All three sets were salvaged after a
thorough cleaning and reset. Points have a concave/convex
configuration to allow a more precise timing of spark generation.
Points that appear to have pitting or rough surface need to be replaced
to allow the magneto to work properly.
A broken magneto
cam can also be cause for erratic ignition. After spending an
afternoon double and triple checking my work, I finally noticed the
culprit to this particular ignition sytem issue. There is a cam
which sits on the crank of older motors. What this cam does is
opens and closes the points at a precise moment. Well if the cam
is cracked or overly worn, this will cause everything to be
wrong. This is an usual situation, but if you've worked on enough
of these you never know what you'll find next.
Weak Spark - Dead
Coil
On older magnetos,
dead coils are the #2 reason why spark is weak, or non-existent.
The older the coil, the likelier it is to have failed due to drying
out. They crack, and when this happens they usually short out or
the internal copper windings break and the electrical field can no
longe be generated. In this picture, someone tried using a short
cut of covering the coil with some sort of glue. This is about as
short-cutted as you can get, and had snowball's chance in hell of
actually working. It was picture worthy, to say the least, and
I'll give the person some credit for creativity. Albeit,
completely wrong.
A cracked coil doesn't always mean it is no longer working
properly. External coils from motors circa 1974-1980 can actually
be cracked and not short out, and still perform normally. In
these cases, you can take liquid tape (black neoprene dip) and seal
these cracks to fix the normal insulating properties of the coil.
this is used in many cases to repair a wire than may have damage
insulation to prevent arcing or leakage of current.
Here
is a modern coil where the insulation had dried out and was working
normally. The motor ran as it should, and I happened to be
examing something else when I noticed spark arcing through the cracks
in the insulation and out the grounding strap. Again, there was
no evidence of any issues of the motor running improperly, and in fact
the motor had passed all bench tests and evaluation on a test
vessel. At this point the coil should be replaced of course.
Weak Spark - Wrong Wires
One thing the manufacturer warms repair people about is identifying
replacement parts of low quality substitution, or simply 'spurious'
parts. What does this mean? It means junk parts that sort
of get the job done but really aren't supposed to be used (say,
automotive parts on a marine engine) or cob-job type situations.
I will say that about 50% of my time is spent fixing DIYers bad jobs,
wrong jobs, or just plain stupid ideas. As the saying goes, "Do
it right, do it once."
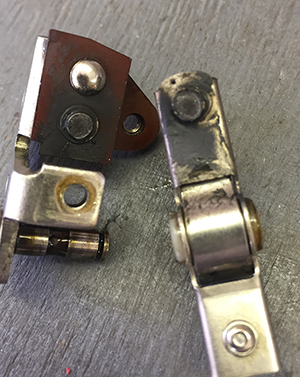
Here is a simple example of a bad repair job. What makes little
sense to me is that the time it would take to replace these parts with
the correct ones is no different than using the wrong ones. This
motor had very low, almost no spark. Well turns out someone
decided to use automotive, fiber type spark plug wires. I
replaced these with marine copper core wires and the motor had bright
blue, strong 1/2" gap spark. Little things make a big difference
and there is a reason why the manufacturer has specific parts
recommended for use. The top wire shows the copper strands.
The bottom wire shows the automotive style fiber strands.
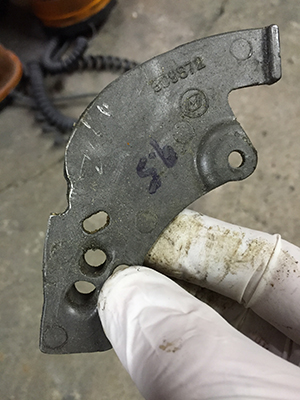
Broken Timing Cam
Most motors have some sort of cam which regulated the amount of fuel
flow based on motor RPMs. In carburated motors, this timing is
absolutely critical so that the ratio of fuel mixture stays in
syncronization with ignition spark. It is so important, that a
motor can actually not run at all, or very poorly, when set
wrong. Newer CD ignitions automatically set some of this timing,
and modern day motors use EFI (electronic fuel injection) coupled with
sensors to adjust the fuel to spark timing for optimum
performance. Newer motors can be up to 80% more economic on fuel
at idle and low RPM's than carburated motors (watch the video on the
homepage I took, entertaining).
Here is a broken timing cam from a 9.5hp motor. This probably could be
repaired with epoxy if you cannot find a replacement, but the curve
must remain the same as original. That divot is there, for who
knows why. These cams can become worn over long periods of time,
and this is not a part you can do without in 100% good working
shape.
Corroded Connectors
The creating of electricity in your ignition is only as good as the
delivery system by which it travels. Electricity is like water;
if it travels through a pipe and the pipe is solid, the same amount you
pour in one end should show up on the other end. If there is
less, you have to look for where it is leaking out.
Older style magnetos are relatively simple; you need good grounds
(which is the entire magneto plate/stator assembly) and good
connections on the coil to plug wires and plug terminals to spark
plugs. These are the most common areas for reduction of spark
strength due to leakage. Old wires that are dried out and taken
permenant form need to be replaced. While the insulation may
appear intact, voltage is lost as it leaches out and finds grounds
upstream of the spark plug/boot. If you crank a motor in a
completely dark room, you may be able to see these spots.
Remember electricity will generally pick the shortest distance between
two points to arc; this is why many buildings have lightning rods on
their roofs...it grounds the electricity in a more predictable path to
help shield the building from damage.
Newer style CD ignitions are considered 'solid state' in that they are
encapsulated to avoid exposure to moisture and elements. Their
main vulnerabilities are at the connections, as shown below. You
can see the green corrosion, and the picture on the left actually shows
salt corrosion. This happens when carelessly left exposed to
weather, or in non-stop salt exposure.
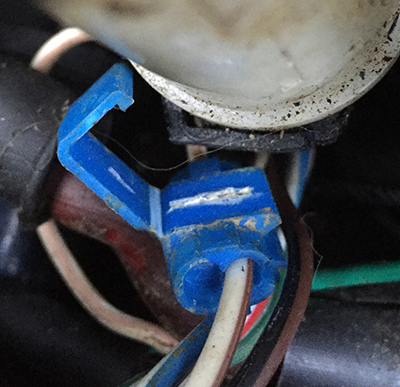
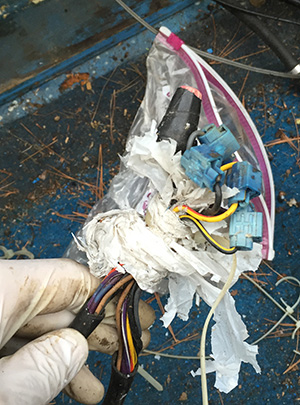
This particular customers entire vessel had issues with electrical
systems as the previous owner he bought it from did not maintain the
boat. The picture below is a real head-shaker. Apparently
the forward controls did not have a wire long enough to reach from the
helm to the motor, so someone decides to splice wires onto the remote
controls. the problem is that they used quick splices to connect
the wires. This may seem to work, but is the wrong way to do
things. The splicing should have been with shrink-wrapped butt
connectors and then coated with a marine based liquid rubber or
silicone to minize water intrusion/corrosion. They wrapped the
wires in a zip lock back and then a 2nd layer with a grocery bag, then
agian with duck tape. This bundle was sitting in the bilge well
near the fuel tank. Lucky there weren't any explosions!
Corrosion is
limited to just connectors. It can also interfere with grounding
of coil leads. Some coils have a strap built into them to ground
to the block, others have a wire coming off which is than screwed down
to the block. Below is a coil with a corroded strap, which
appears green. Note that these should be shiny and cleanly
grounded to the block, and then covered in a marine protectant
substance to discourage corrosion. It doesn't take long for
things to be badly affected in a salty environment, either.
How Solenoids Work
Solenoids are basically coils of wire that when energized, create a
magnetic field. Generally there is some sort of metal plunger
that is attracted toward this coil, creating some sort of connection or
mechanical movement. Older outboards have choke lever solenoids,
which all they do is close the choke. When this happens, it gives
the motor a 'burp' of fuel rich air mixture to get the motor to fire
off.
The newer you get, the less you see these, and the more you see
electronic fuel primers. These work on a similar principle but
instead inject fuel into the manifold, cylinders, and possibly the rear
of the carb throat. This leads to faster starts on motors than
the older style choke configuration. The old chokes work just
fine (and are still used to this day on many motorized devices), but
generally take a couple of extra manual pulls. I guess paying
more money to only have to pull over a motor 1 time instead of 3 is
what sells products. Of course, the U.S.A. has the highest rate
of obesity on the planet.
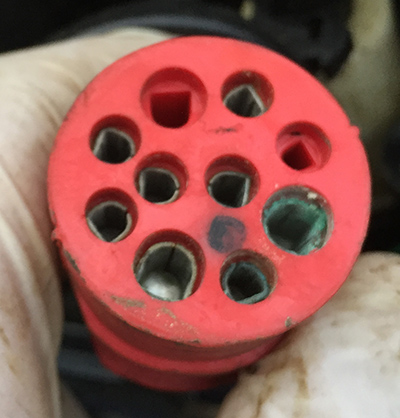
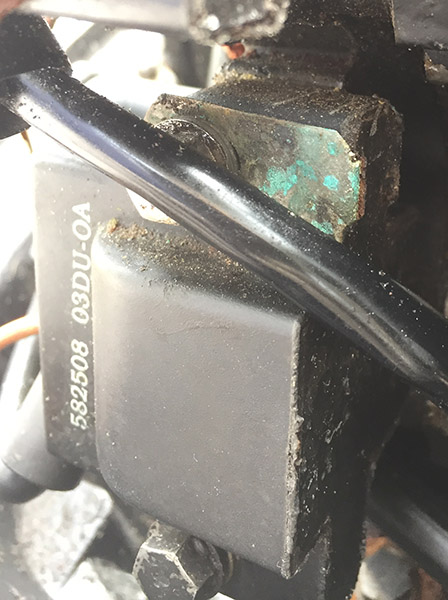
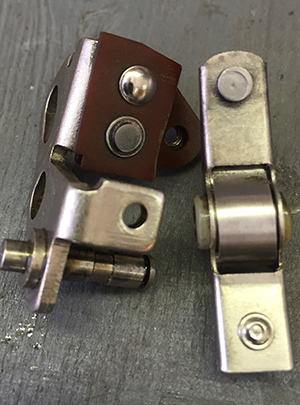
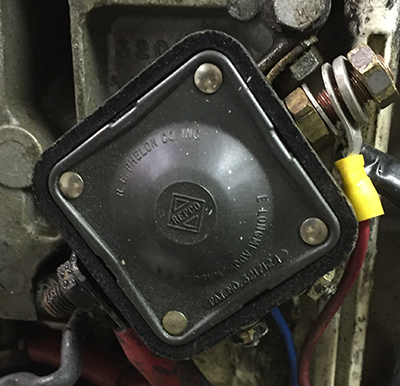
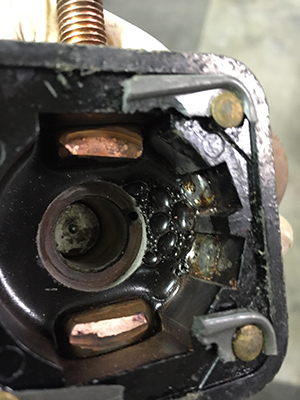
Here are some pics of a typical starter solenoid. Picture 1 (top
left) is what you see normally, mounted on the motor, with the key
switch harnass lead on the bottom right small pole, ground lead (to
motor) on the bottom left small pole, then you have the battery
positive (+) lead to the large right pole, and finally the positive
lead to the starter motor, which is grounded to the block of the motor
through it's mounting bracket (left large pole). I opened this up
because the wire windings had shorted out, and this particular solenoid
was faulty.
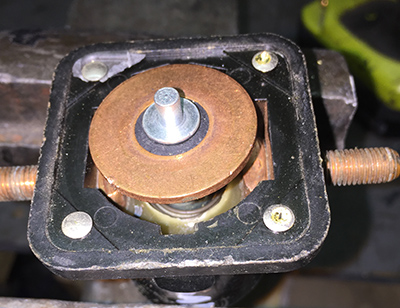
By removing the
plastic cover, it reveals the internals. You can see the high
voltage poles on either side (left/right). In the middle you have
a large copper ring attached to a plunger. Removing this plunger
hardware, you can see ther is a sealed coil below (as evidenced by the
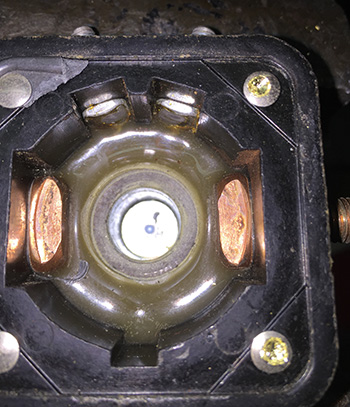
plastic sealant). The two small metal poles can be seen at the
top of picture #2 (sorry, bad angle due to the reflection of my
camera). What happens is when you turn your key (or press a start
button), these two poles send a small amount of voltage to flow through
this magnet, pulling the plunger down (which is the 'click' you hear
when you turn the key to the on position).
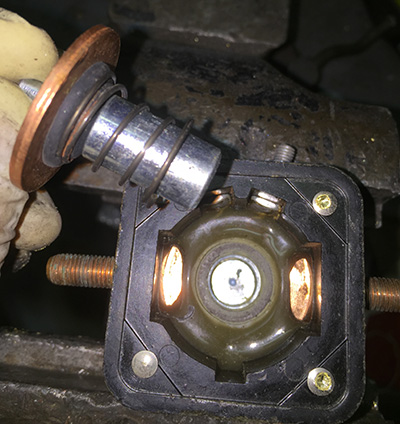
The plunger drops, and connects the large copper disc and also the two
larger polls, allowing the delivery of (in this case) 12 volts DC to a
desired instrument. Picture #3 shows what the plunger looks
like. The spring keeps the plunger from accidentally making the
connection. The solenoid allows the delivery of high voltage
without having an 'in line' smaller switch. Without this
solenoid, the switch would need to be heavy duty enough to handle the
draw of whatever is down line, and could easily burn out/melt.
The lights in your household all work off of fairly standard voltages
(generally 110v A/C). What a breaker switch does (in your
electric panel) is trips off if you turn too many things on in the same
circuit, to prevent the draw from going so high that you potentially
have things burn up/out. Solenoids simply keep the higher draws
going to where they need while allowing lesser beefy components to
still be part of the chain.
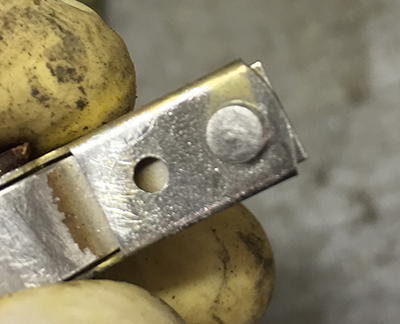
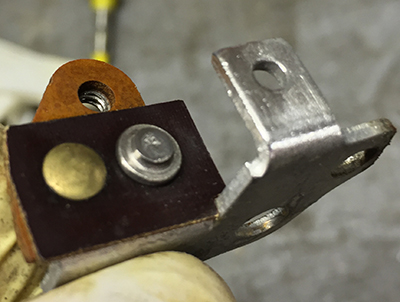
Here is a solenoid
that worked intermittently, and tested out as OK, but from a practical
standpoint, was not working properly. I had a motor where I had
to do a near total rehab on the ignition and on it's initial dry trial
(testing the wiring), the starter would not kick over other than moving
about an 1/8 of an inch. I tested the solenoid and it checked out
based on OEM procedures. So apart comes the starter motor to
check the brushes and commutator. Back together and it worked
properly. But on putting the motor into the test tank, I had to
repeatedly engage the key switch, and every 12th turn, the starter
would work.
Then it would work as normally expected, then not the right way.
I switched starters with one I knew was good, and it behaved the same
way...without consistency. So all fingers pointed to the
solenoid, which I switched out, and the problem was solved. By
opening this unit up, it was obvious that at some point a previous
owner had shorted out the ignition system as evidenced by the
melting. Who knows how, but likely a direct short by someone who
didn't double check their work prior to making connections to the
battery. Note the pitting/melting in the low-voltage key switch,
but that aside, the distortion/burns on the high-voltage circuit.
The reason why it was intermittent is because the physical connections
on both circuits were hit or miss based on the physical condition on
the components.

Again, just because
the books say it's OK, doesn't mean it's OK. The best knowledge
is what you pick up on the job.
Spark Arcing
Sometimes the issue with your motor running rough can be so simple, it
is easy to be overlooked. In many instances, motors have aging
components. Now, metal generally stands the test of time if
maintained properly. However, plastic, rubber, and other
perishable components are another story. In your FUEL system, you
can plan on replacing all your lines/hoses on a semi regular basis
(say, every few years). On your IGNITION system, the rubber
insulation in your plug wires and boots will dry out over time.
When the rubber dries out it is subject to cracking. That
insulation is like a water pipe with a crack in it - maybe it works,
sometimes.
Electricity will usually try to find it's way to the shortest path to a
ground source. In the instance of your motor, that starts at the
charge coil, then down the power coil lead, then to a powerpack (CD
ignition, or just the plug wire in old point/condenser magnetos), then
to a coil, then to the plug leads. A strong ignition can have the
spark jumping as much as an inch or two to the block or another ground!
If the motor runs erratically, it's more than likely an ignition
issue. Sometimes running it at night, or with the lights turned
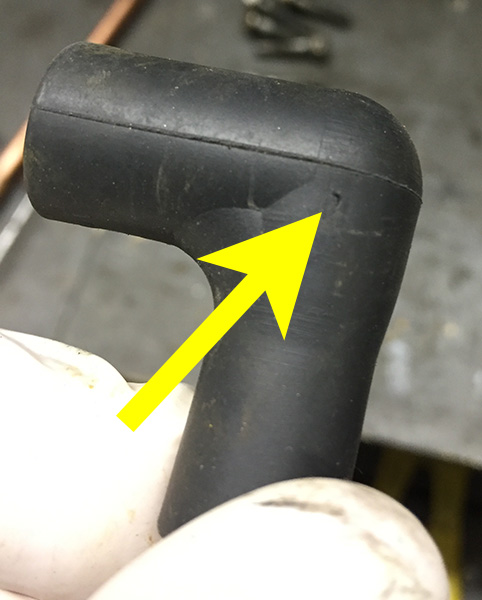
off indoors, will quickly let you find a stray spark. I had a
motor that would run fine, but sporadically drop one cylinder, than it
would come back, than drop off. Turning off the light revealed
the spark was arcing from the plug boot insulator to the block with no
rhyme or reason. Replacing the plug boot fixed the issue.
It was finding it's way through a tiny pin hole which under normal
conditions would not be noticeable by the naked eye. Note that
once the spark arcs, it leaves a carbon footprint, which makes it
easier to choose this path again.
Damaged Magneto
CD ignition magnetos are generally very durable and almost never go
bad. They are generally made up of a charge coil which generates
electricity as a magnet in the flywheel passes by, and a trigger or
sensor which tells the power pack/CD box when to fire off each
cylinder.
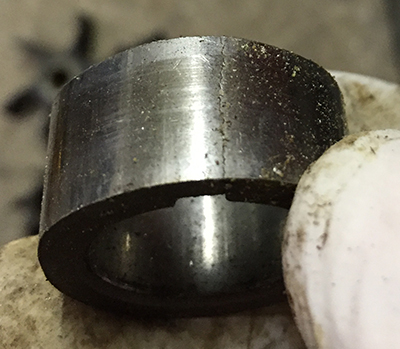
Occasionally these components fail, but that is uncommon. What is
somewhat more common is when physical damage causes them to fail.
Usually a wallowed out brass bearing ring (which sits on a boss on top
of the powerhead) can allow some slop or wobble, and this causes the
components to rub up against the spinning flywheel, physically damaging
them. This is normal wear and tear and the magneto plate needs to
be replaced in this instance.
An even more uncommon situation is if one of the screws holding any one
of these components somehow shakes loose and starts bouncing around
underneath the flywheel, basically acting like a minature wrecking
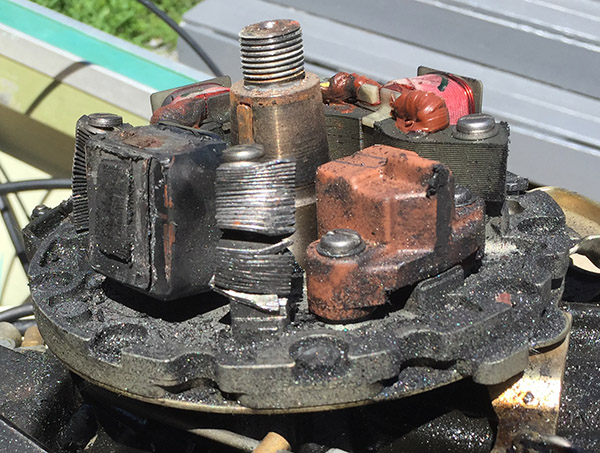
ball, wiping out the whole magneto. Below is an example of one
where the customer had been using the motor, and suddenly the motor
stops dead in it's tracks. Nothing he did could get the motor up
and running again. The ignition system was dead. Pull the
flywheel, and it becomes very obvious what happened. Replacing
these components and the motor was restored back to normal operating
condition. Notice the shards of metal throughout, and clearly the
coil and stator are badly damaged.
Bad Stators
The stator is where all the magic in the ignition system begins. As
explained in the prior section, this is where voltage is initially
generated, then down to the power pack, then to the coils, then to the
spark plugs. Simply put, the ignition system is the brain of older
engines. If this system is not functioning properly, the motor will run
with no rhyme or reason, and can be very frustrating.
I have had many situations where a motor will run totally fine, but
with no consistency not start, or run and be shut down (say to fish a
hole), but not what to restart, or shut off suddenly like the kill
switch was activated. Testing components does not reveal any 'out of
spec' situations. Well, sometimes a visual inspection and common sense
will give you an answer, sometimes it won't. So you go through the
recommended testing procedures put out by the manufacturer, then you
use common sense and visually inspect a component, then you have to
rely on experience which the books can't teach.
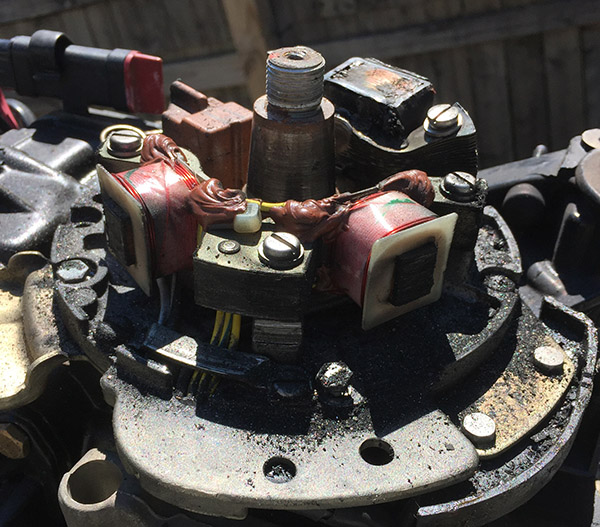
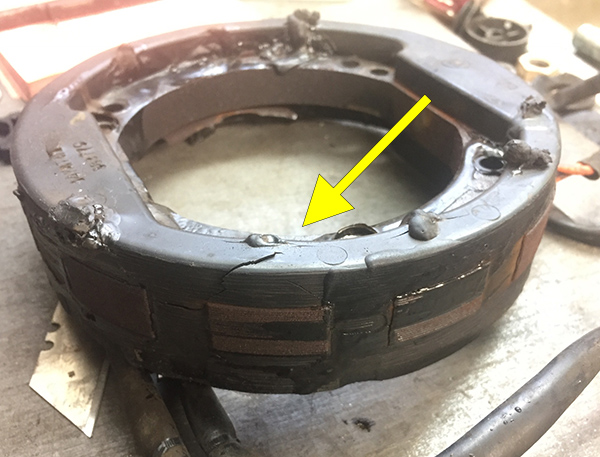
The pictures below show a stator off of a 70hp motor that would run
totally fine, but then not want to start. It was very inconsistent.
While running the motor, I could hear an occasional 'SNAP,' as if there
was spark arcing. I was familiar with this noise from seeing arcing out
of bad coils or carbon trails from a plug boot onto a ground within
vacinity of the boot. Now you have to understand that when a motor is
running it is LOUD. So catching this noise over all the other sounds
coming from an engine is only due to my familiarity with motors.
 Well, my ears weren't
lying. I pulled the flywheel off and CLEARLY,
this stator had better days before. For whatever reason (likely age),
the insulation had broken down and likely normal moisture had
penetrated into the copper windings, causing it to short out by arcing
from the coils to the powerhead. You can see melted insulation all over
the stator. This is a motor I had personally run continuously for
upwards of 10 hours straight! What can happen is as the stator warms up
and cools down, the insulation expands and contracts, and over time can
become brittle. Replacing the stator and the motor was restored to
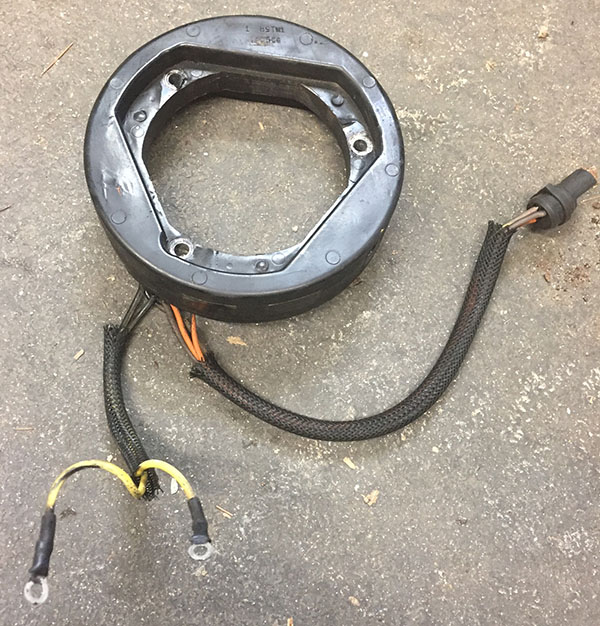
normal operation. The 3rd picture(above)is what a normal, good
condition stator should look like.
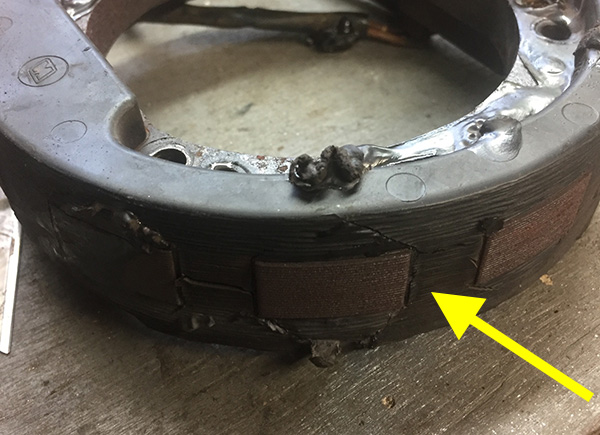
You
can also have stator where arcing occurs where the wires come out of
the insulation. The picture to the right shows this. Again, a
static test of the component did not indicate a problem. Physical
inspection and a careful eye did. Books don't teach you how to figure
out the problem, but are imporant reference material for competent
education!
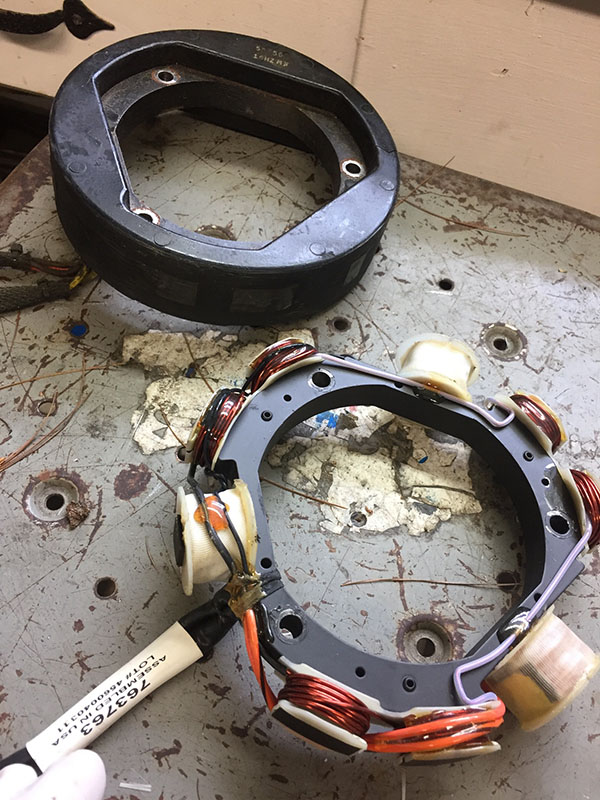
Depending
on the manufacturer, stator come with insulation or without it. See
below the lower stator is a replacement one produced by CDI
electronics. It gives you a glimpse of the inner workings of the stator
on a larger motor.
back to the top!
|